【可视化学习】34-根据户型数据渲染全景房
发表于:2023-08-30 |

前言

本篇文章将手把手带大家利用threejs和请求数据渲染全景房

初始化项目

创建vite-vue项目

1
npm init vite@latest vr-room -- --template vue

安装依赖

1
npm i three gsap

设置全局样式

1
2
3
4
html,body {
margin: 0;
padding: 0;
}

测试Three是否可用

将App.vue组件改装

1
2
3
4
5
6
7
8
9
10
11
12
13
14
15
16
17
18
19
20
21
22
23
24
25
26
27
28
29
30
31
32
33
34
35
36
37
38
39
40
41
42
43
44
45
46
47
48
49
50
51
52
53
54
55
<script setup>
// 导入Three.js
import * as THREE from "three";
// 导入轨道控制器
import { OrbitControls } from "three/examples/jsm/controls/OrbitControls.js";

// 创建场景
const scene = new THREE.Scene();

// 创建相机
const camera = new THREE.PerspectiveCamera(
75,
window.innerWidth / window.innerHeight,
0.1,
1000
);

// 设置相机位置
camera.position.z = 5;
// 相机添加到场景中
scene.add(camera);

// 初始化渲染器
const renderer = new THREE.WebGLRenderer();
// 设置渲染的尺寸大小
renderer.setSize(window.innerWidth, window.innerHeight);
// 将webgl渲染的canvas内容添加到body
document.body.appendChild(renderer.domElement);
// 创建轨道控制器
const controls = new OrbitControls(camera, renderer.domElement);
// 设置控制器阻尼,让控制器更有真实效果,必须在动画循环里调用.update()。
controls.enableDamping = true;

// 添加坐标轴辅助器
const axesHelper = new THREE.AxesHelper(5);
scene.add(axesHelper);

// 渲染
function render() {
controls.update();
renderer.render(scene, camera);
// 渲染下一帧的时候就会调用render函数
requestAnimationFrame(render);
}

render();
</script>

<template>
<div>
</div>
</template>

<style scoped>
</style>

添加全景图

图片放在public/assets文件下

1
2
3
4
5
6
// 加载全景图
const loader = new THREE.TextureLoader();
const texture = loader.load("/assets/HdrSkyCloudy004_JPG_8K.jpg");
texture.mapping = THREE.EquirectangularReflectionMapping;
scene.background = texture;
scene.environment = texture;

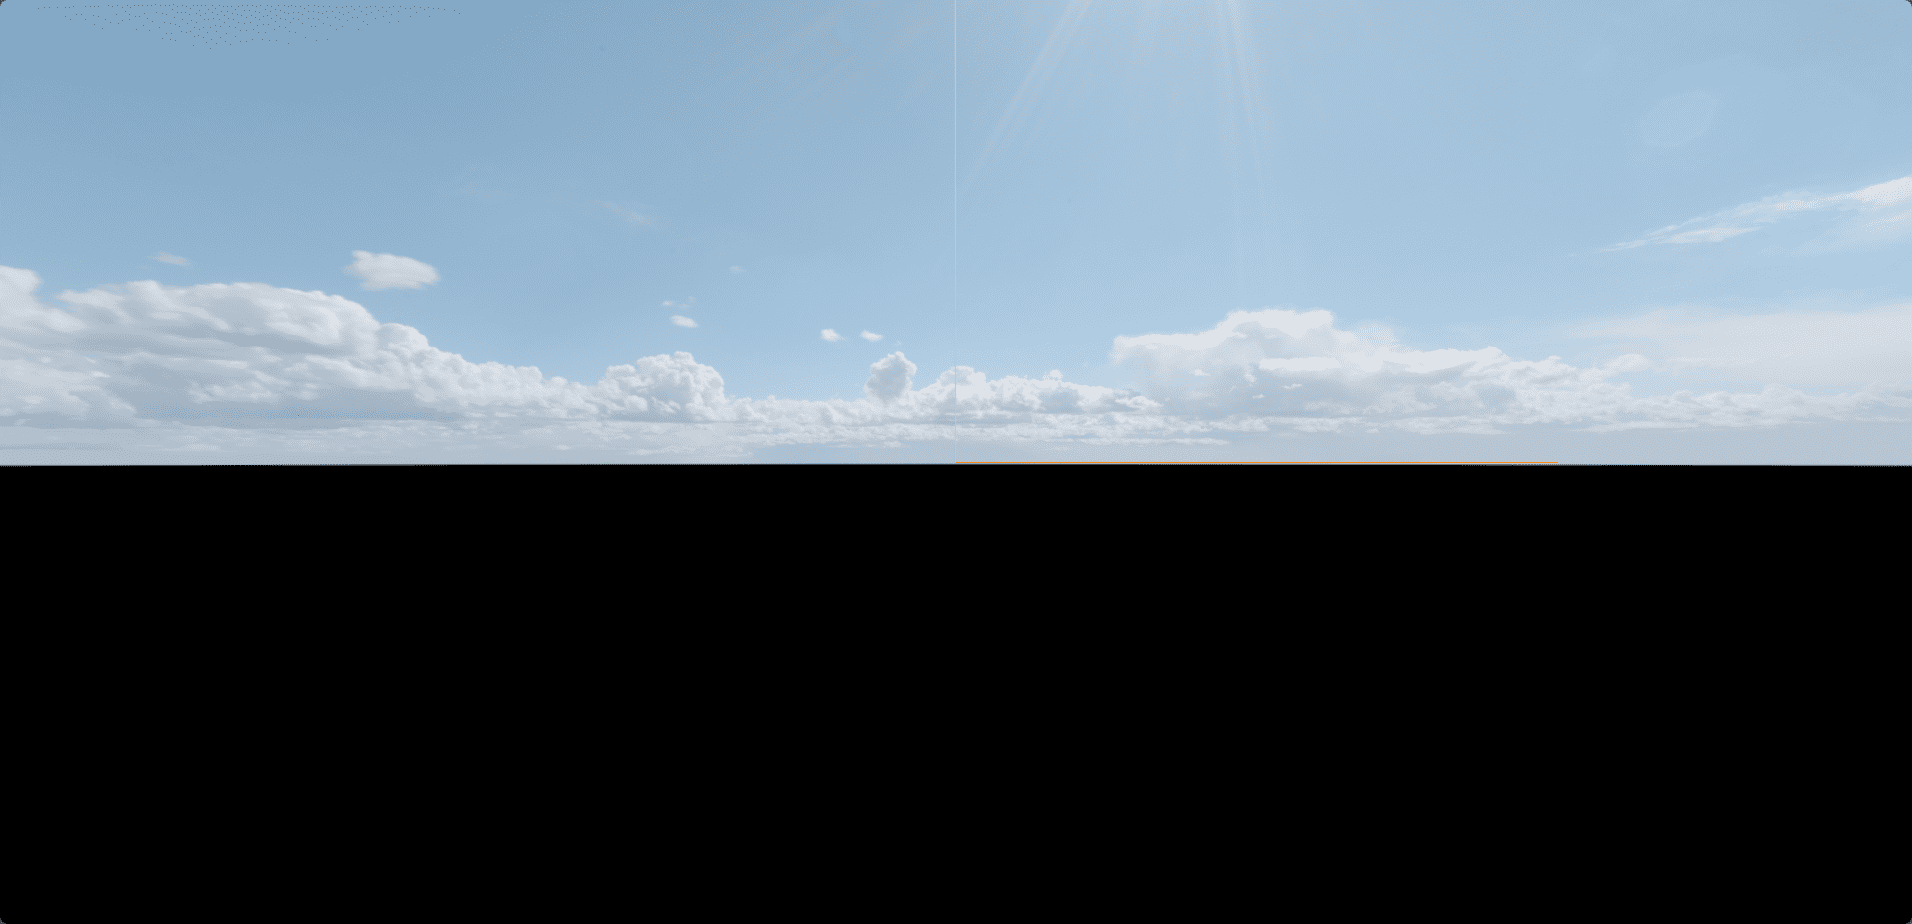
效果图

请求测试数据

1
2
3
4
5
6
7
8
// 获取请求数据
fetch(
"https://test-1251830808.cos.ap-guangzhou.myqcloud.com/three_course/demo720.json"
)
.then((res) => res.json())
.then((obj) => {
console.log(obj);
})

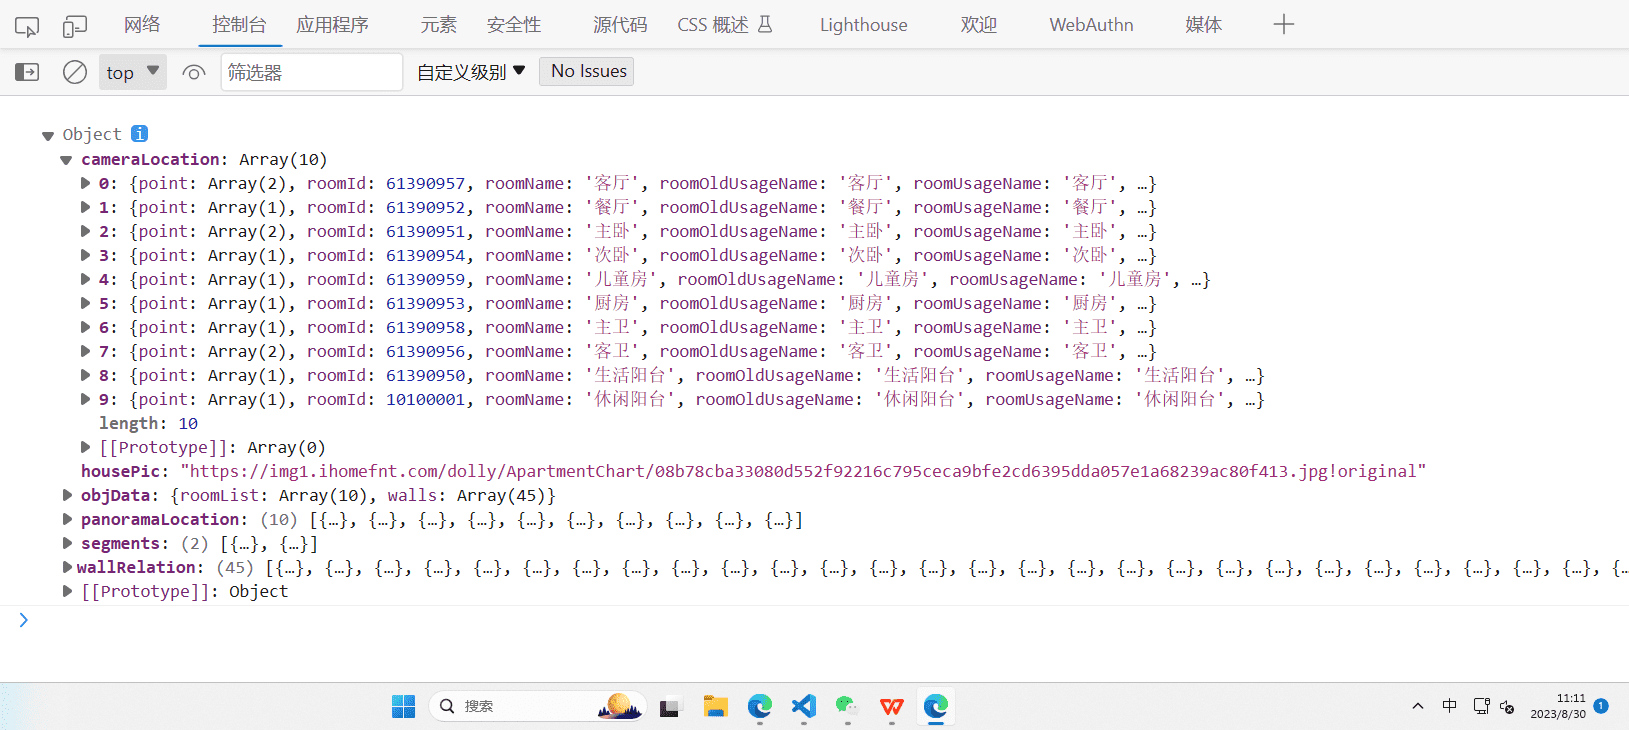
请求数据图

生成数据

生成房间顶部,底部数据

首先我们根据测试点位数据中的objData的roomList进行生成
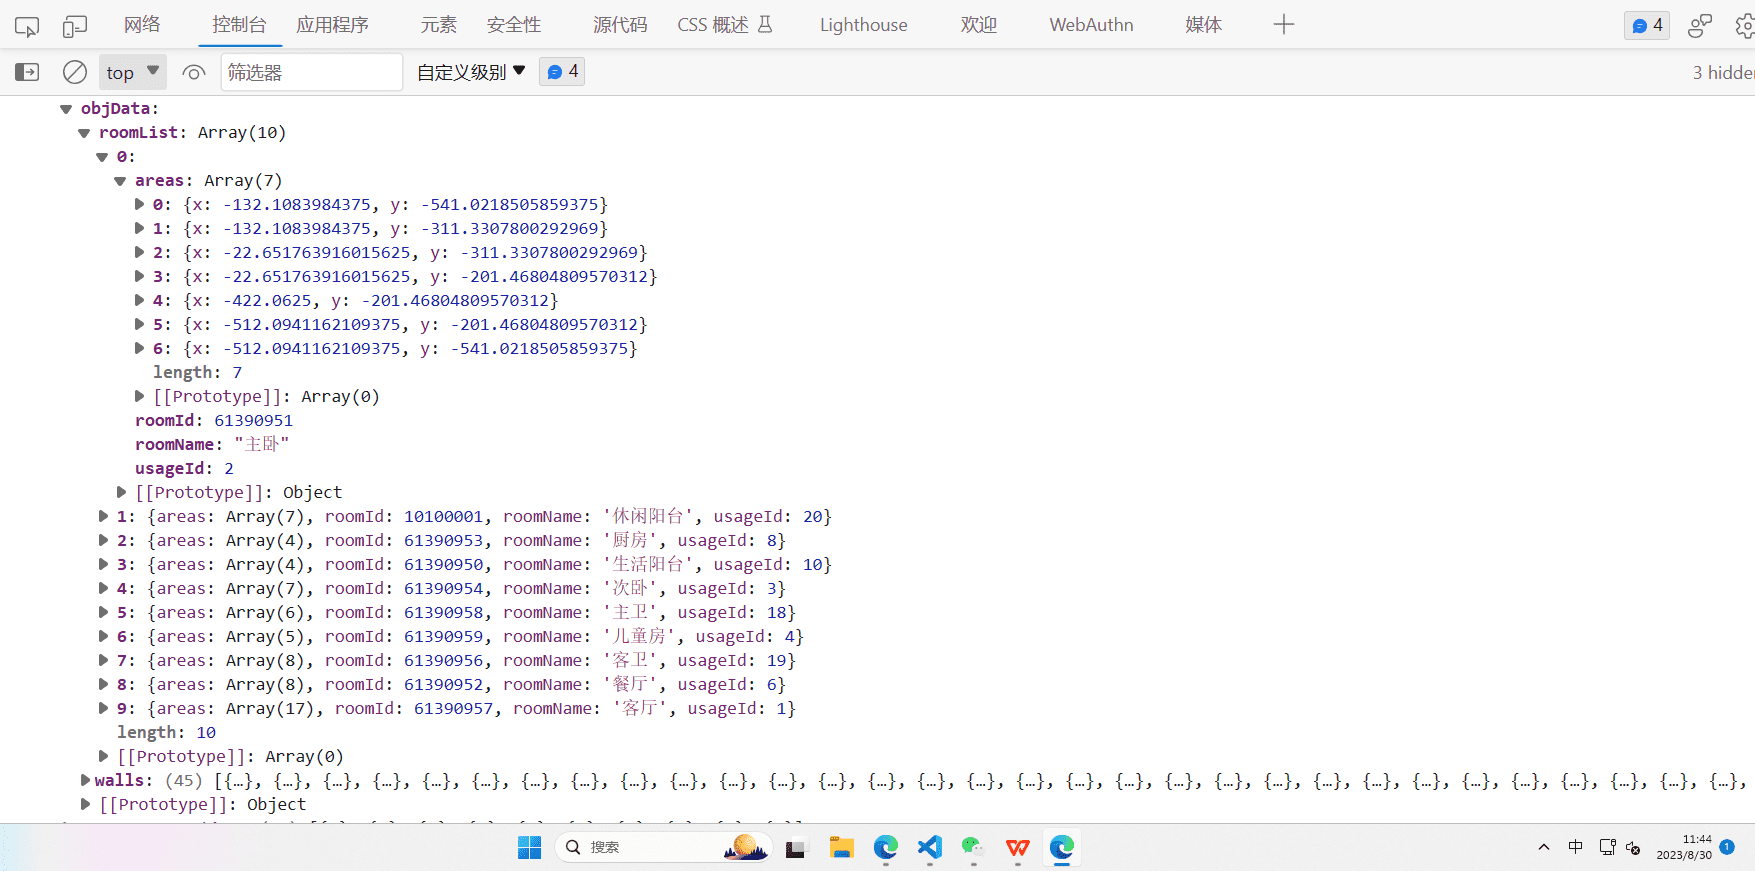
房间数据
我们先写一个创建多边形的类,代码如下:

1
2
3
4
5
6
7
8
9
10
11
12
13
14
15
16
17
18
19
20
21
22
23
24
25
26
27
28
29
30
31
32
33
34
35
import * as THREE from "three";

export default class RoomShapeMesh extends THREE.Mesh {
constructor(room, isTop) {
super();

this.room = room;
this.roomShapePoints = room.areas;
this.isTop = isTop;
this.init();
}
init() {
let roomShape = new THREE.Shape();
// 生成房间形状
for (let i = 0; i < this.roomShapePoints.length; i++) {
let point = this.roomShapePoints[i];
if (i === 0) {
roomShape.moveTo(point.x / 100, point.y / 100);
} else {
roomShape.lineTo(point.x / 100, point.y / 100);
}
}
// 生成房间形状的几何体
let roomShapeGeometry = new THREE.ShapeGeometry(roomShape);
// 旋转几何体顶点
roomShapeGeometry.rotateX(Math.PI / 2);
this.geometry = roomShapeGeometry;
this.material = new THREE.MeshBasicMaterial({
side: this.isTop ? THREE.FrontSide : THREE.DoubleSide,
color: new THREE.Color(Math.random(), Math.random(), Math.random()),
transparent: true,
});
this.isTop ? (this.position.y = 2.8) : (this.position.y = 0);
}
}

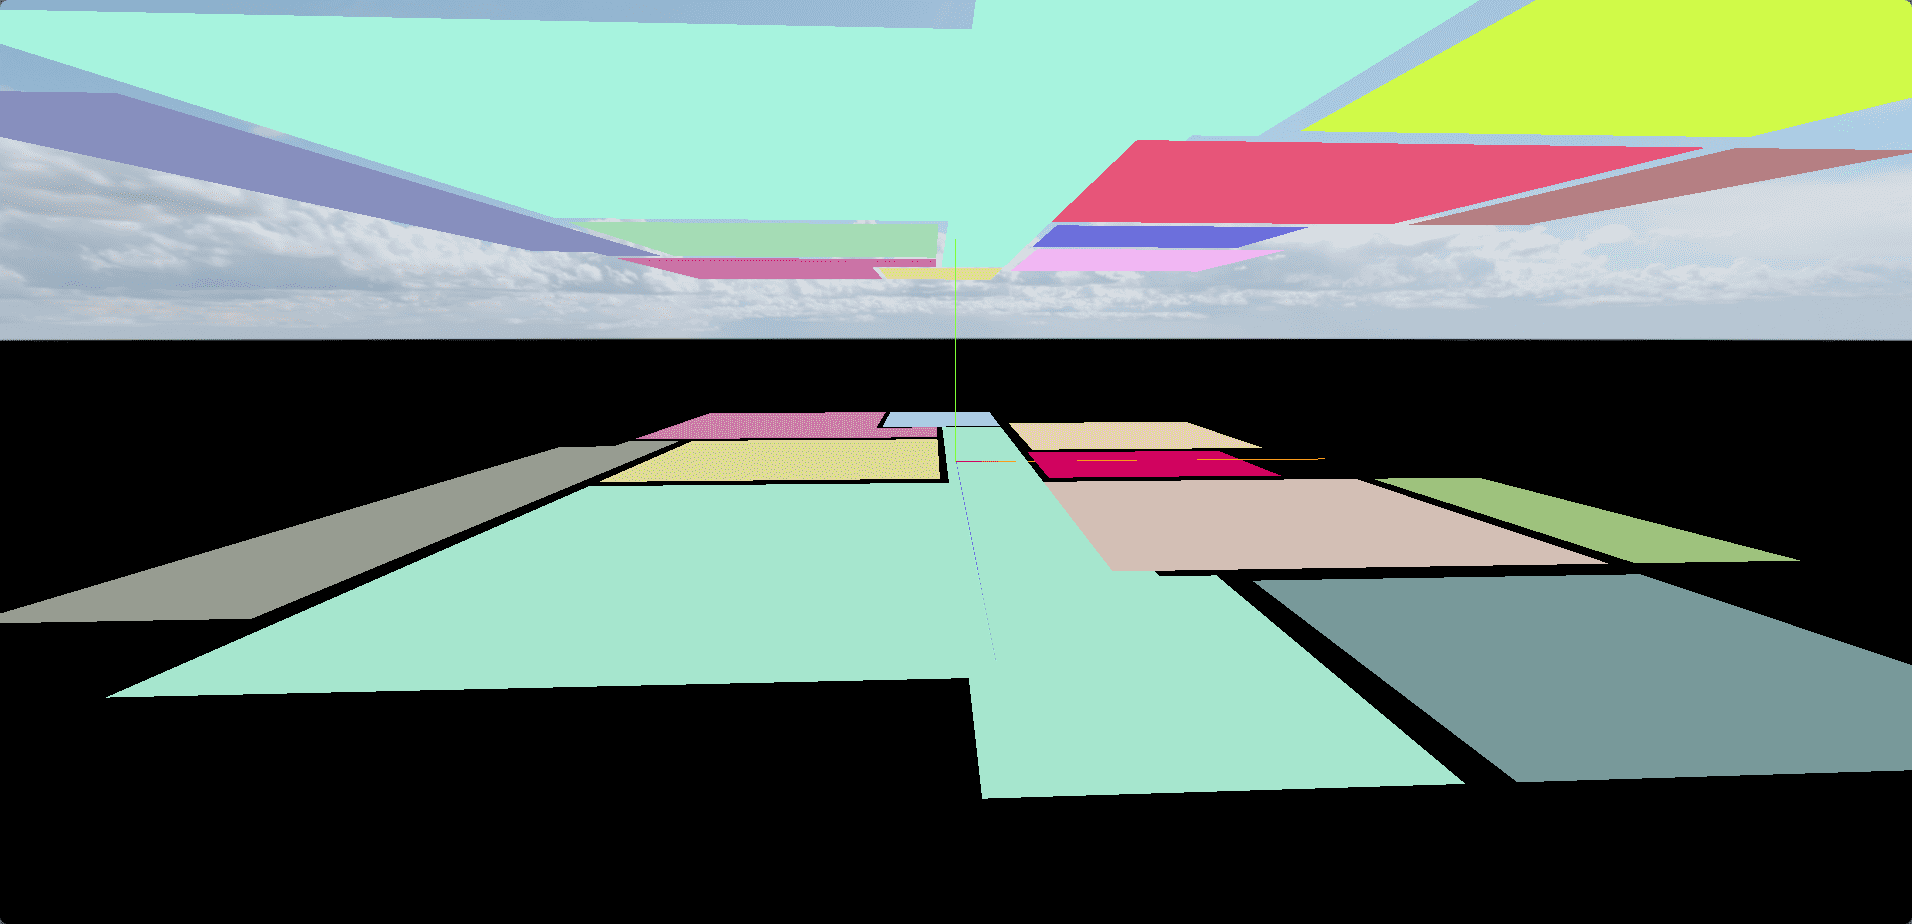
核心逻辑就是使用数据中给的点位生成多边形,因为给的数据y轴是朝上的,因此需要旋转几何体顶点90度,然后,我们需要两面,一个底面,一个顶面,而顶面不需要两边看到,就有了上面这段代码,通过这个类,我们可以生成对应的面

1
2
3
4
5
6
7
8
9
10
// 导入生成房间顶,底面的类
import RoomShapeMesh from "./threeMesh/RoomShapeMesh.js";
// 循环创建房间
for (let i = 0; i < obj.objData.roomList.length; i++) {
// 获取房间数据
const room = obj.objData.roomList[i];
let roomMesh = new RoomShapeMesh(room);
let roomMesh2 = new RoomShapeMesh(room, true);
scene.add(roomMesh, roomMesh2);
}

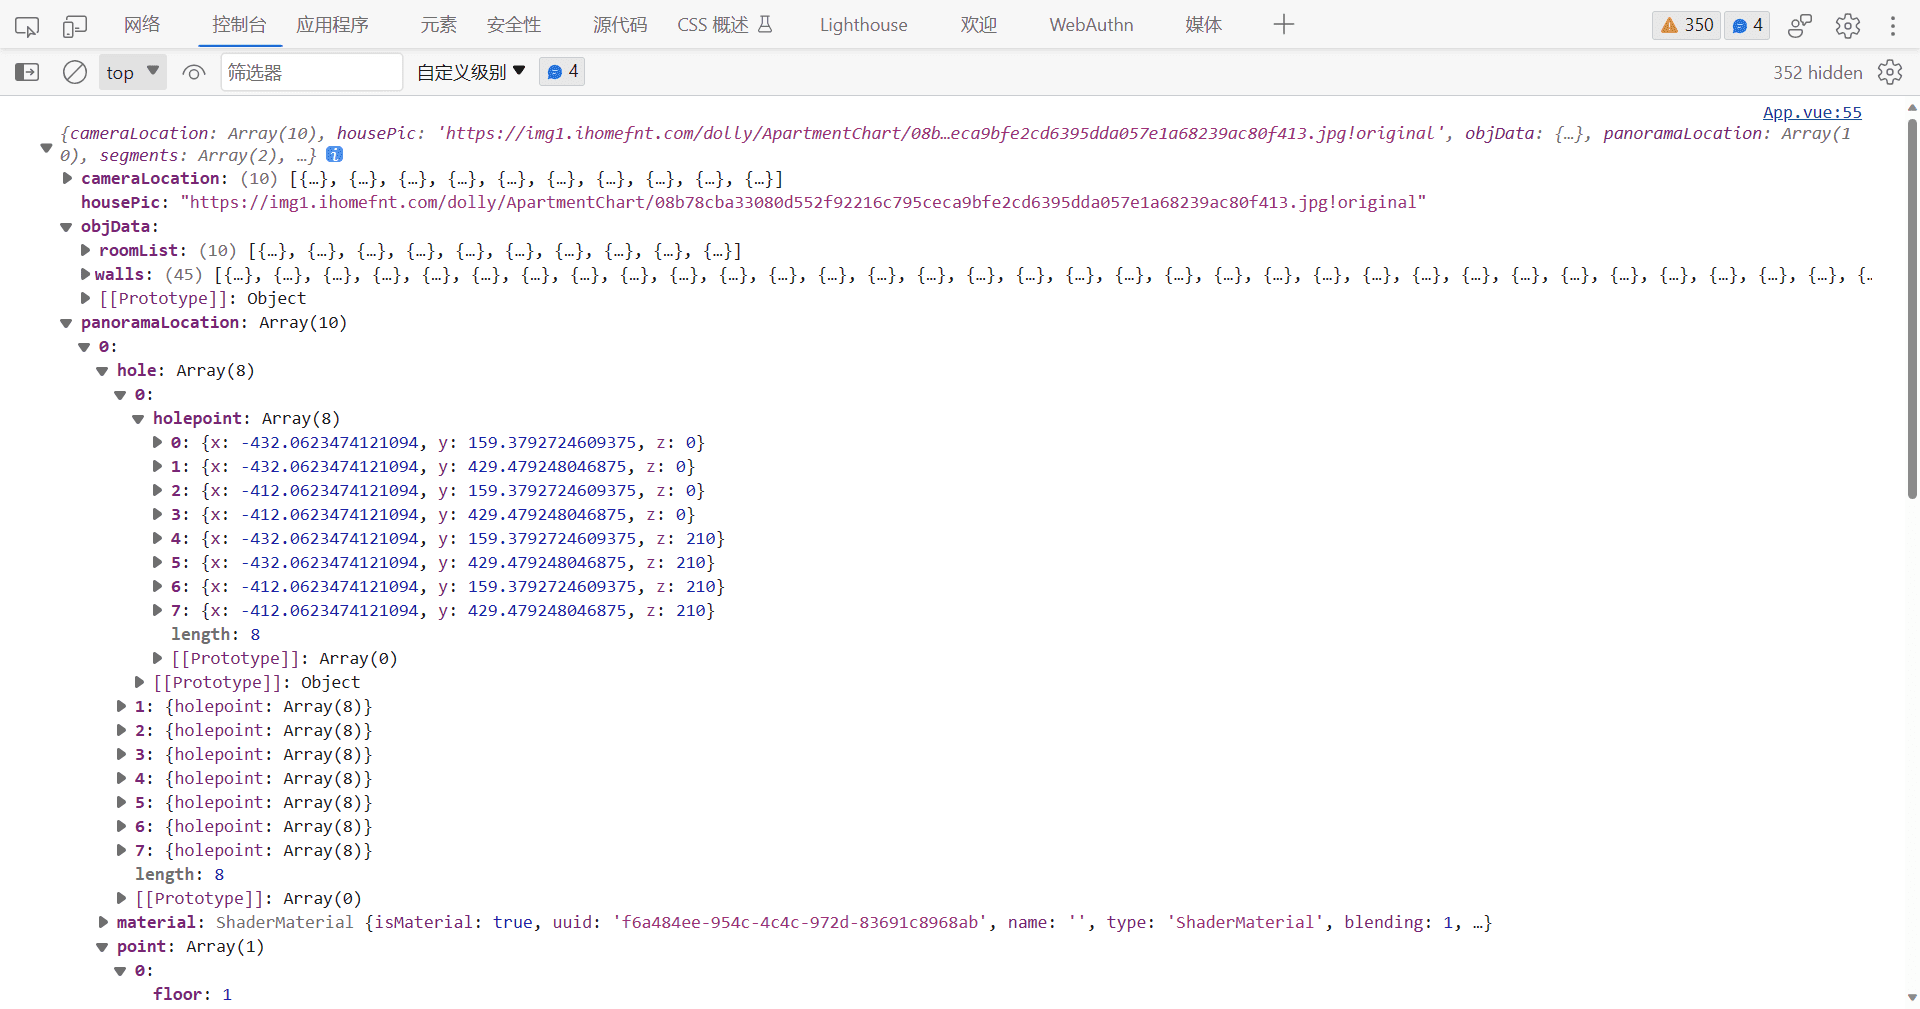
房间数据顶面底面效果图

生成房间顶部底部映射数据

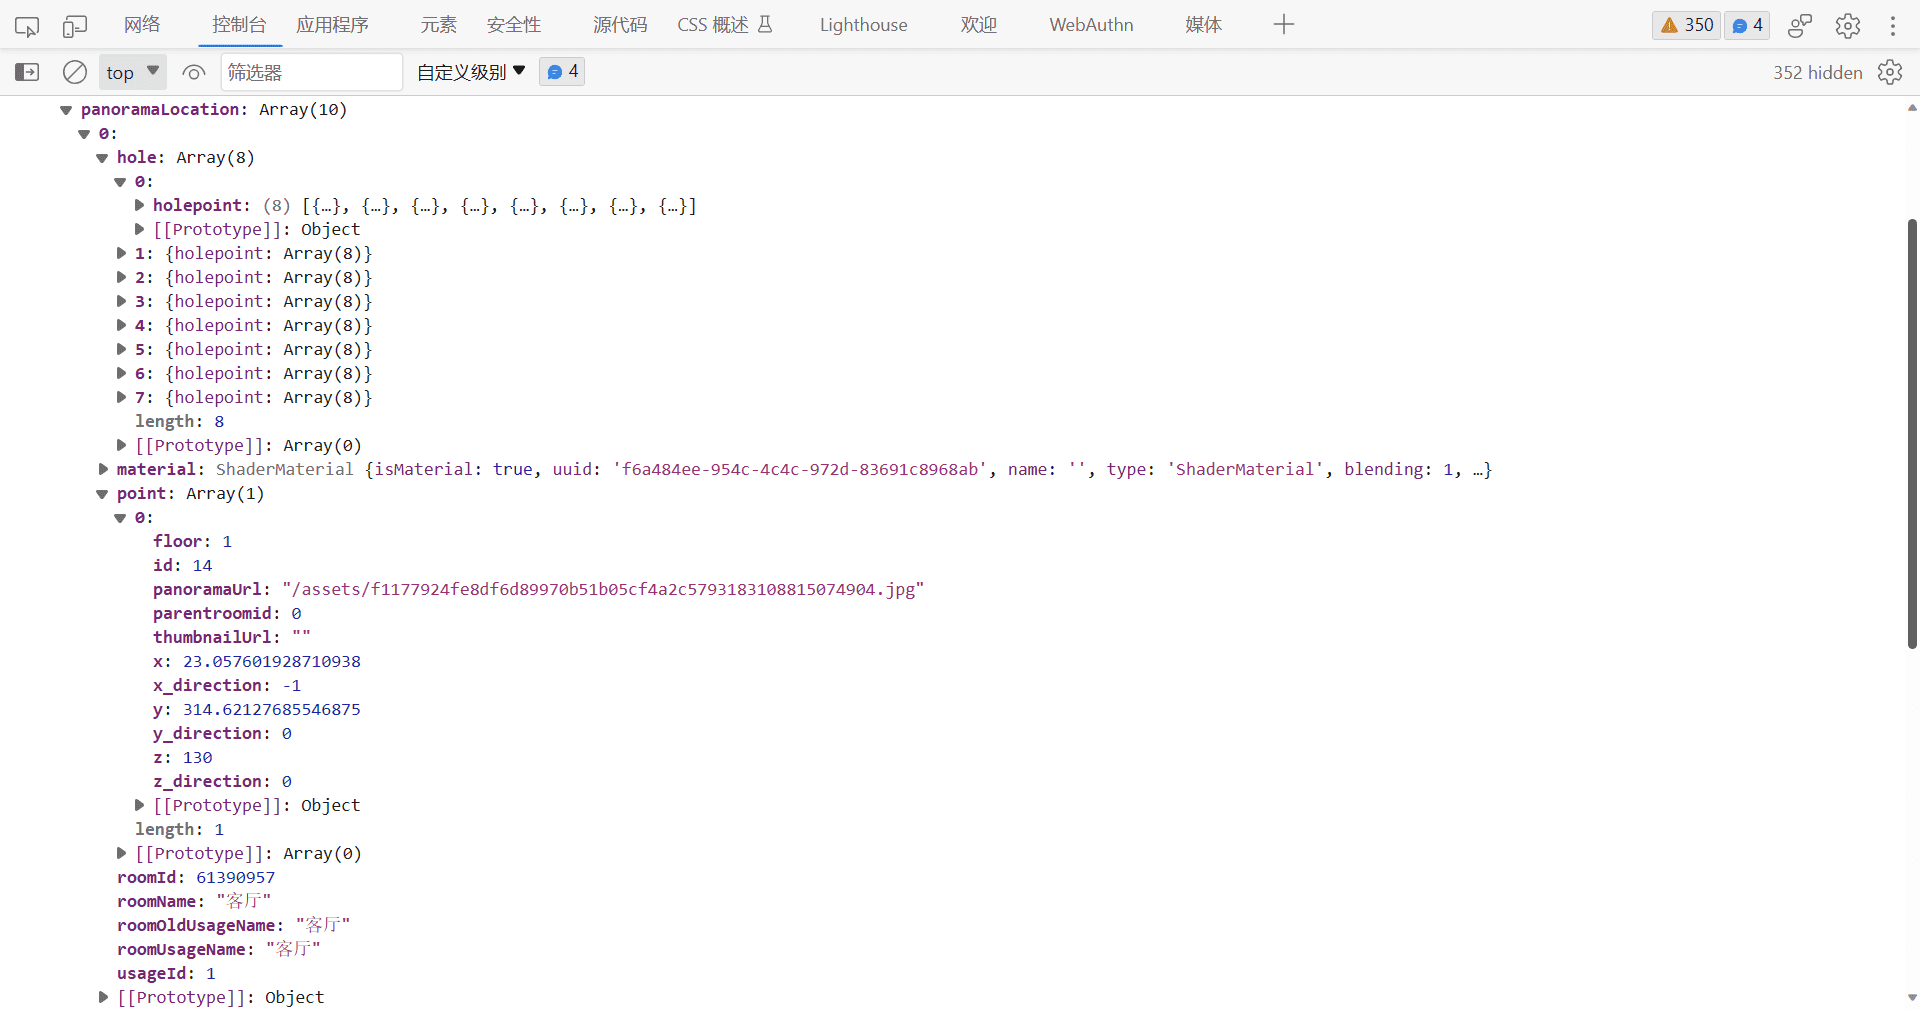
映射所需数据
映射所需数据
写一个映射的类,代码如下:

1
2
3
4
5
6
7
8
9
10
11
12
13
14
15
16
17
18
19
20
21
22
23
24
25
26
27
28
29
30
31
32
33
34
35
36
37
38
39
40
41
42
43
44
45
46
47
48
49
50
51
52
53
54
import * as THREE from "three";

export default function WallShaderMaterial(panarama) {
let point = panarama.point[0];
let panaramaTexture = new THREE.TextureLoader().load(point.panoramaUrl);
panaramaTexture.flipY = false;
panaramaTexture.wrapS = THREE.RepeatWrapping;
panaramaTexture.wrapT = THREE.RepeatWrapping;
panaramaTexture.magFilter = THREE.NearestFilter;
panaramaTexture.minFilter = THREE.NearestFilter;
let center = new THREE.Vector3(point.x / 100, point.z / 100, point.y / 100);
return new THREE.ShaderMaterial({
uniforms: {
uPanorama: { value: panaramaTexture },
uCenter: { value: center },
},
vertexShader: `
varying vec2 vUv;
uniform vec3 uCenter;
varying vec3 vPosition;
void main() {
vUv = uv;
vec4 modelpos = modelMatrix * vec4(position, 1.0);
vPosition = modelpos.xyz;
gl_Position = projectionMatrix * modelViewMatrix * vec4(position, 1.0);
}
`,
fragmentShader: `
varying vec2 vUv;
uniform sampler2D uPanorama;
uniform vec3 uCenter;
varying vec3 vPosition;
const float PI = 3.14159265359;

void main() {

vec3 nPos = normalize(vPosition - uCenter);
float theta = acos(nPos.y)/PI;
float phi = 0.0;
phi = (atan(nPos.z, nPos.x)+PI)/(2.0*PI);
phi += 0.75;
vec4 pColor = texture2D(uPanorama, vec2(phi, theta));

gl_FragColor = pColor;
if(nPos.z<0.003&&nPos.z>-0.003 && nPos.x<0.0){
phi = (atan(0.003, nPos.x)+PI)/(2.0*PI);
phi += 0.75;
gl_FragColor = texture2D(uPanorama, vec2(phi, theta));
}

}
`,
});
}

代码解释1:

1
2
3
4
5
6
7
let point = panarama.point[0];
let panaramaTexture = new THREE.TextureLoader().load(point.panoramaUrl);
panaramaTexture.flipY = false;
panaramaTexture.wrapS = THREE.RepeatWrapping;
panaramaTexture.wrapT = THREE.RepeatWrapping;
panaramaTexture.magFilter = THREE.NearestFilter;
panaramaTexture.minFilter = THREE.NearestFilter;

这一段代码是用返回字段中的图片地址信息,当然这些贴图我都已经提前放在了本地,使用这张贴图的意思.

  • flipY:翻转图像的Y轴以匹配WebGL纹理坐标空间需要关闭,不然贴图就会朝着我们这一面,
  • minFilter:该属性定义当一个纹理单元(texel)不足以覆盖单个像素点时纹理如何采样,设置为NearestFilter为了性能
  • magFilter:该属性定义当一个纹理单元(texel)覆盖多个像素点时纹理如何采样。设置为NearestFilter为了性能
  • wrapS,wrapT:都设置为平铺重复。表示边缘被夹到纹理单元(texels)的外边界。THREE.ClampToEdgeWrapping:夹边。超过1.0的值被固定为1.0。超过1.0的其它地方的纹理,沿用最后像素的纹理。用于当叠加过滤时,需要从0.0到1.0精确覆盖且没有模糊边界的纹理。THREE.RepeatWrapping:平铺重复。超过1.0的值都被置为0.0。纹理被重复一次。在渲染具有诸如砖墙之类纹理的物体时,如果使用包含一整张砖墙的纹理贴图会占用较多的内存,通常只需载入一张具有一块或多块砖瓦的较小的纹理贴图,再把它按照重叠纹理寻址模式在物体表面映射多次,就可以达到和使用整张砖墙贴图同样的效果。
    THREE.MirroredRepeatWrapping:镜像重复。每到边界处纹理翻转,意思就是每个1.0 u或者v处纹理被镜像翻转。

代码解释2:

1
let center = new THREE.Vector3(point.x / 100, point.z / 100, point.y / 100);

之前说过,因为yz轴给的数据和three中的是相反的,所以换成three的坐标系需要进行相应的切换

代码解释3:

1
2
3
4
5
6
7
8
9
10
11
12
13
14
15
16
17
18
19
20
21
22
23
24
25
26
27
28
29
30
31
32
33
34
35
36
37
38
39
40
41
42
return new THREE.ShaderMaterial({
uniforms: {
uPanorama: { value: panaramaTexture },
uCenter: { value: center },
},
vertexShader: `
varying vec2 vUv;
uniform vec3 uCenter;
varying vec3 vPosition;
void main() {
vUv = uv;
vec4 modelpos = modelMatrix * vec4(position, 1.0);
vPosition = modelpos.xyz;
gl_Position = projectionMatrix * modelViewMatrix * vec4(position, 1.0);
}
`,
fragmentShader: `
varying vec2 vUv;
uniform sampler2D uPanorama;
uniform vec3 uCenter;
varying vec3 vPosition;
const float PI = 3.14159265359;

void main() {

vec3 nPos = normalize(vPosition - uCenter);
float theta = acos(nPos.y)/PI;
float phi = 0.0;
phi = (atan(nPos.z, nPos.x)+PI)/(2.0*PI);
phi += 0.75;
vec4 pColor = texture2D(uPanorama, vec2(phi, theta));

gl_FragColor = pColor;
if(nPos.z<0.003&&nPos.z>-0.003 && nPos.x<0.0){
phi = (atan(0.003, nPos.x)+PI)/(2.0*PI);
phi += 0.75;
gl_FragColor = texture2D(uPanorama, vec2(phi, theta));
}

}
`,
});

首先是THREE.ShaderMaterial大家都知道是用来返回自定义的webgl的材质,定义全局参数,将纹理贴图和中心点坐标传下去,能够在片元着色器和顶点着色器中使用。

1
2
3
4
uniforms: {
uPanorama: { value: panaramaTexture },
uCenter: { value: center },
},

片元着色器

1
2
3
4
5
6
7
8
9
10
11
vertexShader: `
varying vec2 vUv;
uniform vec3 uCenter;
varying vec3 vPosition;
void main() {
vUv = uv;
vec4 modelpos = modelMatrix * vec4(position, 1.0);
vPosition = modelpos.xyz;
gl_Position = projectionMatrix * modelViewMatrix * vec4(position, 1.0);
}
`,

这是一段很常规的顶点着色器代码,将webgl中的顶点坐标转换成屏幕坐标,然后将uv坐标传递给片元着色器

1
2
3
4
5
6
7
8
9
10
11
12
13
14
15
16
17
18
19
20
21
fragmentShader: `
varying vec2 vUv;
uniform sampler2D uPanorama;
uniform vec3 uCenter;
varying vec3 vPosition;
const float PI = 3.14159265359;
void main() {
vec3 nPos = normalize(vPosition - uCenter);
float theta = acos(nPos.y)/PI;
float phi = 0.0;
phi = (atan(nPos.z, nPos.x)+PI)/(2.0*PI);
phi += 0.75;
vec4 pColor = texture2D(uPanorama, vec2(phi, theta));
gl_FragColor = pColor;
if(nPos.z<0.003&&nPos.z>-0.003 && nPos.x<0.0){
phi = (atan(0.003, nPos.x)+PI)/(2.0*PI);
phi += 0.75;
gl_FragColor = texture2D(uPanorama, vec2(phi, theta));
}
}
`,

代码中的变量和函数解释如下:

varying vec2 vUv;:插值后的纹理坐标,在顶点着色器中传递给片元着色器。
uniform sampler2D uPanorama;:纹理采样器,用于从纹理单元中获取纹理颜色。
uniform vec3 uCenter;:用于指定球心位置的坐标。
varying vec3 vPosition;:插值后的片元位置坐标,在顶点着色器中传递给片元着色器。
const float PI = 3.14159265359;:表示圆周率 π 的常量。
接下来是 main() 函数,它定义了每个片元的颜色计算逻辑:

vec3 nPos = normalize(vPosition - uCenter);:计算从球心到当前片元位置的单位向量。
float theta = acos(nPos.y)/PI;:根据单位向量的 y 分量计算球面上的纬度角度(theta)。
float phi = (atan(nPos.z, nPos.x)+PI)/(2.0PI);:根据单位向量的 z 和 x 分量计算球面上的经度角度(phi)。
phi += 0.75;:对经度角度进行偏移,以调整纹理的起始位置。
vec4 pColor = texture2D(uPanorama, vec2(phi, theta));:从纹理单元中采样纹素颜色,并将结果赋值给 pColor。
gl_FragColor = pColor;:设置当前片元的颜色为 pColor。
if(nPos.z<0.003&&nPos.z>-0.003 && nPos.x<0.0):检查当前片元在球面上是否处于特定区域。
phi = (atan(0.003, nPos.x)+PI)/(2.0
PI);:根据单位向量的 x 分量计算特定区域内的经度角度。
phi += 0.75;:对经度角度进行偏移,以调整纹理的起始位置。
gl_FragColor = texture2D(uPanorama, vec2(phi, theta));:根据特定区域重新采样纹素颜色,并覆盖原有的颜色。

使用映射类

根据id进行对应的内容映射,将多边形和贴图对应起来

1
2
3
4
5
6
7
8
9
10
11
12
13
14
15
16
17
18
19
20
21
22
23
24
25
26
27
28
29
30
31
32
33
34
35
36
37
38
39
40
// 导入映射类
import WallShaderMaterial from "./threeMesh/WallShaderMaterial.js";
// 获取请求数据
let idToPanorama = {};
let panoramaLocation;
fetch(
"https://test-1251830808.cos.ap-guangzhou.myqcloud.com/three_course/demo720.json"
)
.then((res) => res.json())
.then((obj) => {
console.log(obj);
// 循环创建房间
// 循环创建房间
for (let i = 0; i < obj.objData.roomList.length; i++) {
// 获取房间数据
const room = obj.objData.roomList[i];
let roomMesh = new RoomShapeMesh(room);
let roomMesh2 = new RoomShapeMesh(room, true);
scene.add(roomMesh, roomMesh2);
panoramaLocation = obj.panoramaLocation;
// 房间到全景图的映射
for (let j = 0; j < obj.panoramaLocation.length; j++) {
const panorama = obj.panoramaLocation[j];
if (panorama.roomId === room.roomId) {
let material = new WallShaderMaterial(panorama);
panorama.material = material;
idToPanorama[room.roomId] = panorama;
}
}

//

roomMesh.material = idToPanorama[room.roomId].material;
roomMesh.material.side = THREE.DoubleSide;
roomMesh2.material = idToPanorama[room.roomId].material.clone();
roomMesh2.material.side = THREE.FrontSide;

console.log(idToPanorama);
}
})

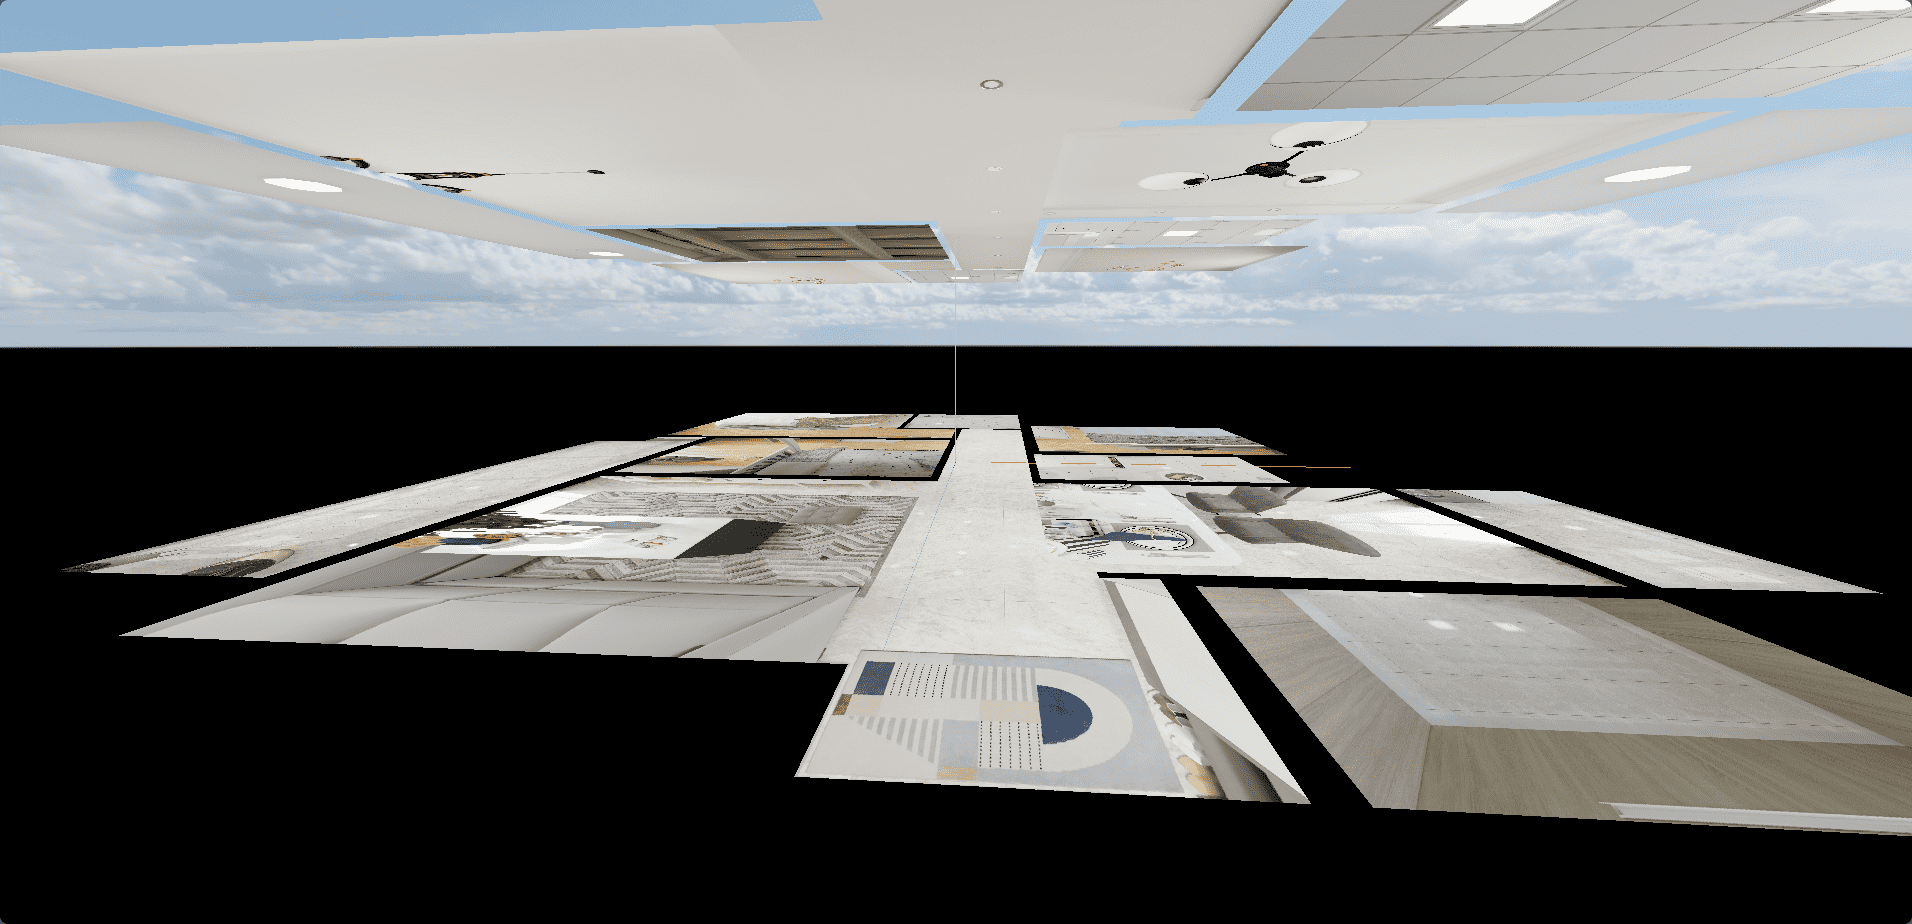
映射效果图

生成墙体数据

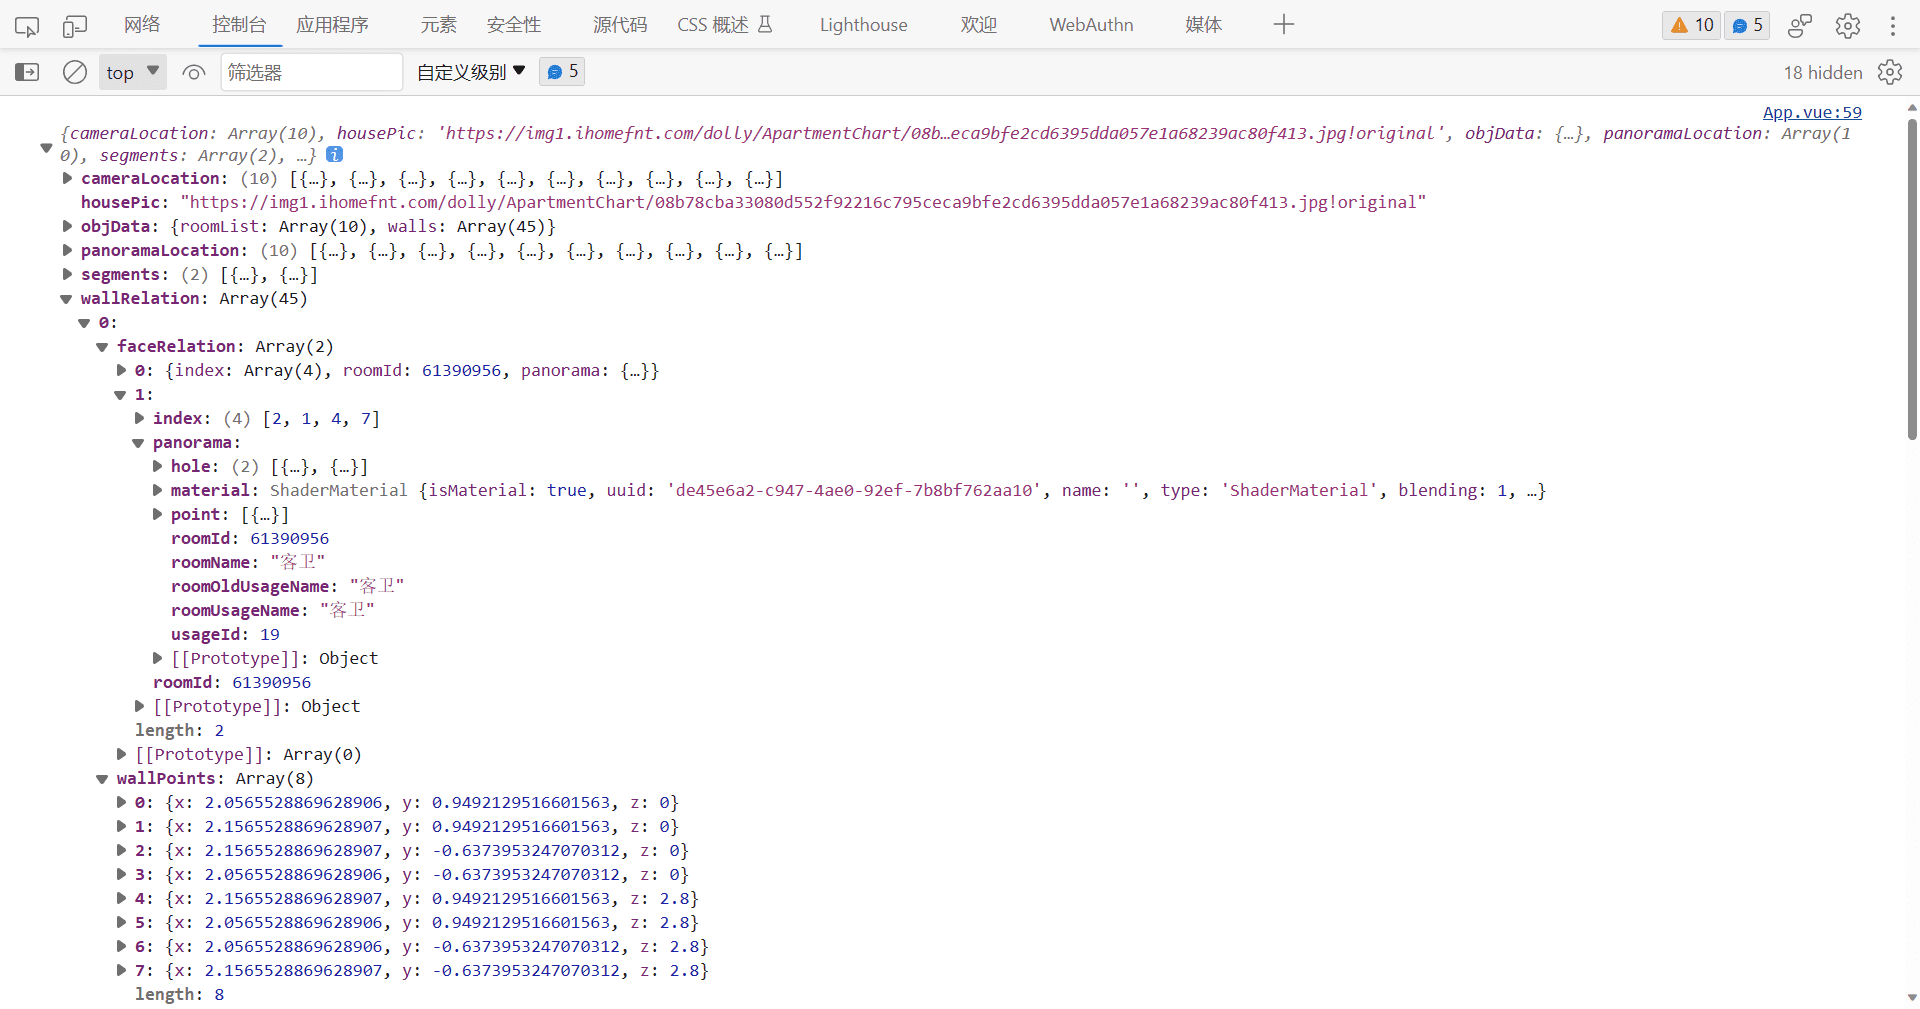
墙体数据

创建墙数据

1
2
3
4
5
6
7
8
9
10
11
12
// 创建墙
for (let i = 0; i < obj.wallRelation.length; i++) {
let wallPoints = obj.wallRelation[i].wallPoints;
let faceRelation = obj.wallRelation[i].faceRelation;

faceRelation.forEach((item) => {
item.panorama = idToPanorama[item.roomId];
});

let mesh = new Wall(wallPoints, faceRelation);
scene.add(mesh);
}

定义墙体类

1
2
3
4
5
6
7
8
9
10
11
12
13
14
15
16
17
18
19
20
21
22
23
24
25
26
27
28
29
30
31
32
33
34
35
36
37
38
39
40
41
42
43
44
45
46
47
48
49
50
51
52
53
54
55
56
57
58
59
60
61
62
63
64
65
66
67
68
69
70
71
72
73
74
75
76
77
78
79
80
81
82
83
84
85
86
87
88
89
90
91
92
93
94
95
96
97
98
99
100
101
102
103
104
105
106
107
108
109
110
111
112
113
114
115
116
117
118
119
120
121
122
123
124
125
126
127
128
129
130
131
132
133
134
135
136
137
138
139
140
141
142
143
144
145
146
147
148
149
150
import * as THREE from "three";

export default class Wall extends THREE.Mesh {
constructor(wallPoints, faceRelation) {
super();
this.wallPoints = wallPoints;
this.faceRelation = faceRelation;
this.init();
}
init() {
let wallPoints = this.wallPoints;
wallPoints.forEach((item) => {
item.x = item.x / 100;
item.y = item.y / 100;
item.z = item.z / 100;
});

let faceIndexs = [
// 底面
[0, 1, 2, 3],
// 上面
[4, 5, 6, 7],
// 左面
[0, 3, 6, 5],
// 右面
[2, 1, 4, 7],
// 前面
[1, 0, 5, 4],
// 后面
[3, 2, 7, 6],
];
// 材质索引
let mIndex = [];
faceIndexs.forEach((item) => {
// 根据面相关判断对应的全景图和材质
let faceItem;
let isFace = this.faceRelation.some((face) => {
faceItem = face;
return (
item.includes(face.index[0]) &&
item.includes(face.index[1]) &&
item.includes(face.index[2]) &&
item.includes(face.index[3])
);
});
if (isFace) {
mIndex.push(faceItem.panorama);
} else {
mIndex.push(0);
}
});

// let faces = [
// // 底面
// [
// [wallPoints[0].x, wallPoints[0].z, wallPoints[0].y],
// [wallPoints[1].x, wallPoints[1].z, wallPoints[1].y],
// [wallPoints[2].x, wallPoints[2].z, wallPoints[2].y],
// [wallPoints[3].x, wallPoints[3].z, wallPoints[3].y],
// ],
// // 上面
// [
// [wallPoints[4].x, wallPoints[4].z, wallPoints[4].y],
// [wallPoints[5].x, wallPoints[5].z, wallPoints[5].y],
// [wallPoints[6].x, wallPoints[6].z, wallPoints[6].y],
// [wallPoints[7].x, wallPoints[7].z, wallPoints[7].y],
// ],
// ];

let faces = faceIndexs.map((item, index) => {
return [
[wallPoints[item[0]].x, wallPoints[item[0]].z, wallPoints[item[0]].y],
[wallPoints[item[1]].x, wallPoints[item[1]].z, wallPoints[item[1]].y],
[wallPoints[item[2]].x, wallPoints[item[2]].z, wallPoints[item[2]].y],
[wallPoints[item[3]].x, wallPoints[item[3]].z, wallPoints[item[3]].y],
];
});

let positions = [];
let uvs = [];
let indices = [];
let nomarls = [];
let faceNormals = [
[0, -1, 0],
[0, 1, 0],
[-1, 0, 0],
[1, 0, 0],
[0, 0, 1],
[0, 0, -1],
];
let materialGroups = [];

for (let i = 0; i < faces.length; i++) {
let point = faces[i];
let facePositions = [];
let faceUvs = [];
let faceIndices = [];

facePositions.push(...point[0], ...point[1], ...point[2], ...point[3]);
faceUvs.push(0, 0, 1, 0, 1, 1, 0, 1);
faceIndices.push(
0 + i * 4,
2 + i * 4,
1 + i * 4,
0 + i * 4,
3 + i * 4,
2 + i * 4
);

positions.push(...facePositions);
uvs.push(...faceUvs);
indices.push(...faceIndices);
nomarls.push(
...faceNormals[i],
...faceNormals[i],
...faceNormals[i],
...faceNormals[i]
);

// 设置材质组
materialGroups.push({
start: i * 6,
count: 6,
materialIndex: i,
});
}

let geometry = new THREE.BufferGeometry();
geometry.setAttribute(
"position",
new THREE.Float32BufferAttribute(positions, 3)
);
geometry.setAttribute("uv", new THREE.Float32BufferAttribute(uvs, 2));
geometry.setAttribute(
"normal",
new THREE.Float32BufferAttribute(nomarls, 3)
);
geometry.setIndex(new THREE.BufferAttribute(new Uint16Array(indices), 1));
geometry.groups = materialGroups;

this.geometry = geometry;
this.material = mIndex.map((item) => {
if (item == 0) {
return new THREE.MeshBasicMaterial({ color: 0x333333 });
} else {
return item.material;
}
});
}
}

代码解释1:

1
2
3
4
5
6
constructor(wallPoints, faceRelation) {
super();
this.wallPoints = wallPoints;
this.faceRelation = faceRelation;
this.init();
}

传进来墙的点位信息和朝向信息

代码解释2:

1
2
3
4
5
6
let wallPoints = this.wallPoints;
wallPoints.forEach((item) => {
item.x = item.x / 100;
item.y = item.y / 100;
item.z = item.z / 100;
});

点位信息重置,将点的xyz切换成我们要使用的坐标系

代码解释3:

1
2
3
4
5
6
7
8
9
10
11
12
13
14
 let faceIndexs = [
// 底面
[0, 1, 2, 3],
// 上面
[4, 5, 6, 7],
// 左面
[0, 3, 6, 5],
// 右面
[2, 1, 4, 7],
// 前面
[1, 0, 5, 4],
// 后面
[3, 2, 7, 6],
];

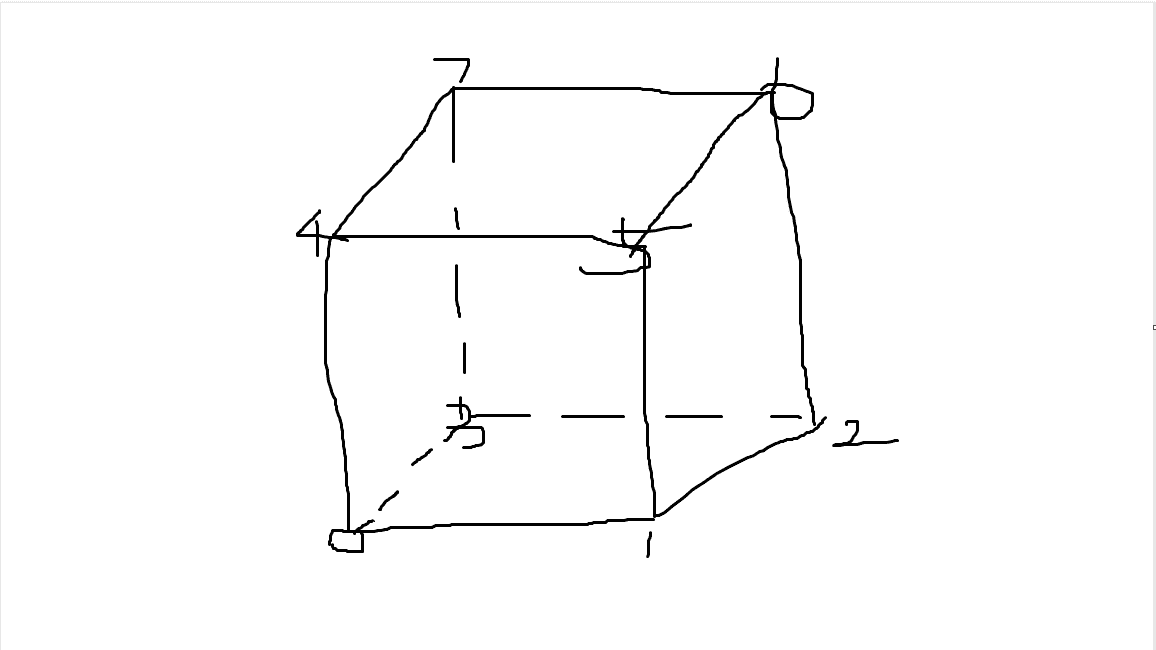
这段代码我可以给大家画个图就可以理解了
代码解释3

代码注释4:

接下来部分的代码,根据 faceRelation 中的数据,确定每个面对应的全景图和材质。遍历 faceRelation 数组,找到与当前面索引匹配的关联项,并将关联项的全景图索引添加到 mIndex 数组中。

然后,定义了一个包含了所有面的顶点坐标、UV 坐标、顶点索引和法线的数组。通过遍历 faceIndexs 数组,获取每个面的顶点坐标,并将它们添加到 positions 数组中。设置 UV 坐标为默认值 [0, 0, 1, 0, 1, 1, 0, 1],将其添加到 uvs 数组中。设置顶点索引,并将索引添加到 indices 数组中。设置法线信息,并将法线添加到 normals 数组中。

效果图
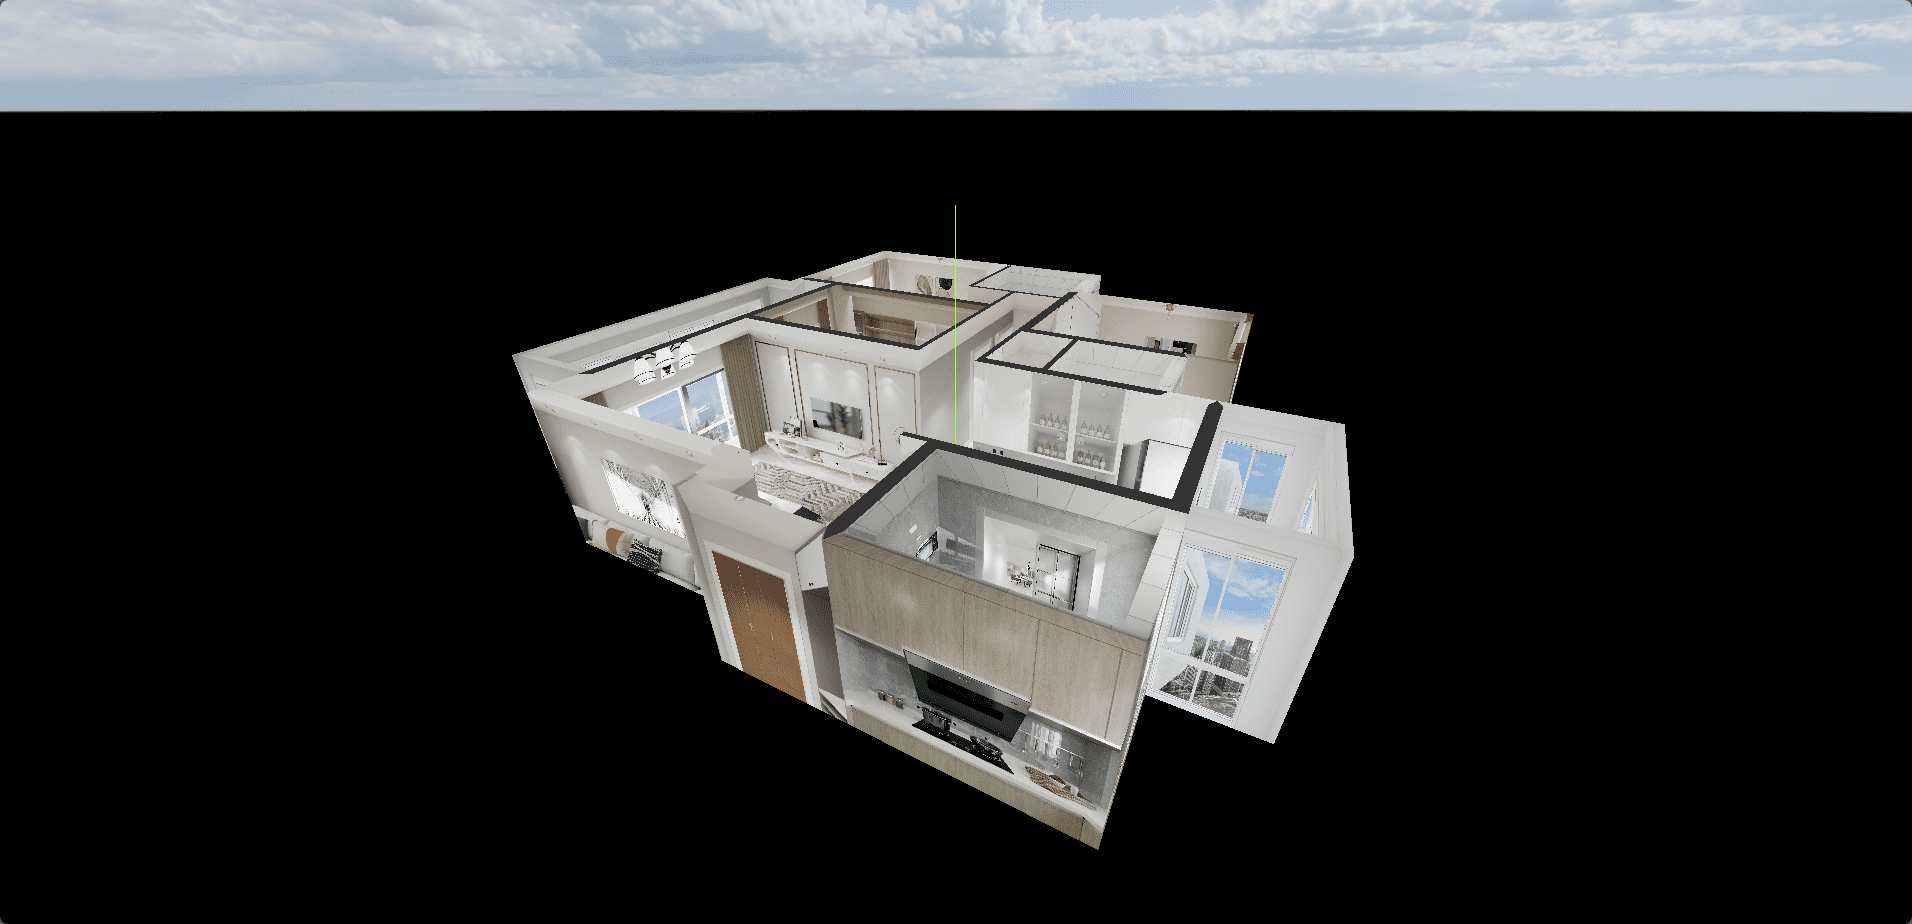
效果图

添加房间切换

修改div

1
2
3
<div>
<button class="btn" @click="changeRoom">切换房间</button>
</div>

调整样式

1
2
3
4
5
6
7
8
9
10
11
12
13
14
15
16
17
18
19
20
21
22
23
24
<style>
* {
margin: 0;
padding: 0;
box-sizing: border-box;
}
canvas {
width: 100vw;
height: 100vh;
position: fixed;
left: 0;
top: 0;
}
.btn {
position: fixed;
left: 50px;
top: 50px;
background: skyblue;
padding: 10px 20px;
border-radius: 5px;
cursor: pointer;
z-index: 1000;
}
</style>

添加切换房间逻辑

按照指定的房间顺序依次切换房间,如果到最后一个房间,就从第一个房间开始切换,dir适当调整一下镜头,让房间切换不至于在边上

1
2
3
4
5
6
7
8
9
10
11
12
13
14
15
16
17
18
19
20
21
22
23
24
25
26
27
28
29
30
31
32
33
34
35
36
37
let roomIndex = 0;
let timeline = gsap.timeline();
let dir = new THREE.Vector3();
function changeRoom() {
let room = panoramaLocation[roomIndex];
dir = camera.position
.clone()
.sub(
new THREE.Vector3(
room.point[0].x / 100,
room.point[0].z / 100,
room.point[0].y / 100
)
)
.normalize();

timeline.to(camera.position, {
duration: 1,
x: room.point[0].x / 100 + dir.x * 0.01,
y: room.point[0].z / 100,
z: room.point[0].y / 100 + dir.z * 0.01,
});
camera.lookAt(
room.point[0].x / 100,
room.point[0].z / 100,
room.point[0].y / 100
);
controls.target.set(
room.point[0].x / 100,
room.point[0].z / 100,
room.point[0].y / 100
);
roomIndex++;
if (roomIndex >= panoramaLocation.length) {
roomIndex = 0;
}
}

本文就到这里,下次文章再见。本文代码放在了我的git仓库里面,地址为https://gitee.com/guJyang/vr-room

上一篇:
submenu在结合路由使用时刷新页面,导致submenu的展开状态丢失
下一篇:
【项目配置】5-svg在vue3中使用