前言
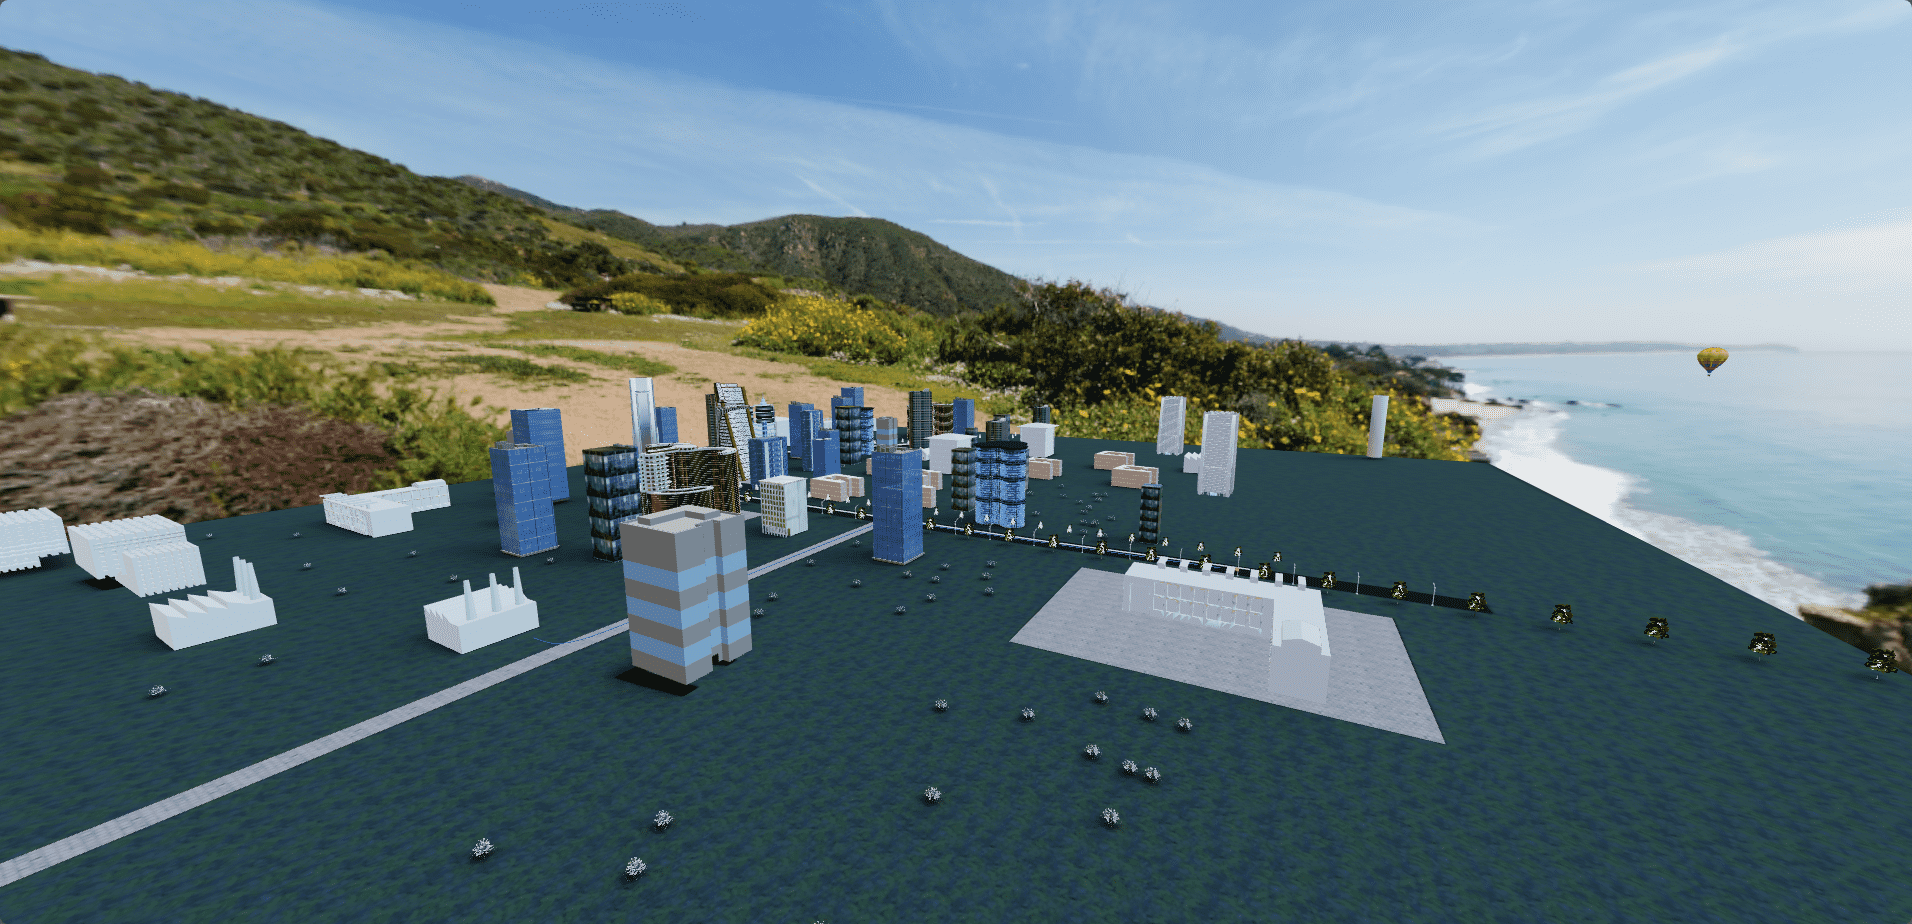
本文不讲述建模部分,这个我自己也不是很熟练,等以后有机会了再统一出个建模的文章。
初始化项目
这块已经讲述过很多了,这里就不多赘述了
设置全局样式
1
2
3
4
5
6
7
8
9
10
11
12
13
14
15
| *{
margin: 0;
padding: 0;
}
ul,li{
list-style: none;
}
html{
font-size:calc(100vw / 19.2);
}
body{
font-size: 16px;
}
|
基础目录结构和实现逻辑
这个和我之前那篇智慧城市的文章一样,就使用那个拆分就可以了
导入组件
首先在App.vue中
1
2
3
4
5
6
7
8
9
| <template>
<div class="home">
<Scene></Scene>
</div>
</template>
<script setup>
import Scene from "@/components/Scene.vue";
</script>
|
添加事件总览
新建utils文件夹,新建eventHub.js
1
2
3
4
5
| import Mitt from "mitt";
const eventHub = new Mitt();
export default eventHub;
|
组件导入目录
Scene组件
1
2
3
4
5
6
7
8
9
10
11
12
13
14
15
16
17
18
19
20
21
22
23
24
25
26
27
28
29
30
31
32
33
34
35
36
37
38
39
40
41
42
43
44
45
46
47
48
| <template>
<div class="scene" ref="sceneDiv"></div>
</template>
<script setup>
import { onMounted, ref} from "vue";
// 导入场景
import scene from "@/three/scene";
import camera from "@/three/camera";
// 导入辅助坐标轴
import axesHelper from "@/three/axesHelper";
// 导入渲染器
import renderer from "@/three/renderer";
// 初始化调整屏幕
import "@/three/init";
// 导入添加物体函数
import createMesh from "@/three/createMesh";
// 导入每一帧的执行函数
import animate from "@/three/animate";
// 场景元素div
let sceneDiv = ref(null);
// 添加相机
scene.add(camera);
// 添加辅助坐标轴
scene.add(axesHelper);
// 创建物体
createMesh();
onMounted(() => {
sceneDiv.value.appendChild(renderer.domElement);
animate();
});
</script>
<style>
.scene {
width: 100vw;
height: 100vh;
position: fixed;
z-index: 100;
left: 0;
top: 0;
}
</style>
|
新建/src/three文件夹
在这个文件夹下面初始化我们的基础文件,初始化的代码就不解释了,之前的文章都有讲过
camera.js
1
2
3
4
5
6
7
8
9
10
11
12
13
| import * as THREE from "three";
const camera = new THREE.PerspectiveCamera(
75,
window.innerHeight / window.innerHeight,
1,
100000
);
camera.position.set(1000, 1000, 1000);
export default camera;
|
renderer.js
1
2
3
4
5
6
7
8
9
10
11
12
13
14
15
16
17
| import * as THREE from "three";
const renderer = new THREE.WebGLRenderer({
antialias: true,
logarithmicDepthBuffer: true,
physicallyCorrectLights: true,
});
renderer.setSize(window.innerWidth, window.innerHeight);
renderer.shadowMap.enabled = true;
renderer.toneMapping = THREE.ACESFilmicToneMapping;
renderer.toneMappingExposure = 1.5;
export default renderer;
|
init.js
1
2
3
4
5
6
7
8
9
10
11
12
13
14
15
16
17
18
19
20
21
| import camera from "./camera";
import renderer from "./renderer";
camera.aspect = window.innerWidth / window.innerHeight;
camera.updateProjectionMatrix();
window.addEventListener("resize", () => {
camera.aspect = window.innerWidth / window.innerHeight;
camera.updateProjectionMatrix();
renderer.setSize(window.innerWidth, window.innerHeight);
renderer.setPixelRatio(window.devicePixelRatio);
});
|
axesHelper.js
1
2
3
4
5
| import * as THREE from "three";
const axesHelper = new THREE.AxesHelper(5);
export default axesHelper;
|
controls.js
1
2
3
4
5
6
7
8
9
10
11
12
| import { OrbitControls } from "three/examples/jsm/controls/OrbitControls";
import camera from "./camera";
import renderer from "./renderer";
const controls = new OrbitControls(camera, renderer.domElement);
controls.enableDamping = true;
export default controls;
|
animate.js
1
2
3
4
5
6
7
8
9
10
11
12
13
| import camera from "./camera";
import renderer from "./renderer";
import controls from "./controls";
import scene from "./scene";
function animate() {
controls.update();
requestAnimationFrame(animate);
renderer.render(scene, camera);
}
export default animate;
|
scene.js
这里我们导入一个纹理图片
1
2
3
4
5
6
7
8
9
10
11
12
13
14
15
16
17
18
19
| import * as THREE from "three";
import { RGBELoader } from "three/examples/jsm/loaders/RGBELoader.js";
const scene = new THREE.Scene();
const hdrLoader = new RGBELoader();
hdrLoader.loadAsync("./textures/023.hdr").then((texture) => {
scene.background = texture;
scene.environment = texture;
scene.environment.mapping = THREE.EquirectangularReflectionMapping;
});
const light = new THREE.DirectionalLight(0xffffff, 1);
light.position.set(10, 100, 10);
scene.add(light);
export default scene;
|
createMesh.js
1
2
3
4
5
6
7
8
9
10
11
| import scene from "./scene";
import City from "./mesh/City";
let city;
export default function createMesh() {
city = new City(scene);
}
export function updateMesh(time) {
city.update(time);
}
|

导入模型
City.js
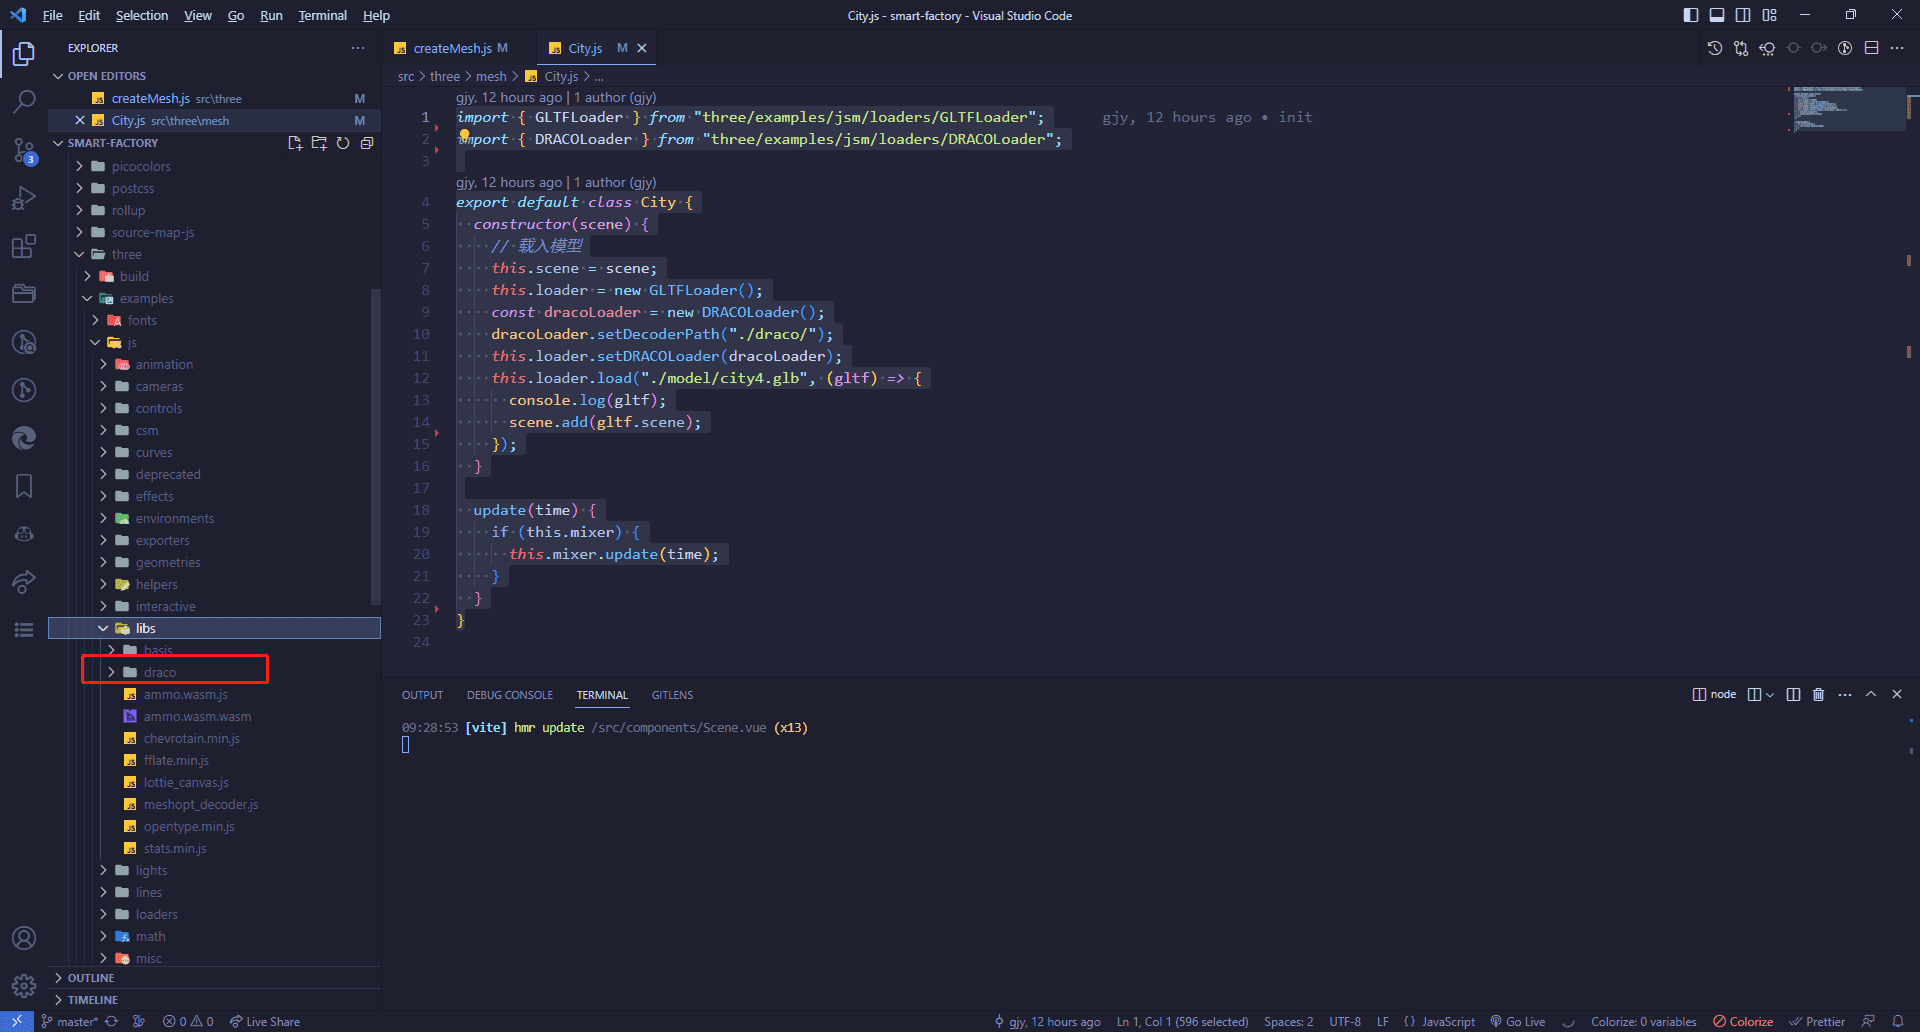
注意:DRACOLoader是用来解析glb文件的,然后这个文件是需要从node_modules\three\examples\js\libs文件夹下面拷贝出来的,然后放到public文件夹下面,这样才能正常解析

1
2
3
4
5
6
7
8
9
10
11
12
13
14
15
16
17
| import { GLTFLoader } from "three/examples/jsm/loaders/GLTFLoader";
import { DRACOLoader } from "three/examples/jsm/loaders/DRACOLoader";
export default class City {
constructor(scene) {
this.scene = scene;
this.loader = new GLTFLoader();
const dracoLoader = new DRACOLoader();
dracoLoader.setDecoderPath("./draco/");
this.loader.setDRACOLoader(dracoLoader);
this.loader.load("./model/city4.glb", (gltf) => {
console.log(gltf);
scene.add(gltf.scene);
});
}
}
|

添加热气球动画
模型里面已经设置了动画,在这里只需要调用即可,不用自己绘制动画
animate.js
调用updateMesh,传入time
1
2
3
4
5
6
7
8
9
10
11
12
13
14
15
16
17
18
| import { updateMesh } from "@/three/createMesh";
import * as THREE from "three";
import camera from "./camera";
import renderer from "./renderer";
import controls from "./controls";
import scene from "./scene";
const clock = new THREE.Clock();
function animate() {
const time = clock.getDelta();
controls.update(time);
updateMesh(time);
requestAnimationFrame(animate);
renderer.render(scene, camera);
}
export default animate;
|
City.js
导入glb中的动画
1
2
3
4
5
6
7
8
9
10
11
12
13
14
15
16
17
18
19
20
21
22
23
24
25
26
27
28
29
30
31
32
33
34
| import { GLTFLoader } from "three/examples/jsm/loaders/GLTFLoader";
import { DRACOLoader } from "three/examples/jsm/loaders/DRACOLoader";
import * as THREE from "three";
export default class City {
constructor(scene) {
this.scene = scene;
this.loader = new GLTFLoader();
const dracoLoader = new DRACOLoader();
dracoLoader.setDecoderPath("./draco/");
this.loader.setDRACOLoader(dracoLoader);
this.loader.load("./model/city4.glb", (gltf) => {
console.log(gltf);
scene.add(gltf.scene);
this.gltf = gltf;
gltf.scene.traverse((child) => {
if (child.name === "热气球") {
this.mixer = new THREE.AnimationMixer(child);
this.clip = gltf.animations[1];
this.action = this.mixer.clipAction(this.clip);
this.action.play();
}
});
});
}
update(time) {
if (this.mixer) {
this.mixer.update(time);
}
}
}
|
动画效果
仔细看,可以看到热气球是在飘动的
添加汽车动画
City.js
在模型里面,已经设置了汽车的轨迹,我们只需要根据轨迹来设置汽车的位置即可
1
2
3
4
5
6
7
8
9
10
11
12
13
14
15
16
17
18
19
20
21
22
23
24
25
26
27
28
29
30
31
32
33
34
35
36
37
38
39
40
41
42
43
44
45
46
47
48
49
50
51
52
53
54
55
56
57
58
59
60
61
62
63
64
65
66
67
68
69
70
71
72
73
74
75
76
77
78
| import { GLTFLoader } from "three/examples/jsm/loaders/GLTFLoader";
import { DRACOLoader } from "three/examples/jsm/loaders/DRACOLoader";
import * as THREE from "three";
import gsap from "gsap";
export default class City {
constructor(scene) {
this.scene = scene;
this.loader = new GLTFLoader();
const dracoLoader = new DRACOLoader();
dracoLoader.setDecoderPath("./draco/");
this.loader.setDRACOLoader(dracoLoader);
this.loader.load("./model/city4.glb", (gltf) => {
console.log(gltf);
scene.add(gltf.scene);
this.gltf = gltf;
gltf.scene.traverse((child) => {
if (child.name === "热气球") {
this.mixer = new THREE.AnimationMixer(child);
this.clip = gltf.animations[1];
this.action = this.mixer.clipAction(this.clip);
this.action.play();
}
if (child.name === "汽车园区轨迹") {
const line = child;
line.visible = false;
const points = [];
for (
let i = line.geometry.attributes.position.count - 1;
i >= 0;
i--
) {
points.push(
new THREE.Vector3(
line.geometry.attributes.position.getX(i),
line.geometry.attributes.position.getY(i),
line.geometry.attributes.position.getZ(i)
)
);
}
this.curve = new THREE.CatmullRomCurve3(points);
this.curveProgress = 0;
this.carAnimation();
}
if (child.name === "redcar") {
console.log(child);
this.redcar = child;
}
});
});
}
update(time) {
if (this.mixer) {
this.mixer.update(time);
}
}
carAnimation() {
gsap.to(this, {
curveProgress: 0.999,
duration: 10,
repeat: -1,
onUpdate: () => {
const point = this.curve.getPoint(this.curveProgress);
this.redcar.position.set(point.x, point.y, point.z);
if (this.curveProgress + 0.001 < 1) {
const point = this.curve.getPoint(this.curveProgress + 0.001);
this.redcar.lookAt(point);
}
},
});
}
}
|
动画效果
仔细看,可以看到汽车是在运动的
设置不同视角观看以及热气球动画
模型视角
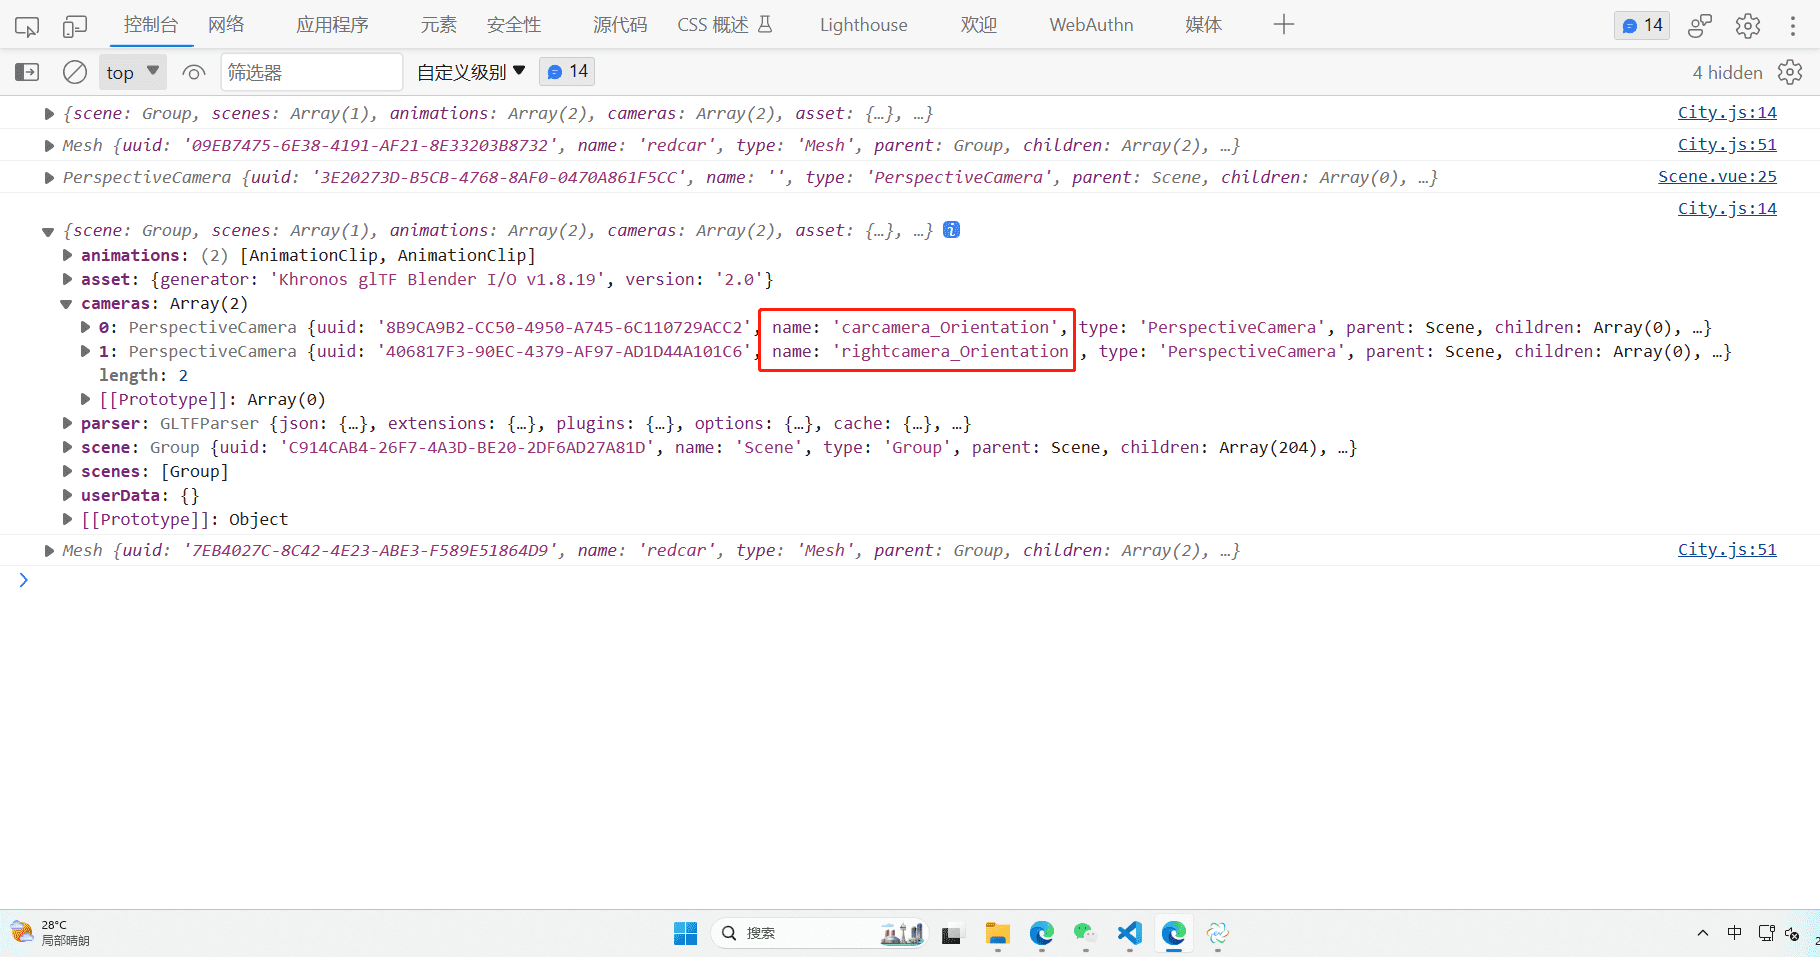
在建模的时候已经给了我们多个视角,我们只需要对应切换即可

依旧使用之前智慧城市的控制屏幕代码
并添加事件
BigScreen.vue
1
2
3
4
5
6
7
8
9
10
11
12
13
14
15
16
17
18
19
20
21
22
23
24
25
26
27
28
29
30
31
32
33
34
35
36
37
38
39
40
41
42
43
44
45
46
47
48
49
50
51
52
53
54
55
56
57
58
59
60
61
62
63
64
65
66
67
68
69
70
71
72
73
74
75
76
77
78
79
80
81
82
83
84
85
86
87
88
89
90
91
92
93
94
95
96
97
98
99
100
101
102
103
104
105
106
107
108
109
110
111
112
113
114
115
116
117
118
119
120
121
122
123
124
125
126
127
128
129
130
131
132
133
134
135
136
137
138
139
140
141
142
143
144
145
146
147
148
149
150
151
152
153
154
155
156
157
158
159
160
161
162
163
164
165
166
167
168
169
170
171
172
173
174
175
176
177
178
179
180
181
182
183
184
185
186
187
188
189
190
191
192
193
194
195
196
197
198
199
200
201
202
203
204
205
206
207
208
209
210
211
212
213
214
215
216
217
218
219
220
221
222
223
224
225
226
227
228
229
230
231
232
233
234
235
236
237
| <template>
<div id="bigScreen">
<div class="header">智慧城市管理系统平台</div>
<div class="main">
<div class="left">
<div class="cityEvent">
<h3>
<span>热气球控制</span>
</h3>
<h1 @click="toggleAction(0)">
<img class="icon" src="../assets/bg/bar.svg" alt="" />
<span>设置热气球以横穿园区的动画显示</span>
</h1>
<h1 @click="toggleAction(1)">
<img class="icon" src="../assets/bg/bar.svg" alt="" />
<span>设置热气球以环绕园区进行运动</span>
</h1>
<div class="footerBorder"></div>
</div>
<div class="cityEvent">
<h3>
<span>相机控制</span>
</h3>
<h1 @click="toggleCamera('default')">
<img class="icon" src="../assets/bg/bar.svg" alt="" />
<span>默认的相机视角</span>
</h1>
<h1 @click="toggleCamera('carcamera_Orientation')">
<img class="icon" src="../assets/bg/bar.svg" alt="" />
<span>设置相机追随汽车导览园区</span>
</h1>
<h1 @click="toggleCamera('rightcamera_Orientation')">
<img class="icon" src="../assets/bg/bar.svg" alt="" />
<span>查看汽车司机视角</span>
</h1>
<div class="footerBorder"></div>
</div>
</div>
</div>
</div>
</template>
<script setup>
import eventHub from "@/utils/eventHub";
const toggleAction = (i) => {
eventHub.emit("actionClick", i);
};
const toggleCamera = (name) => {
eventHub.emit("toggleCamera", name);
};
</script>
<style>
#bigScreen {
width: 100vw;
height: 100vh;
position: fixed;
z-index: 100;
left: 0;
top: 0;
pointer-events: none;
display: flex;
flex-direction: column;
}
.header {
/* width: 1920px;
height: 100px; */
width: 19.2rem;
height: 1rem;
background-image: url(@/assets/bg/title.png);
background-size: cover;
background-position: center;
background-repeat: no-repeat;
text-align: center;
color: rgb(226, 226, 255);
font-size: 0.4rem;
}
.main {
flex: 1;
width: 19.2rem;
display: flex;
justify-content: space-between;
}
.left {
width: 4rem;
/* background-color: rgb(255,255,255,0.5); */
background-image: url(@/assets/bg/line_img.png);
background-repeat: no-repeat;
background-size: contain;
background-position: right center;
display: flex;
flex-direction: column;
align-items: center;
padding: 0.4rem 0;
}
.right {
width: 4rem;
/* background-color: rgb(255,255,255,0.5); */
background-image: url(@/assets/bg/line_img.png);
background-repeat: no-repeat;
background-size: contain;
background-position: left center;
display: flex;
flex-direction: column;
align-items: center;
padding: 0.4rem 0;
}
.cityEvent {
position: relative;
width: 3.5rem;
/* height: 3rem; */
margin-bottom: 0.5rem;
background-image: url(@/assets/bg/bg_img03.png);
background-repeat: repeat;
pointer-events: auto;
}
.cityEvent::before {
width: 0.4rem;
height: 0.4rem;
position: absolute;
left: 0;
top: 0;
border-top: 4px solid rgb(34, 133, 247);
border-left: 4px solid rgb(34, 133, 247);
content: "";
display: block;
}
.cityEvent::after {
width: 0.4rem;
height: 0.4rem;
position: absolute;
right: 0;
top: 0;
border-top: 4px solid rgb(34, 133, 247);
border-right: 4px solid rgb(34, 133, 247);
content: "";
display: block;
}
.footerBorder {
position: absolute;
bottom: 0;
bottom: 0;
width: 3.5rem;
height: 0.4rem;
}
.footerBorder::before {
width: 0.4rem;
height: 0.4rem;
position: absolute;
left: 0;
top: 0;
border-bottom: 4px solid rgb(34, 133, 247);
border-left: 4px solid rgb(34, 133, 247);
content: "";
display: block;
}
.footerBorder::after {
width: 0.4rem;
height: 0.4rem;
position: absolute;
right: 0;
top: 0;
border-bottom: 4px solid rgb(34, 133, 247);
border-right: 4px solid rgb(34, 133, 247);
content: "";
display: block;
}
.icon {
width: 40px;
height: 40px;
}
.cityEvent h1 span {
flex: 1;
}
h1 {
color: #fff;
display: flex;
align-items: center;
padding: 0 0.3rem 0.3rem;
justify-content: space-between;
font-size: 0.25rem;
}
h3 {
color: #fff;
display: flex;
align-items: center;
padding: 0.3rem 0.3rem;
}
h1 > div {
display: flex;
align-items: center;
}
h1 span.time {
font-size: 0.2rem;
font-weight: normal;
}
.cityEvent li > p {
color: #eee;
padding: 0rem 0.3rem 0.3rem;
}
.list h1 {
padding: 0.1rem 0.3rem;
}
.cityEvent.list ul {
pointer-events: auto;
cursor: pointer;
}
.cityEvent li.active h1 {
color: red;
}
.cityEvent li.active p {
color: red;
}
</style>
|
App.vue
在App.vue中导入并使用
1
2
3
4
5
6
7
8
9
10
11
| <template>
<div class="home">
<Scene></Scene>
<BigScreen></BigScreen>
</div>
</template>
<script setup>
import Scene from "@/components/Scene.vue";
import BigScreen from "@/components/BigScreen.vue";
</script>
|
Camera.js
根据不同的事件切换不同的相机视角
1
2
3
4
5
6
7
8
9
10
11
12
13
14
15
16
17
18
19
20
21
22
23
24
25
26
27
28
29
30
31
32
33
34
| import * as THREE from "three";
import eventHub from "@/utils/eventHub";
const camera = new THREE.PerspectiveCamera(
75,
window.innerHeight / window.innerHeight,
1,
100000
);
camera.position.set(1000, 1000, 1000);
class CameraModule {
constructor() {
this.activeCamera = camera;
this.collection = {
default: camera,
};
eventHub.on("toggleCamera", (name) => {
this.setActive(name);
});
}
add(name, camera) {
this.collection[name] = camera;
}
setActive(name) {
this.activeCamera = this.collection[name];
}
}
export default new CameraModule();
|
City.js
在City.js中添加相机视角
1
2
3
4
| import cameraModule from "../camera";
gltf.cameras.forEach((camera) => {
cameraModule.add(camera.name, camera);
});
|
在City.js中切换热气球动画
1
2
3
4
5
6
7
| eventHub.on("actionClick", (i) => {
console.log(i);
this.action.reset();
this.clip = this.gltf.animations[i];
this.action = this.mixer.clipAction(this.clip);
this.action.play();
});
|
其他文件
在其他使用到camera的地方全部切换
animate.js
1
2
| import cameraModule from "./camera";
renderer.render(scene, cameraModule.activeCamera);
|
controls.js
1
2
3
4
5
| import cameraModule from "./camera";
const controls = new OrbitControls(
cameraModule.activeCamera,
renderer.domElement
);
|
init.js
1
2
3
4
5
6
7
8
9
10
11
12
13
14
15
16
17
18
19
20
21
22
| import cameraModule from "./camera";
import renderer from "./renderer";
cameraModule.activeCamera.aspect = window.innerWidth / window.innerHeight;
cameraModule.activeCamera.updateProjectionMatrix();
window.addEventListener("resize", () => {
cameraModule.activeCamera.aspect = window.innerWidth / window.innerHeight;
cameraModule.activeCamera.updateProjectionMatrix();
renderer.setSize(window.innerWidth, window.innerHeight);
renderer.setPixelRatio(window.devicePixelRatio);
});
|
Scene.vue
1
2
3
| import cameraModule from "@/three/camera";
scene.add(cameraModule.activeCamera);
|
切换视角效果
切换观览模式
BigScreen.vue
1
2
3
4
5
6
7
8
9
10
11
12
13
14
15
16
17
18
19
20
21
22
23
24
25
26
27
28
29
30
31
32
33
34
35
36
37
38
| <div class="right">
<div class="cityEvent list">
<h3>
<span>切换园区观览模式</span>
</h3>
<ul>
<li @click="toggleControls('Orbit')">
<h1>
<div>
<img class="icon" src="../assets/bg/dianli.svg" alt="" />
<span> 轨道观览 </span>
</div>
</h1>
<p>可以锁定目标建筑和园区进行轨道式360°查看</p>
</li>
<li @click="toggleControls('Fly')">
<h1>
<div>
<img class="icon" src="../assets/bg/dianli.svg" alt="" />
<span> 飞行观览 </span>
</div>
</h1>
<p>可以使用飞行模式进行园区进行观览</p>
</li>
<li @click="toggleControls('FirstPerson')">
<h1>
<div>
<img class="icon" src="../assets/bg/dianli.svg" alt="" />
<span> 第一人称 </span>
</div>
</h1>
<p>可以使用第一人称模式进行园区进行观览</p>
</li>
</ul>
<div class="footerBorder"></div>
</div>
</div>
|
1
2
3
4
| const toggleControls = (name) => {
eventHub.emit("toggleControls", name);
};
|
controls.js
切换控制器,具体的控制器代码可以去threejs官网查看,这里使用了FlyControls和FirstPersonControls
1
2
3
4
5
6
7
8
9
10
11
12
13
14
15
16
17
18
19
20
21
22
23
24
25
26
27
28
29
30
31
32
33
34
35
36
37
38
39
40
41
42
43
44
45
46
47
48
| import { OrbitControls } from "three/examples/jsm/controls/OrbitControls";
import { FlyControls } from "three/examples/jsm/controls/FlyControls";
import { FirstPersonControls } from "three/examples/jsm/controls/FirstPersonControls";
import cameraModule from "./camera";
import renderer from "./renderer";
import eventHub from "@/utils/eventHub";
class ControlsModule {
constructor() {
this.setOrbitControls();
eventHub.on("toggleControls", (name) => {
this[`set${name}Controls`]();
});
}
setOrbitControls() {
this.controls = new OrbitControls(
cameraModule.activeCamera,
renderer.domElement
);
this.controls.enableDamping = true;
this.controls.maxPolarAngle = Math.PI / 2;
this.controls.minPolarAngle = 0;
}
setFlyControls() {
this.controls = new FlyControls(
cameraModule.activeCamera,
renderer.domElement
);
this.controls.movementSpeed = 100;
this.controls.rollSpeed = Math.PI / 60;
}
setFirstPersonControls() {
this.controls = new FirstPersonControls(
cameraModule.activeCamera,
renderer.domElement
);
this.controls.movementSpeed = 100;
this.controls.rollSpeed = Math.PI / 60;
}
}
export default new ControlsModule();
|
animate.js
切换控制器
1
2
3
4
5
6
7
8
9
10
11
12
13
14
15
16
17
18
| import * as THREE from "three";
import cameraModule from "./camera";
import renderer from "./renderer";
import controlsModule from "./controls";
import scene from "./scene";
import { updateMesh } from "@/three/createMesh";
const clock = new THREE.Clock();
function animate(t) {
const time = clock.getDelta();
controlsModule.controls.update(time);
updateMesh(time);
requestAnimationFrame(animate);
renderer.render(scene, cameraModule.activeCamera);
}
export default animate;
|
切换控制器效果
结语
本篇文章就简单阐述到这里了,每天学习一点点,做大做强!


