编辑器组件封装(二)
发表于:2023-09-21 |

前言

本篇文章将优化我自己封装的编辑器,更详细的内容请参考我的编辑器组件封装(一),我项目代码以及简单操作文档我放在了我的git仓库https://gitee.com/guJyang/chat-input-next

@人员追加头像

App.vue

修改列表传参

1
2
3
4
5
6
7
8
9
10
11
12
13
14
15
16
17
18
19
20
21
22
23
24
25
26
27
28
29
30
// @列表
const atPopoverList = ref([{
name: 'codesigner',
avatar:new URL("@/assets/word.jpg", import.meta.url).href,
},
{
name: 'react',
avatar: new URL("@/assets/excel.jpg", import.meta.url).href,
},
{
name: 'vue',
avatar: new URL("@/assets/video.png", import.meta.url).href,
},
{
name: 'webgl',
avatar: new URL("@/assets/pdf.jpg", import.meta.url).href,
},
{
name: 'gis',
avatar: new URL("@/assets/txt.jpg", import.meta.url).href,
},{
name:'cesium',
avatar: new URL("@/assets/zip.jpg", import.meta.url).href,
},{
name:'three',
avatar:new URL("@/assets/word.jpg", import.meta.url).href,
},{
name:'cannon-es',
avatar: new URL("@/assets/excel.jpg", import.meta.url).href,
}]);

At组件中修改样式

1
2
3
4
5
6
7
8
9
10
11
12
13
14
15
16
<template>
<div class="at-popover" v-if="visible" id="at-popover" :style="{...positionStyle}">
<div class="at-popover-content" ref="atPopoverContent">
<ul>
<li v-for="(item,index) in list" :key="index" class="at-popover-line" :class="{active:index===activeLine}" @click="handleSelect(item.name)">
<div v-if="item.avatar" class="at-popover-line-avatar-wrap">
<img :src="item.avatar" alt="" class="at-popover-line-avatar">
</div>
<div>
{{item.name}}
</div>
</li>
</ul>
</div>
</div>
</template>
1
2
3
4
5
6
7
8
.at-popover-line-avatar-wrap{
margin-right: 5px;
height:20px;
}
.at-popover-line-avatar{
width:20px;
height:20px;
}

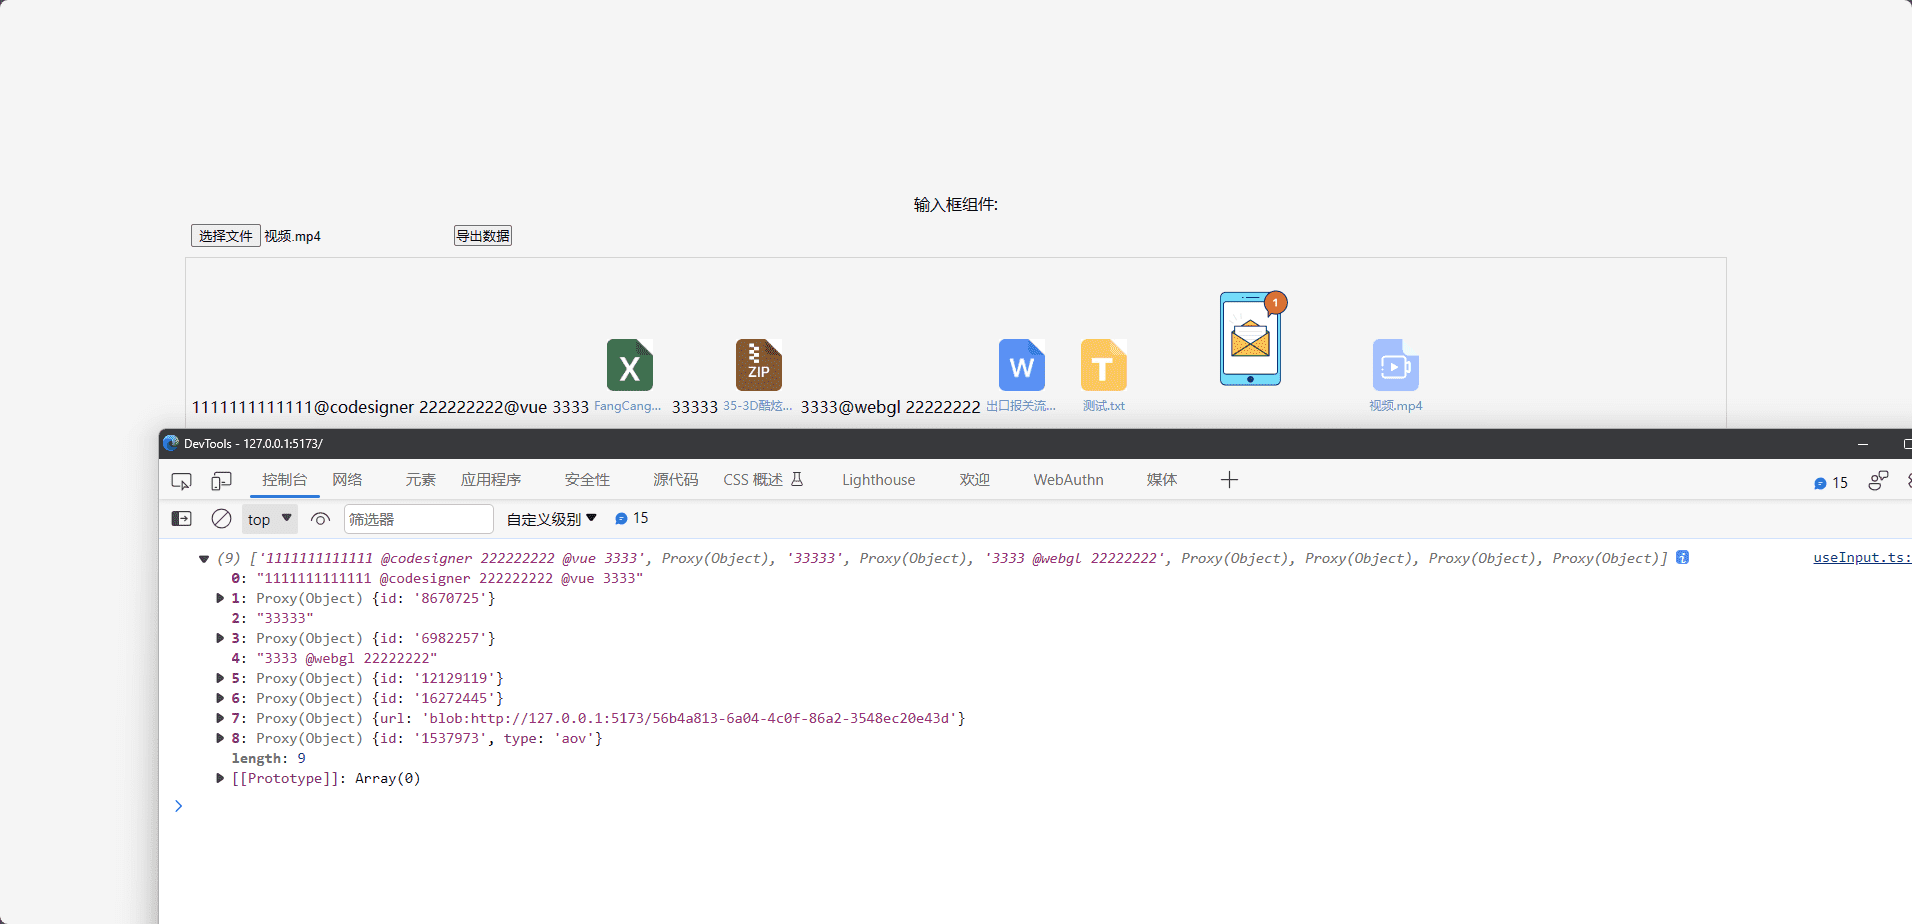
效果图

信息处理

我们之前只是将内容一直导入到我们的输入框内,但是从来没有将数据导出过,这样的一个富文本编辑框,是不合格的,接下来,我们将数据给导出

  • 处理方式:我们可以看到,我们的富文本编辑器内容是有一层一层的div,img,a,文本标签构成的,我们需要将这些标签给解析出来,然后将数据给导出
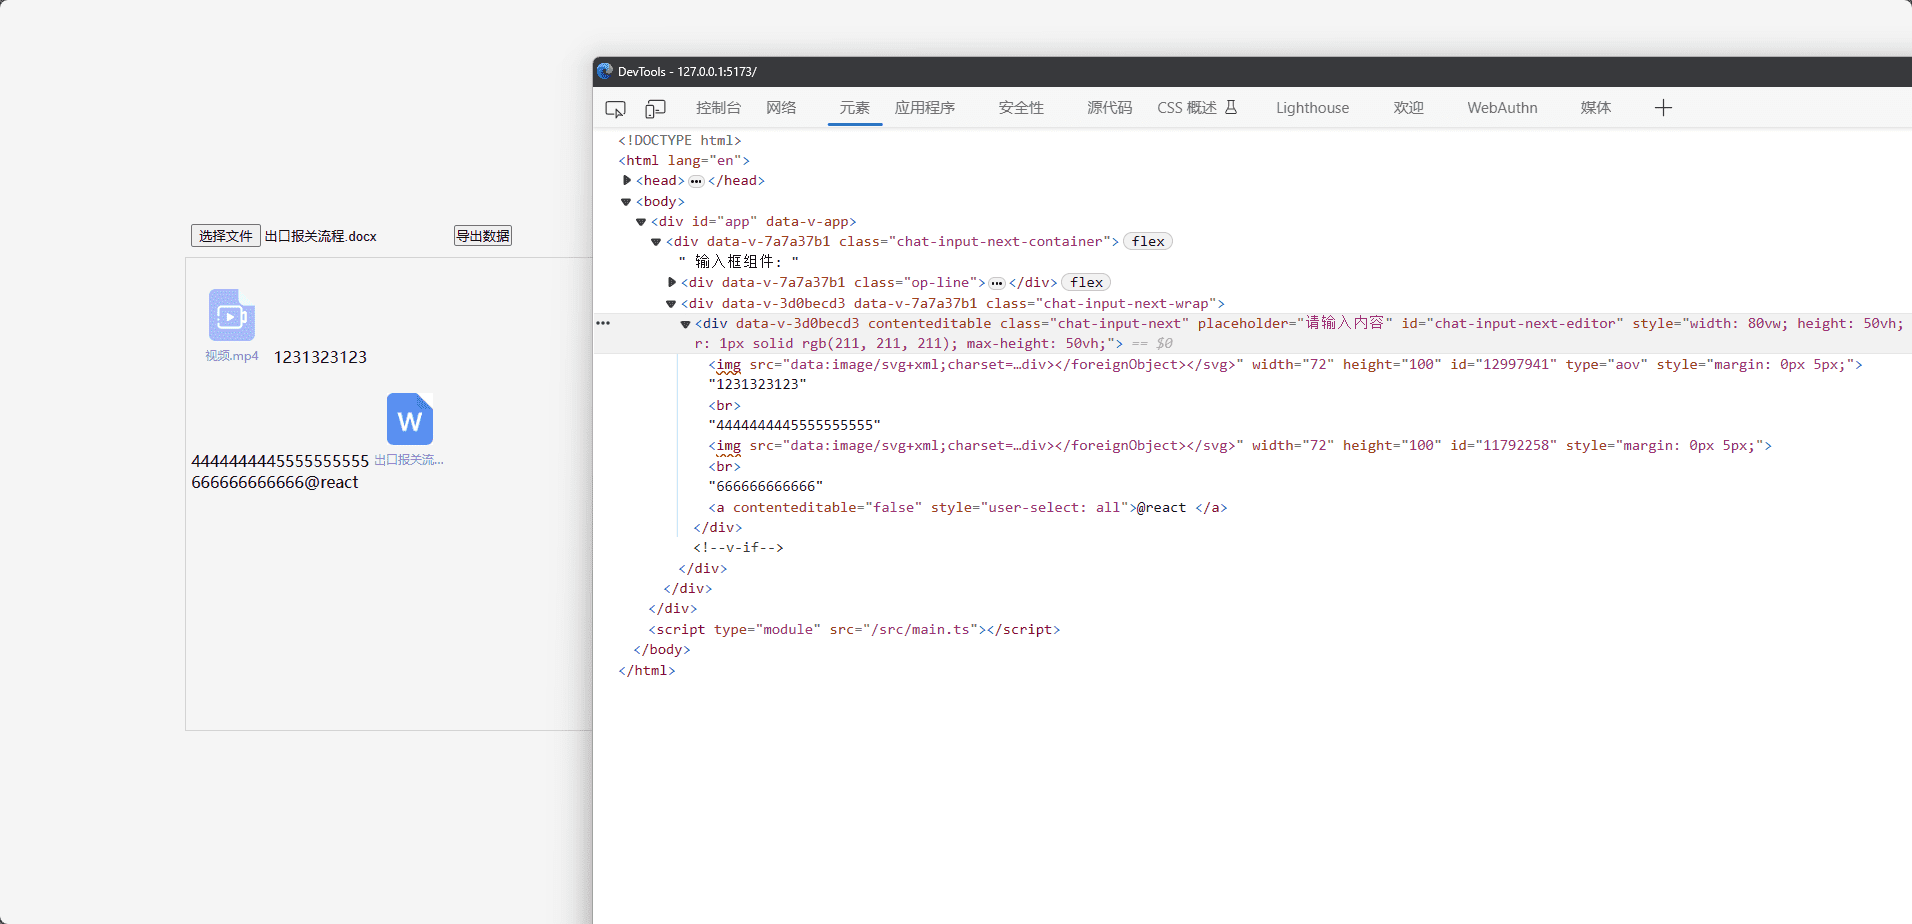
    效果图

App.vue中

添加一个方法,用于导出数据

1
2
3
4
// 得到导出的数据
const handleDataExport=()=>{
chatInputNext.value&&chatInputNext.value.exportData()
}
1
2
3
4
5
6
7
8
9
10
<template>
<div class="chat-input-next-container">
输入框组件:
<div class="op-line">
<input type="file" @change="handleFileChange">
<button @click="handleDataExport">导出数据</button>
</div>
<ChatInputNext :cusStyle="{width:'80vw',height:'50vh',border:'1px solid #d3d3d3',maxHeight:'50vh'}" ref="chatInputNext" @error="handleError" :atUserList="atPopoverList"></ChatInputNext>
</div>
</template>

chat-input-next.vue中

预备一下处理方法

1
2
3
4
5
6
7
8
9
10
11
12
13
const {insertImage,insertFile:insertFiles,insertContent,exportMsgData} =useInput({
editorKey: "chat-input-next-editor",
})
// 导出数据
const exportData=()=>{

}

defineExpose({
insertFile,
insertUrl,
exportData
})

hooks的useInput.ts中

新增ref字段

1
2
3
4
// 消息msg
const inputMsgData=ref([])
// 当前@用户列表
const currentAtUserList=ref([])

新增预备方法

1
2
3
4
5
6
7
8
9
10
11
12
13
14
15
16
17
18
19
20
21
22
23
// 循环子节点
const loopChildren = (children: any) => {

}

// 导出内容
const exportMsgData=()=>{
inputMsgData.value = [];
currentAtUserList.value = [];
const curEditor = document.getElementById(editorKey);
const children = curEditor?.childNodes;
if (!children) {
return;
}
loopChildren(children);
}

return {
insertContent,
insertImage,
insertFile,
exportMsgData
};

ok,接下来,我们就要在loopChildren方法中执行轮询

书写loopChildren方法

  1. 去除不必要的标签以及空标签和空文本节点

    1
    2
    3
    4
    5
    6
    7
    8
    9
    10
    11
    12
    // 循环子节点
    const loopChildren = (children: any) => {
    // 去除span标签以及无效的文本节点
    const filterSpanChildren = Array.prototype.slice
    .call(children)
    .filter(
    (item: any) =>
    item.tagName !== "SPAN" &&
    Boolean(item) &&
    !(item.nodeType === Node.TEXT_NODE && item.textContent === "")
    );
    }
  2. 轮询节点并处理文本节点

    1
    2
    3
    4
    5
    6
    7
    8
    9
    10
    11
    12
    13
    14
    15
    16
    17
    18
    19
    20
    21
    22
    23
    24
    25
    26
    27
    for (let i = 0; i < filterSpanChildren.length; i++) {
    // 当前节点
    const node = filterSpanChildren[i];
    // 如果是文本节点
    if (node.nodeType === Node.TEXT_NODE) {
    // 获取文本内容
    const textContent = node.textContent;
    // 如果是多个节点,且不是第一个,那么需要拼接
    if (filterSpanChildren && filterSpanChildren.length > 1 && i > 0) {
    // 如果前一个节点是a标签,这里我只有@功能是a标签,那么将这段文本和上面一段@的文本拼接,因为@内容也是需要和普通的文本一起展示的
    if (
    filterSpanChildren[i - 1].nodeType === Node.TEXT_NODE ||
    (filterSpanChildren[i - 1].nodeType === Node.ELEMENT_NODE &&
    filterSpanChildren[i - 1].tagName === "A")
    ) {
    inputMsgData.value[inputMsgData.value.length - 1] +=
    " " + textContent;
    } else {
    // 多个节点且为第一个
    inputMsgData.value.push(textContent);
    }
    } else {
    // 只有一个文本节点,直接添加
    inputMsgData.value.push(textContent);
    }
    }
    }
  3. 处理图片节点
    这里是因为我之前添加文件的时候是有一些细节的操作的,不知道大家留意没有,就是普通的图片我是只给了url的,而文件通过domtoimage转化的我是加了imgId的,视频我还加了个type,所以就有了下面这段简单的处理

    1
    2
    3
    4
    5
    6
    7
    8
    9
    10
    11
    12
    13
    14
    15
    16
    17
    18
    19
    // 图片节点
    else if (
    node.nodeType === Node.ELEMENT_NODE &&
    node.tagName === "IMG"
    ) {
    const imgSrc = node.getAttribute("src");
    const imgId = node.getAttribute("id");
    const imgType = node.getAttribute("type");
    if (imgType === "aov") {
    inputMsgData.value.push({ id: imgId, type: "aov" });
    }
    // 说明是普通文件
    else if (imgId) {
    inputMsgData.value.push({ id: imgId });
    } else {
    // 处理图片节点...
    inputMsgData.value.push({ url: imgSrc });
    }
    }
  4. 换行节点

    1
    2
    3
    4
    // 换行节点
    else if (node.nodeType === Node.ELEMENT_NODE && node.tagName === "BR") {
    inputMsgData.value.push("\n");
    }
  5. 处理a标签
    这里和处理文本节点很类似,然后记得在添加@标签的时候把name给给设置进去

    1
    2
    3
    4
    5
    6
    7
    8
    9
    10
    11
    12
    13
    14
    15
    16
    17
    18
    19
    // 如果是a标签
    else if (node.nodeType === Node.ELEMENT_NODE && node.tagName === "A") {
    if (filterSpanChildren && filterSpanChildren.length > 1 && i > 0) {
    // 如果上一个节点是@或者文本节点,那么拼上去,不需要添加了
    if (
    filterSpanChildren[i - 1].nodeType === Node.TEXT_NODE ||
    (filterSpanChildren[i - 1].nodeType === Node.ELEMENT_NODE &&
    filterSpanChildren[i - 1].tagName === "A")
    ) {
    inputMsgData.value[inputMsgData.value.length - 1] +=
    " " + `@${node.getAttribute("nickName")}`;
    } else {
    inputMsgData.value.push(`@${node.getAttribute("nickName")}`);
    }
    } else {
    inputMsgData.value.push(`@${node.getAttribute("nickName")}`);
    }
    currentAtUserList.value.push(node.getAttribute("nickName"));
    }
  6. 处理div和p标签
    这两个标签很可能是嵌套标签,就是标签里面还有别的标签,因此我们需要特殊处理

  • 新增方法判断是否是纯文本
    1
    2
    3
    4
    5
    6
    // 判断是否是纯文本
    function isPlainText(text: string) {
    // 匹配包含html标签的正则表达式
    const htmlPattern = /<\s*[^>]*>/gi;
    return !htmlPattern.test(text);
    }
    进行判断逻辑,如果是纯文本,那么就直接换行添加,如果不是,那么就继续轮询
    1
    2
    3
    4
    5
    6
    7
    8
    9
    10
    11
    12
    13
    else if (
    node.nodeType === Node.ELEMENT_NODE &&
    (node.tagName === "DIV" || node.tagName === "P")
    ) {
    const divContent = node.innerHTML;
    // 处理div节点...
    if (isPlainText(divContent)) {
    inputMsgData.value.push("\n");
    inputMsgData.value.push(divContent);
    } else {
    loopChildren(node.childNodes);
    }
    }

这里贴出完整的loopChildren的代码

1
2
3
4
5
6
7
8
9
10
11
12
13
14
15
16
17
18
19
20
21
22
23
24
25
26
27
28
29
30
31
32
33
34
35
36
37
38
39
40
41
42
43
44
45
46
47
48
49
50
51
52
53
54
55
56
57
58
59
60
61
62
63
64
65
66
67
68
69
70
71
72
73
74
75
76
77
78
79
80
81
82
83
84
85
86
87
88
89
90
91
92
93
94
// 循环子节点
const loopChildren = (children: any) => {
// 去除span标签以及无效的文本节点
const filterSpanChildren = Array.prototype.slice
.call(children)
.filter(
(item: any) =>
item.tagName !== "SPAN" &&
Boolean(item) &&
!(item.nodeType === Node.TEXT_NODE && item.textContent === "")
);
for (let i = 0; i < filterSpanChildren.length; i++) {
// 当前节点
const node = filterSpanChildren[i];
// 如果是文本节点
if (node.nodeType === Node.TEXT_NODE) {
// 获取文本内容
const textContent = node.textContent;
// 如果是多个节点,且不是第一个,那么需要拼接
if (filterSpanChildren && filterSpanChildren.length > 1 && i > 0) {
// 如果前一个节点是a标签,这里我只有@功能是a标签,那么将这段文本和上面一段@的文本拼接,因为@内容也是需要和普通的文本一起展示的
if (
filterSpanChildren[i - 1].nodeType === Node.TEXT_NODE ||
(filterSpanChildren[i - 1].nodeType === Node.ELEMENT_NODE &&
filterSpanChildren[i - 1].tagName === "A")
) {
inputMsgData.value[inputMsgData.value.length - 1] +=
" " + textContent;
} else {
// 多个节点且为第一个
inputMsgData.value.push(textContent);
}
} else {
// 只有一个文本节点,直接添加
inputMsgData.value.push(textContent);
}
}
// 图片节点
else if (
node.nodeType === Node.ELEMENT_NODE &&
node.tagName === "IMG"
) {
const imgSrc = node.getAttribute("src");
const imgId = node.getAttribute("id");
const imgType = node.getAttribute("type");
if (imgType === "aov") {
inputMsgData.value.push({ id: imgId, type: "aov" });
}
// 说明是普通文件
else if (imgId) {
inputMsgData.value.push({ id: imgId });
} else {
// 处理图片节点...
inputMsgData.value.push({ url: imgSrc });
}
}
// 换行节点
else if (node.nodeType === Node.ELEMENT_NODE && node.tagName === "BR") {
inputMsgData.value.push("\n");
}
// 如果是a标签
else if (node.nodeType === Node.ELEMENT_NODE && node.tagName === "A") {
if (filterSpanChildren && filterSpanChildren.length > 1 && i > 0) {
// 如果上一个节点是@或者文本节点,那么拼上去,不需要添加了
if (
filterSpanChildren[i - 1].nodeType === Node.TEXT_NODE ||
(filterSpanChildren[i - 1].nodeType === Node.ELEMENT_NODE &&
filterSpanChildren[i - 1].tagName === "A")
) {
inputMsgData.value[inputMsgData.value.length - 1] +=
" " + `@${node.getAttribute("nickName")}`;
} else {
inputMsgData.value.push(`@${node.getAttribute("nickName")}`);
}
} else {
inputMsgData.value.push(`@${node.getAttribute("nickName")}`);
}
currentAtUserList.value.push(node.getAttribute("nickName"));
}
else if (
node.nodeType === Node.ELEMENT_NODE &&
(node.tagName === "DIV" || node.tagName === "P")
) {
const divContent = node.innerHTML;
// 处理div节点...
if (isPlainText(divContent)) {
inputMsgData.value.push("\n");
inputMsgData.value.push(divContent);
} else {
loopChildren(node.childNodes);
}
}
}
}

信息处理

1
2
3
4
5
6
7
8
9
10
11
12
13
14
15
16
17
18
19
20
21
22
23
24
25
26
27
28
29
30
31
// 导出内容
const exportMsgData=()=>{
inputMsgData.value = [];
currentAtUserList.value = [];
const curEditor = document.getElementById(editorKey);
const children = curEditor?.childNodes;
if (!children) {
return;
}
loopChildren(children);
const filterData = inputMsgData.value.filter((item) => {
return item !== "\n" && Boolean(item);
});
const newData: ExportMsg[] = [];
filterData.forEach((item, index) => {
if (index === 0) {
newData.push(item);
} else {
if (
typeof item === "string" &&
typeof filterData[index - 1] === "string"
) {
newData[newData.length - 1] =
newData[newData.length - 1] + "\n" + item;
} else {
newData.push(item);
}
}
});
console.log(newData)
}

效果图

此时,我们已经将数据给导出了
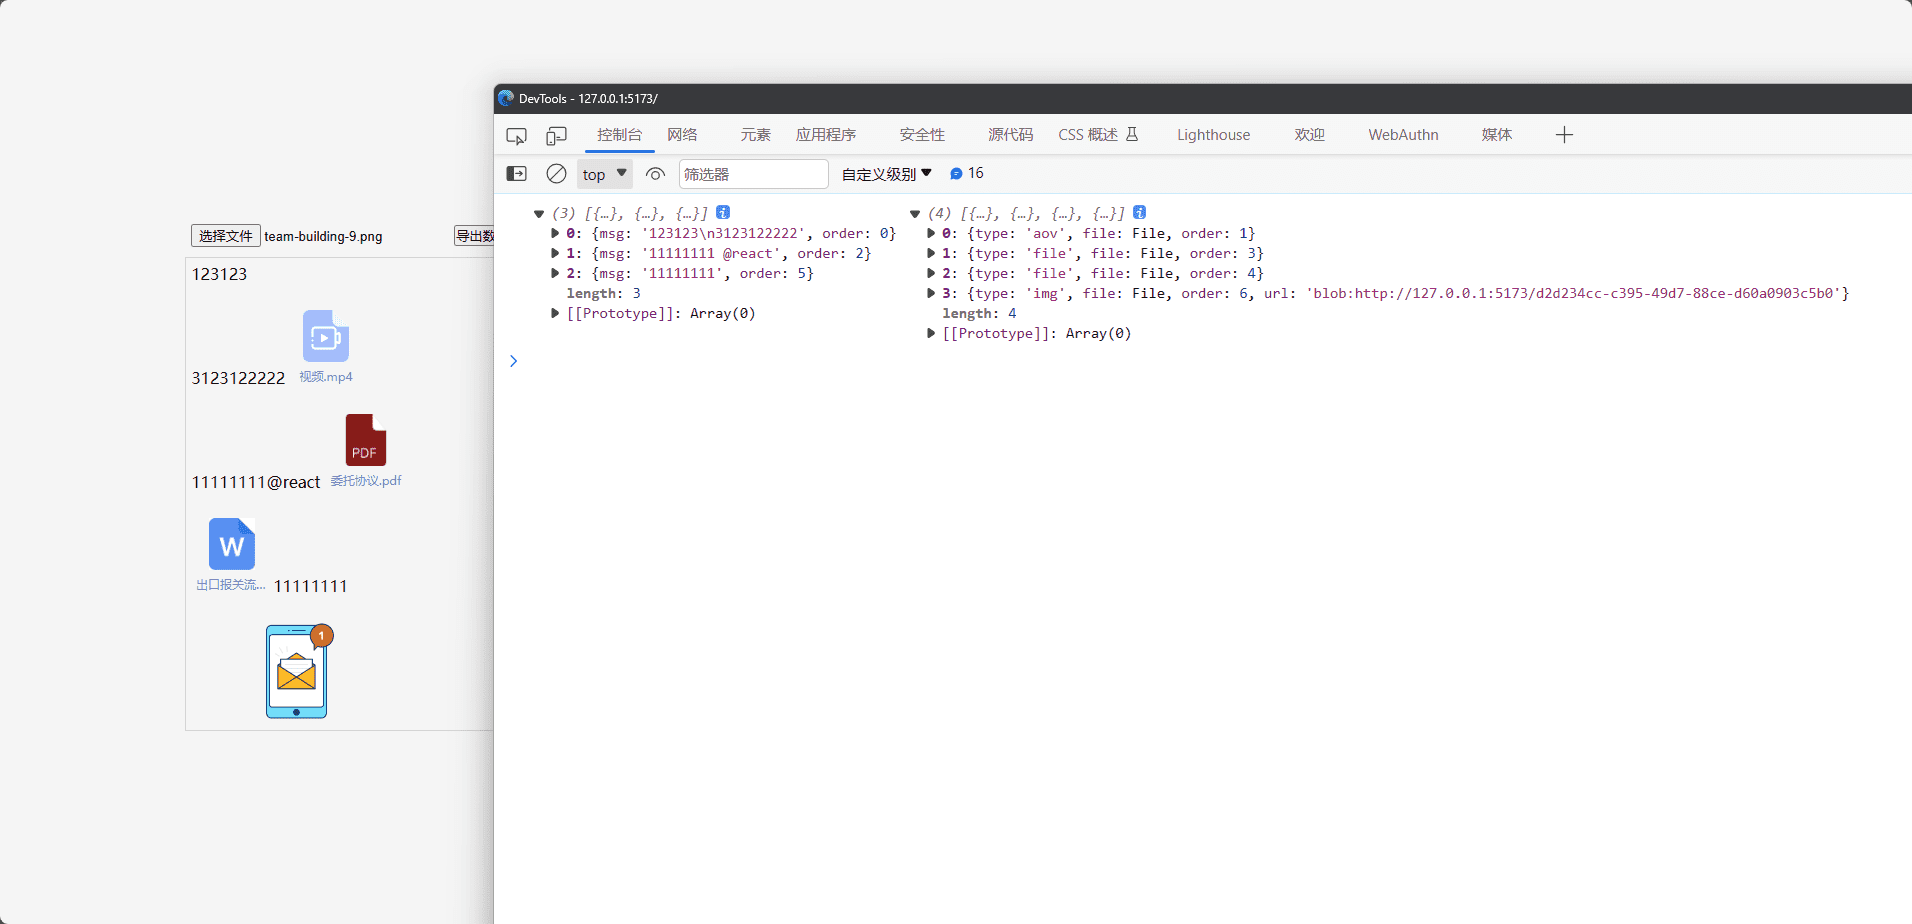
ok,接下来我们将文件和图片的数据对应成file

1
2
3
4
5
6
7
8
9
10
11
12
13
14
15
16
17
18
19
20
21
22
23
24
25
26
27
28
let msgData:{msg:string;order:number}[]=[]
let needUploadFile:{type:'aov'|'img'|'file',file:File,order:number,url?:string}[]=[]
newData.forEach((item, index) => {
if (typeof item === "string") {
msgData.push({
msg: item,
order: index,
})
} else {
// 说明是图片
if (item.url) {
needUploadFile.push({
type:'img',
file: imgMap.value[item.url],
order: index,
url:item.url
})
} else if (item.id) {
const fileType = item.type ? 'aov' : 'file';
needUploadFile.push({
type: fileType,
file: fileImageMap.value[item.id],
order: index,
});
}
}
});
console.log(msgData,needUploadFile)

效果图
此时,我们的数据就算正式导出了

上一篇:
【可视化学习】46-cannon-es的简单使用(一)
下一篇:
编辑器组件封装(一)