前言
前段时间在重构公司一个项目,进度又催的比较紧,就一直在加班,加上有点感冒,挺难受的,就挺久没更新了,昨天开始进行项目收尾的部分,开始闲暇了下来,当然感冒还没完全好,身子骨太弱了,该锻炼锻炼。好了,闲话就不多说了,今天就给大家讲解下IntersectionObserver的使用,这个API是用来监听元素是否进入可视区域的,可以用来实现各种滚动监听效果,比如懒加载,无限滚动,吸顶等等。
API使用解读
这个API的使用非常简单,只需要两步就可以实现监听效果,首先我们需要创建一个IntersectionObserver对象,然后调用observe方法,传入需要监听的元素,就可以实现监听效果了,下面我们就来看看这个API的使用方法:
使用结构
是以new的形式声明一个对象,接收两个参数callback和options
1
2
| const io = new IntersectionObserver(callback, options)
io.observe(DOM)
|
1
2
3
4
5
6
7
8
9
10
| const options = {
root: null,
rootMargin: 10,
thresholds: 1,
}
const io = new IntersectionObserver(entries => {
console.log(entries)
}, options)
|
参数解读
callback
callback是一个回调函数,当被监听的元素进入可视区域时,会触发这个回调函数,这个回调函数接收一个参数entries,entries是一个数组,里面包含了所有被监听的元素的信息,每个元素都是一个IntersectionObserverEntry对象,这个对象包含了很多信息,我们可以通过这个对象来判断元素是否进入了可视区域,下面我们就来看看这个对象的属性和方法
| 属性 |
说明 |
| boundingClientRect |
返回包含目标元素的边界信息,返回结果与element.getBoundingClientRect() 相同 |
| intersectionRatio |
返回目标元素出现在可视区的比例 |
| intersectionRect |
用来描述root和目标元素的相交区域 |
| isIntersecting |
返回一个布尔值,下列两种操作均会触发callback:1. 如果目标元素出现在root可视区,返回true。2. 如果从root可视区消失,返回false |
| rootBounds |
用来描述交叉区域观察者(intersection observer)中的根. |
| target |
目标元素:与根出现相交区域改变的元素 (Element) |
| time |
返回一个记录从 IntersectionObserver 的时间原点到交叉被触发的时间的时间戳 |
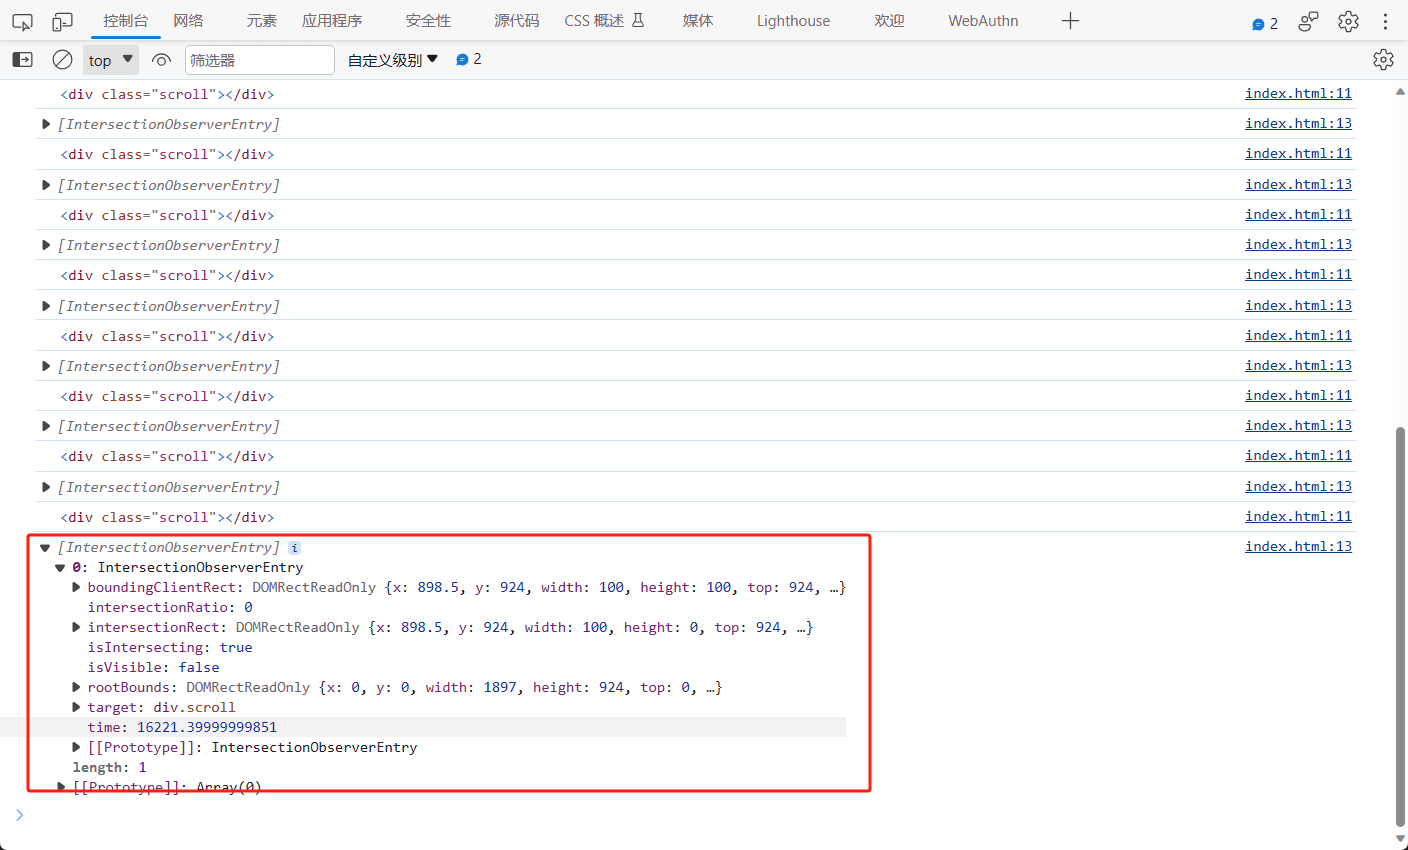
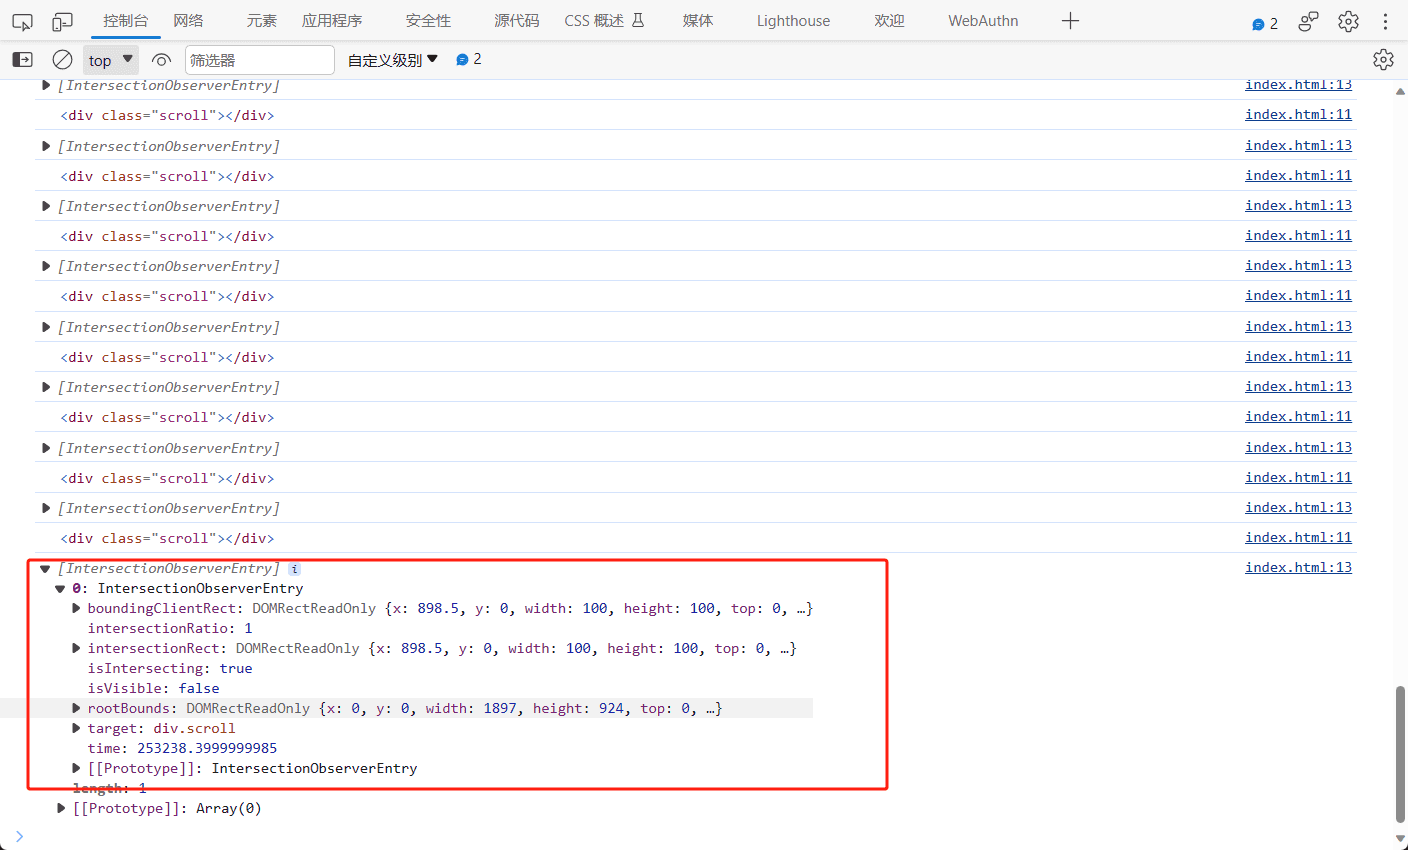
我这里写了一个demo,这个scroll默认显示在第二个100vh的顶部,也就是我可以设置他完全看得见或者完全看不见
1
2
3
4
5
6
7
8
9
10
11
12
13
14
15
16
17
18
19
20
21
22
23
24
25
26
27
28
29
30
31
32
33
34
35
36
37
38
39
40
41
42
43
44
45
46
47
| <!DOCTYPE html>
<html lang="en">
<head>
<meta charset="UTF-8">
<meta name="viewport" content="width=device-width, initial-scale=1.0">
<title>测试</title>
</head>
<script type="text/javascript">
function observe(){
const dom=document.querySelector('.scroll')
console.log(dom)
const io = new IntersectionObserver(entries => {
console.log(entries)
})
io.observe(dom)
}
window.addEventListener("scroll",observe);
</script>
<style>
*{
margin:0;
padding: 0;
}
.wrapper {
width: 100%;
height: 200vh;
background-color: #000;
display: flex;
align-items: center;
justify-content: center;
}
.scroll {
width: 100px;
height: 100px;
background-color: #fff;
transform:translateY(50px)
}
</style>
<body>
<div class="wrapper">
<div class="scroll"></div>
</div>
</body>
</html>
|


可以看到我们完全没显示的时候intersectionRatio为0
完全显示的时候

ok,接下来的属性我们就过一下,就不用案例截图展示了
options
options是一个对象,用来配置参数,也可以不填。共有三个属性,具体如下:
| 属性 |
说明 |
| root |
所监听对象的具体祖先元素。如果未传入值或值为null,则默认使用顶级文档的视窗(一般为html)。 |
| rootMargin |
计算交叉时添加到根(root)边界盒bounding box的矩形偏移量, 可以有效的缩小或扩大根的判定范围从而满足计算需要。所有的偏移量均可用像素(px)或百分比(%)来表达, 默认值为”0px 0px 0px 0px”。 |
| threshold |
一个包含阈值的列表, 按升序排列, 列表中的每个阈值都是监听对象的交叉区域与边界区域的比率。当监听对象的任何阈值被越过时,都会触发callback。默认值为0。 |
方法
| 方法 |
说明 |
| observe |
开始观察指定的DOM元素 |
| unobserve |
停止观察指定的DOM元素 |
| disconnect |
停止观察所有的DOM元素 |
| takeRecords |
返回所有观察目标的IntersectionObserverEntry对象数组 |
应用
图片懒加载
我写了这样一个简单的案例,设置了一个full-screen的高度为100vh,那么此时我的图片就会在第二页
当检测到图片dom进入视口的时候,我的图片才会进行加载的代码
1
2
3
4
5
6
7
8
9
10
11
12
13
14
15
16
17
18
19
20
21
22
23
24
25
26
27
28
29
30
31
32
33
34
35
36
37
38
39
40
41
42
43
44
45
46
47
48
49
50
51
52
53
54
55
56
57
58
59
60
| <!DOCTYPE html>
<html lang="en">
<head>
<meta charset="UTF-8">
<meta name="viewport" content="width=device-width, initial-scale=1.0">
<title>测试懒加载</title>
</head>
<style>
*{
margin:0;
padding: 0;
}
.full-screen{
height:100vh;
}
</style>
<body>
<div class="wrapper">
<div class="full-screen"></div>
<div class="img-list">
<div>
<img style="width:200px;" data-src="./assets/img/1.jpg" alt="">
</div>
<div>
<img style="width:200px" data-src="./assets/img/2.jpg" alt="">
</div>
<div>
<img style="width:200px" data-src="./assets/img/3.jpg" alt="">
</div>
</div>
</div>
</body>
<script type="text/javascript">
const imgList = [...document.querySelectorAll('img')]
var io = new IntersectionObserver((entries) =>{
entries.forEach(entrie=> {
if (entrie.isIntersecting&& entrie.intersectionRatio > 0) {
const img = entrie.target;
const src = img.getAttribute('data-src');
img.setAttribute('src', src);
img.removeAttribute('data-src');
io.unobserve(img)
}
})
}, {
root:null,
rootMargin: '0px',
threshold: 0.1
})
imgList.forEach(img => io.observe(img))
</script>
</html>
|
此时我们可以看到页面一开始并没有加载图片,当图片进入视口的时候,图片才会进行加载,这样就可以实现图片懒加载了,这样的好处就是可以减少页面的加载时间,提高用户体验。
埋点曝光
简单来说就是当我们某个东西完全暴露出来的时候才执行某个事件
1
2
3
4
5
6
7
8
9
10
11
12
13
14
15
16
17
18
19
20
21
22
23
24
25
26
27
28
29
30
31
32
33
34
35
36
37
38
39
40
41
42
43
44
45
46
47
48
49
50
51
52
53
54
55
56
57
| <!DOCTYPE html>
<html lang="en">
<head>
<meta charset="UTF-8">
<meta name="viewport" content="width=device-width, initial-scale=1.0">
<title>埋点曝光</title>
</head>
<style>
*{
margin:0;
padding: 0;
}
.full-screen{
height:100vh;
}
.box{
height: 100px;
width: 100px;
background-color: red;
}
</style>
<body>
<div class="wrapper">
<div class="full-screen"></div>
<div class="listData">
<div class="box">
</div>
</div>
</div>
</body>
<script type="text/javascript">
const box=document.querySelector('.box');
var io = new IntersectionObserver((entries) =>{
entries.forEach((item) => {
if(item.intersectionRatio===1){
console.log('曝光了');
io.unobserve(item.target)
}
})
}, {
root:null,
rootMargin: '0px',
threshold: 1
})
io.observe(box)
</script>
</html>
|
结语
通过这个属性我们还有很多其他的操作,比如虚拟滚动啊,比如某些官网的动画啊之类的,都可以借助这个方法来实现,这里就不一一列举了,我就负责抛砖引玉,大家可以自己去尝试一下。


