前言
大家好啊,12月了,这个月我想着尽量多学一点,多写一点,多分享一点,能够将2023年更加充实一点,不留遗憾。本文主要详细讲解如何使用three.js实现3D动画,这个我在之前很多的文章中都有提到,但是都是一笔带过,这次我想着详细讲解一下,方便大家更好地理解我之前文章中的内容。话不多说,我们开始吧。
小试牛刀-动画模型导入
其实我们很多的动画都是可以通过我们的建模软件来进行完成,之后再导入模型之后,我们进行使用即可,比如这样一个动画,我们在blender中制作好关键的动画帧之后就可以使用,下面我们先带大家一起来导入这个模型,再进行动画的播放。
blender动画
首先我们先来看一下我们的动画效果,这些动画一般都是建模小姐姐完成的,我们只需要调用即可。
初始化代码导入模型
这块就不具体说了,能看我博客的都是大佬,有3d基础的,直接上代码吧。
1
2
3
4
5
6
7
8
9
10
11
12
13
14
15
16
17
18
19
20
21
22
23
24
25
26
27
28
29
30
31
32
33
34
35
36
37
38
39
40
41
42
43
44
45
46
47
48
49
50
51
52
53
54
55
56
57
58
59
60
61
62
63
64
65
66
67
68
69
70
71
72
73
74
75
76
77
78
79
80
81
82
83
84
85
86
87
88
89
90
91
92
93
94
95
96
97
98
99
100
101
102
103
104
|
import * as THREE from "three";
import { OrbitControls } from "three/examples/jsm/controls/OrbitControls.js";
import { GUI } from "three/examples/jsm/libs/lil-gui.module.min.js";
import { RGBELoader } from "three/examples/jsm/loaders/RGBELoader.js";
import { GLTFLoader } from "three/examples/jsm/loaders/GLTFLoader.js";
import { DRACOLoader } from "three/examples/jsm/loaders/DRACOLoader.js";
const scene = new THREE.Scene();
const camera = new THREE.PerspectiveCamera(
45,
window.innerWidth / window.innerHeight,
0.1,
1000
);
const renderer = new THREE.WebGLRenderer({
antialias: true,
});
renderer.shadowMap.enabled = true;
renderer.toneMapping = THREE.ReinhardToneMapping;
renderer.toneMappingExposure = 1;
renderer.setSize(window.innerWidth, window.innerHeight);
document.body.appendChild(renderer.domElement);
camera.position.z = 8;
camera.position.y = 2.5;
camera.position.x = 3;
camera.lookAt(0, 1.2, 0);
const axesHelper = new THREE.AxesHelper(5);
scene.add(axesHelper);
const gridHelper = new THREE.GridHelper(50, 50);
gridHelper.material.opacity = 0.3;
gridHelper.material.transparent = true;
scene.add(gridHelper);
const controls = new OrbitControls(camera, renderer.domElement);
controls.enableDamping = true;
function animate() {
controls.update();
requestAnimationFrame(animate);
renderer.render(scene, camera);
}
animate();
window.addEventListener("resize", () => {
renderer.setSize(window.innerWidth, window.innerHeight);
camera.aspect = window.innerWidth / window.innerHeight;
camera.updateProjectionMatrix();
});
let rgbeLoader = new RGBELoader();
rgbeLoader.load("./texture/Alex_Hart-Nature_Lab_Bones_2k.hdr", (envMap) => {
envMap.mapping = THREE.EquirectangularRefractionMapping;
scene.background = new THREE.Color(0xcccccc);
scene.environment = envMap;
});
const gltfLoader = new GLTFLoader();
const dracoLoader = new DRACOLoader();
dracoLoader.setDecoderPath("./draco/");
gltfLoader.setDRACOLoader(dracoLoader);
gltfLoader.load(
"./model/huawei.glb",
(gltf) => {
console.log(gltf);
scene.add(gltf.scene);
}
);
|
gltf内容介绍


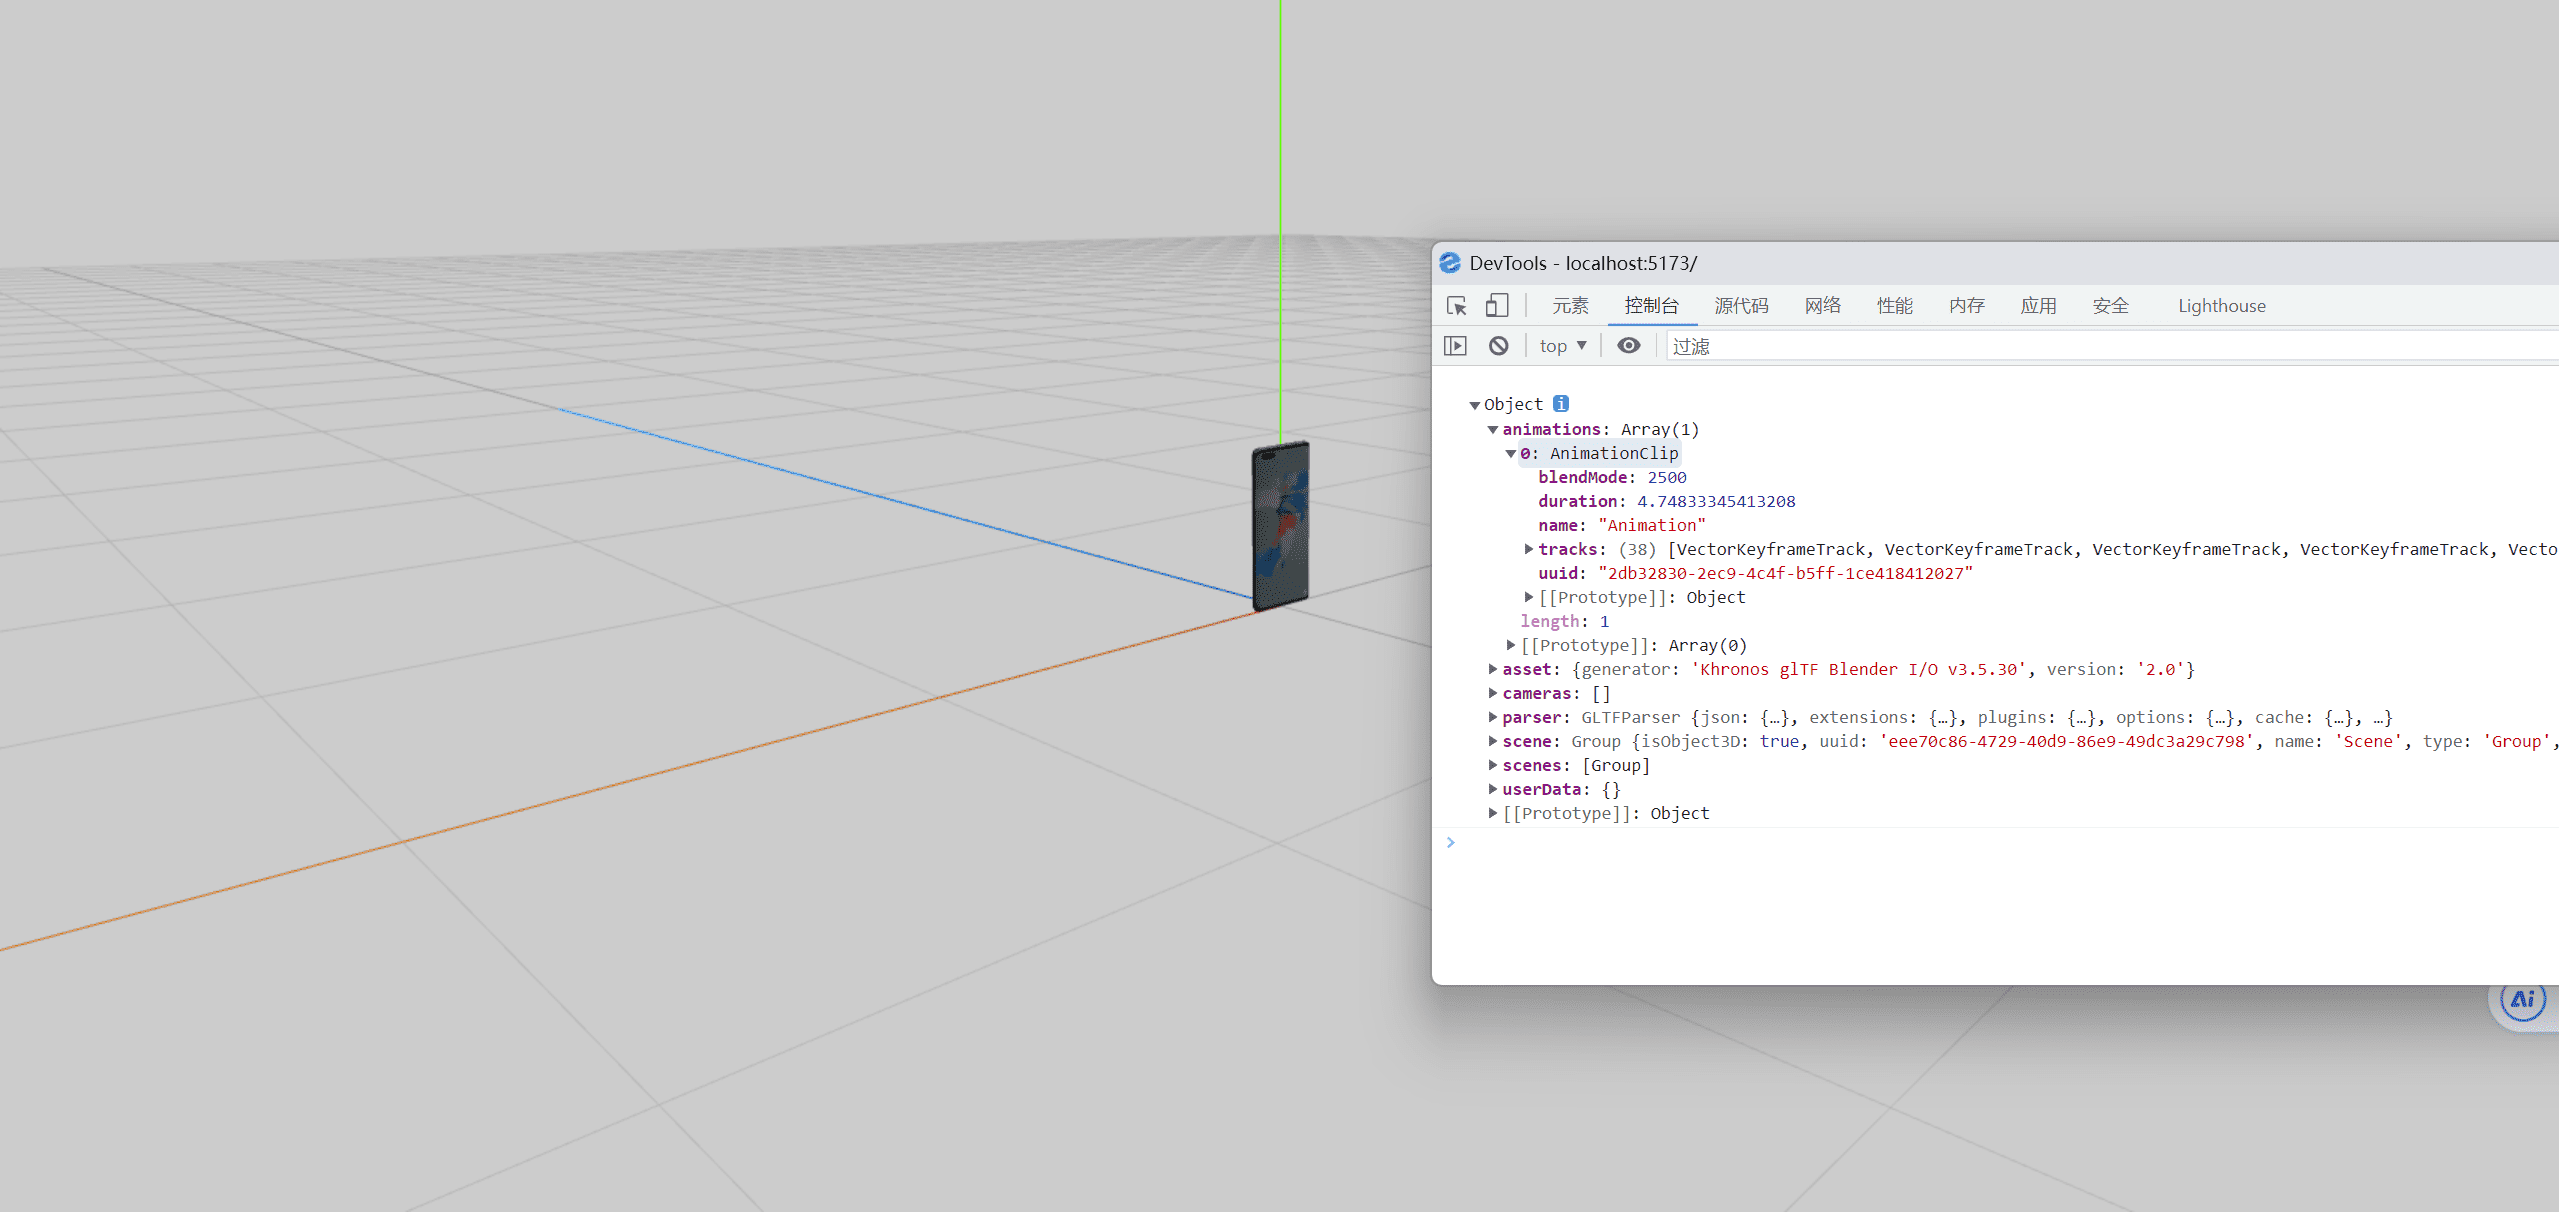
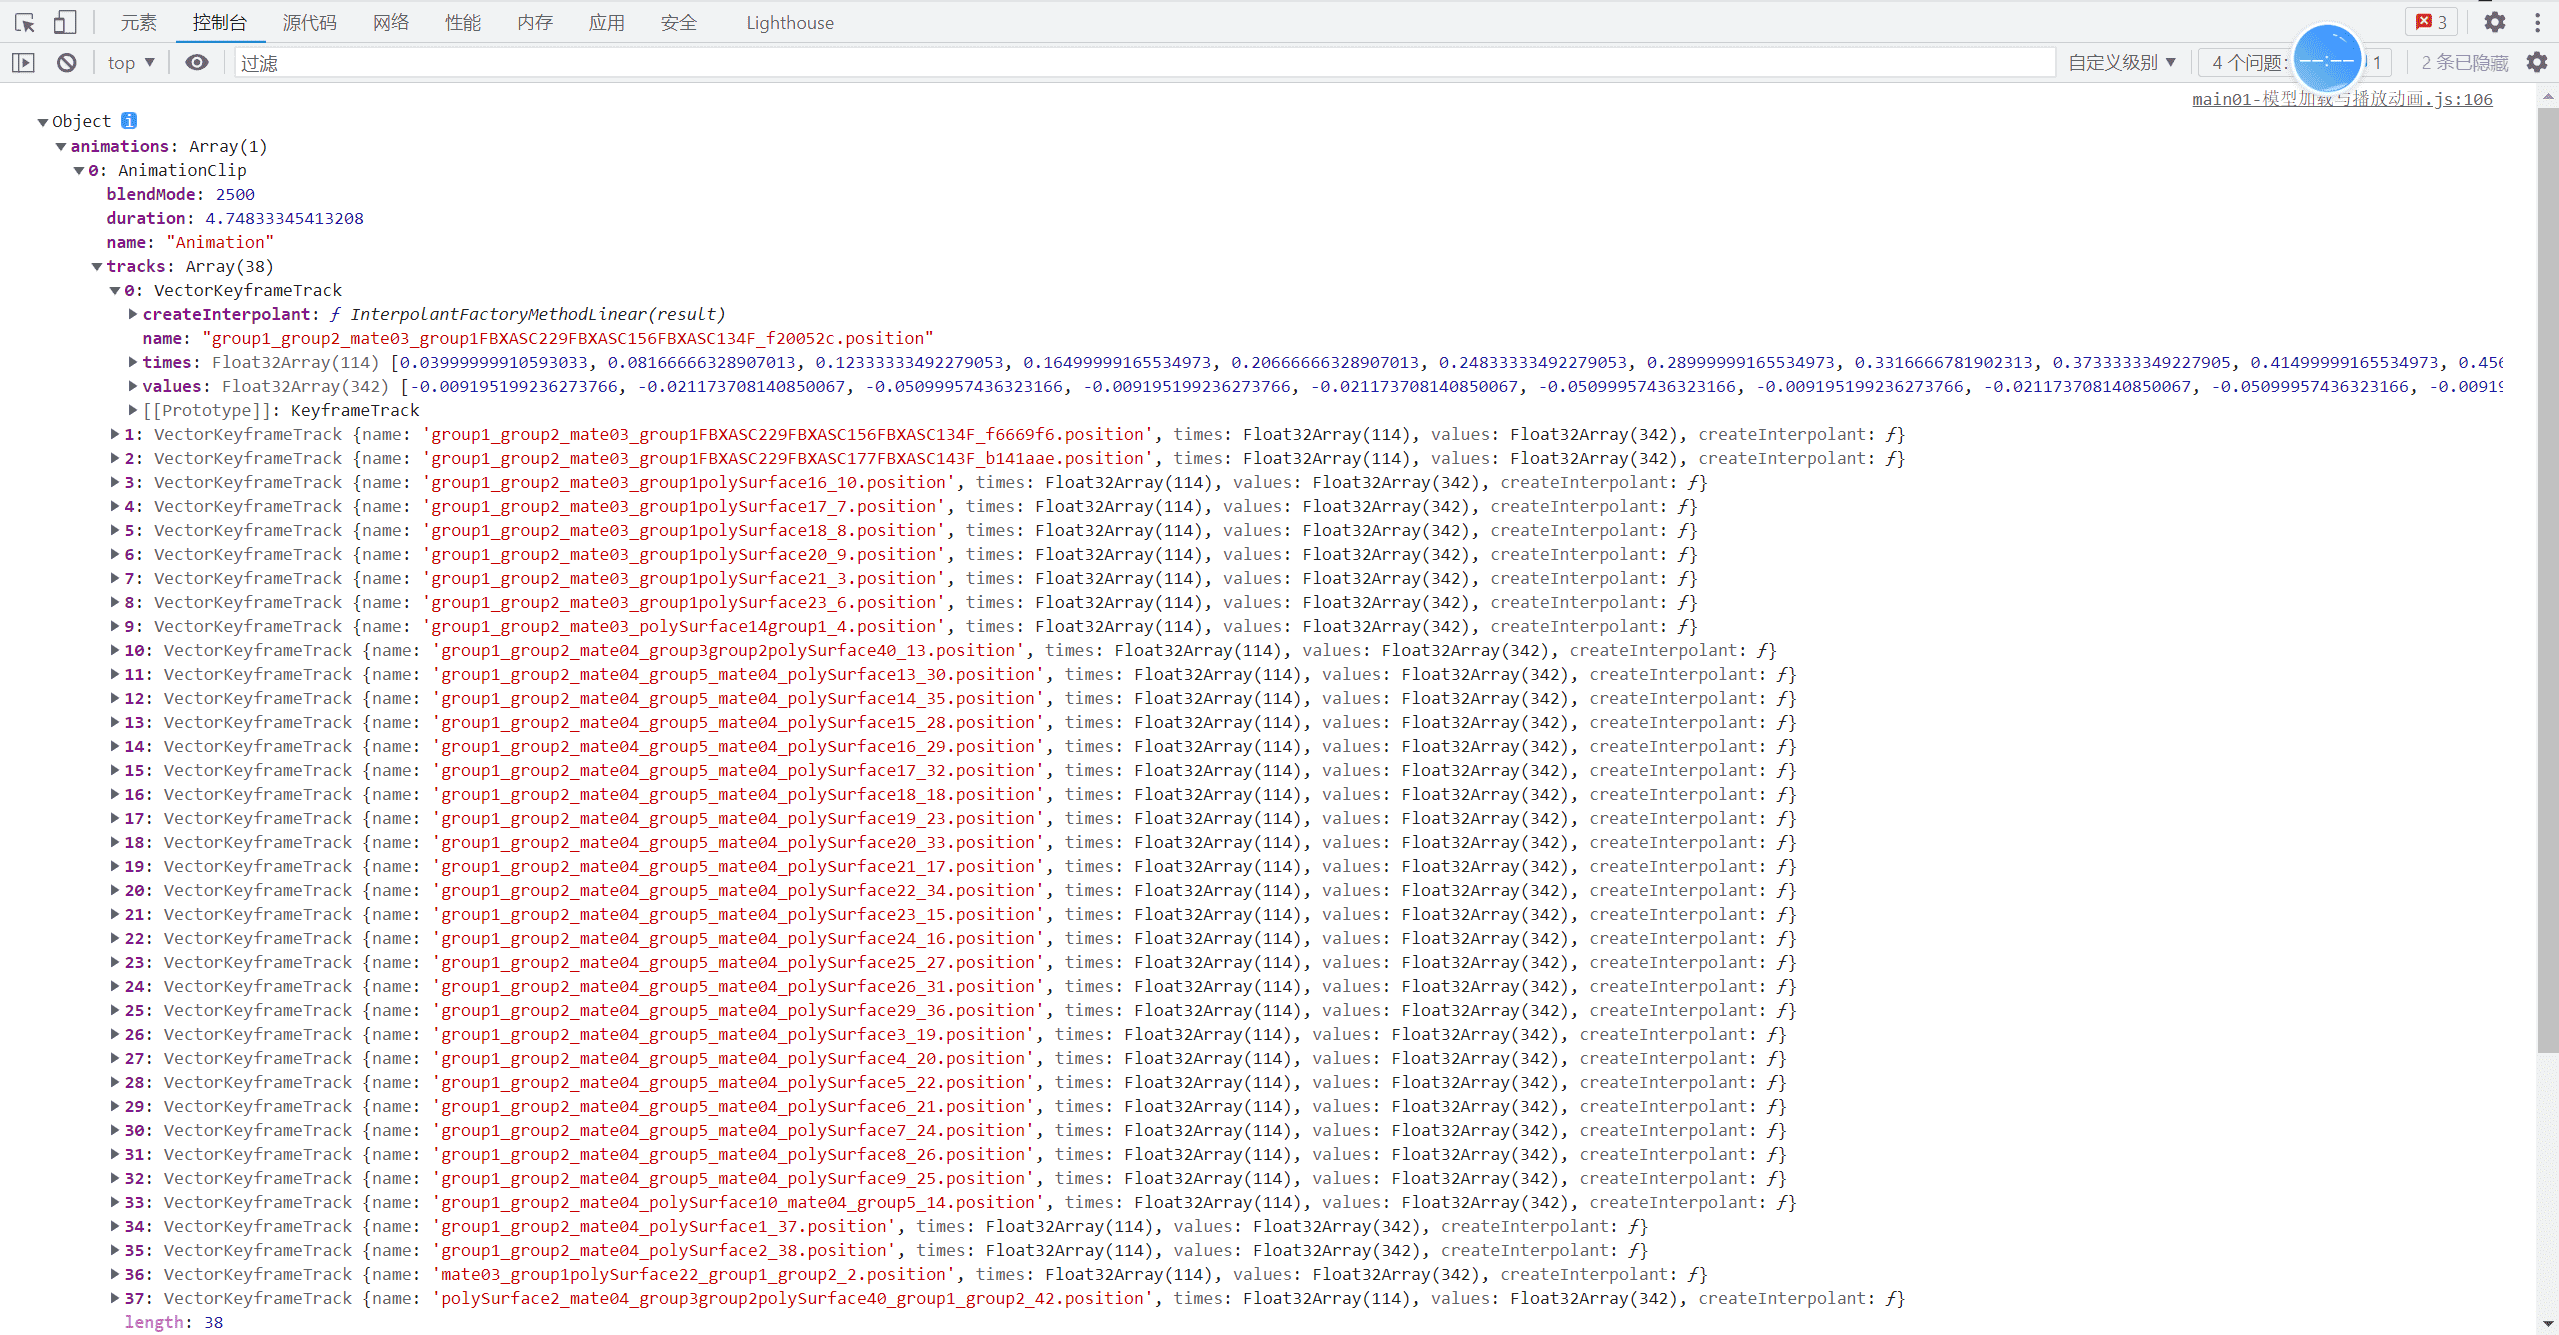
从上面这张图我们可以看到我们的gltf导入之后有一个animation,这个就是动画的数组,可以放置多个动画,AnimationClip就是我们的动画剪辑对象,tracks是我们的轨道集,里面含有的每一个对象VectorKeyframeTrack都是我们的向量关键帧,times是我们的时间点,values是我们对应时间这个点位该在的位置,因为我们的是三维坐标所以是三个值,times和values的长度刚好是1:3的关系
动画播放
创建动画混合器-获取动画-播放动画
1
2
3
4
5
6
7
8
9
10
11
12
13
14
15
16
|
gltfLoader.load(
"./model/huawei.glb",
(gltf) => {
console.log(gltf);
scene.add(gltf.scene);
mixer = new THREE.AnimationMixer(gltf.scene);
const action = mixer.clipAction(gltf.animations[0]);
action.play();
}
);
|
动画更新
这样我们还是无法看到动画的效果,因为我们还没有更新动画,我们需要在渲染函数中更新动画,这样才能看到动画的效果。
1
2
3
4
5
6
7
8
9
10
11
12
| let mixer;
let clock = new THREE.Clock();
function animate() {
let delta = clock.getDelta();
controls.update();
mixer&&mixer.update(delta);
requestAnimationFrame(animate);
renderer.render(scene, camera);
}
animate();
|
three.js设置keyframe实现位移动画
当然,一些简单的动画我们完全可以使用threejs自带的关键帧来实现,这样我们就不需要使用建模软件来进行制作了,我们直接使用代码来实现即可,下面我们就来看一下如何使用threejs来实现关键帧动画。
创建立方体
在这里我们之前的代码不动,就改一下导入模型那块代码,改成我们自己写动画即可。
1
2
3
4
5
6
7
8
|
const geometry = new THREE.BoxGeometry(1, 1, 1);
const material = new THREE.MeshStandardMaterial({
color: 0xff33ff,
});
const cube = new THREE.Mesh(geometry, material);
cube.name = "cube";
scene.add(cube);
|
创建关键帧动画
这里有三个参数,第一个就是名称的前缀,第二个是时间点,第三个是值,这里我们的时间点是0-4,分别对应的值是【0,0,0】,【2,0,0】,【4,0,0】,【2,0,0】,【0,0,0】,这里的值是三维坐标,所以是15个值,这里的时间点和值的长度是1:3的关系,这里的时间点是秒,所以我们的动画时长是4秒。
1
2
3
4
5
6
7
8
9
10
11
12
|
const positionKF = new THREE.VectorKeyframeTrack(
"cube.position",
[0, 1, 2, 3, 4],
[0, 0, 0, 2, 0, 0, 4, 0, 0, 2, 0, 0, 0, 0, 0]
);
mixer = new THREE.AnimationMixer(cube);
const clip = new THREE.AnimationClip("move", 4, [positionKF]);
const action = mixer.clipAction(clip);
action.play();
|
实现旋转动画
我们基于上面的位移代码不要动,往上面添加我们的旋转关键帧动画
使用欧拉角实现旋转
这里我定义了三个欧拉角,分别是【0,0,0】,【Math.PI,0,0】,【0,0,0】,这里的欧拉角是弧度制,所以我们的第二个欧拉角是180度。Euler这个有四个参数,分别是x,y,z,order,这里的order是我们的旋转顺序,我们这里使用的是xyz,所以我们的旋转顺序是先绕x轴旋转,再绕y轴旋转,最后绕z轴旋转。
1
2
3
4
5
6
7
8
9
10
11
12
13
14
15
16
17
18
19
20
21
22
| const quaternion1 = new THREE.Quaternion();
quaternion1.setFromEuler(new THREE.Euler(0, 0, 0));
const quaternion2 = new THREE.Quaternion();
quaternion2.setFromEuler(new THREE.Euler(Math.PI, 0, 0));
const quaternion3 = new THREE.Quaternion();
quaternion3.setFromEuler(new THREE.Euler(0, 0, 0));
console.log(quaternion1, quaternion2, quaternion3);
const finQ = quaternion1
.toArray()
.concat(quaternion2.toArray())
.concat(quaternion3.toArray());
console.log(finQ);
const rotationKF = new THREE.QuaternionKeyframeTrack(
"cube.quaternion",
[0, 2, 4],
finQ
);
const clip = new THREE.AnimationClip("move", 4, [positionKF, rotationKF]);
|
使用四元数
当然这里我们还可以用另外一种方式来实现
1
2
3
4
5
6
| const quaternion1 = new THREE.Quaternion();
quaternion1.setFromAxisAngle(new THREE.Vector3(1, 0, 0), 0);
const quaternion2 = new THREE.Quaternion();
quaternion2.setFromAxisAngle(new THREE.Vector3(1, 0, 0), Math.PI);
const quaternion3 = new THREE.Quaternion();
quaternion3.setFromAxisAngle(new THREE.Vector3(1, 0, 0), 0);
|
这样实现起来也是一样的,这里的第一个参数是我们的旋转轴,第二个参数是我们的旋转角度,这里的旋转轴是单位向量,所以我们这里的旋转轴是x轴,旋转角度是0,180,0,这样我们就可以实现旋转了。效果和上面的欧拉角实现是一样的。
布尔关键帧实现闪烁动画
我们接下来导入个模型,然后实现一个闪烁的动画。
1
2
3
4
5
6
7
8
9
10
11
12
13
14
15
16
17
18
19
20
21
22
23
24
|
gltfLoader.load(
"./model/moon.glb",
(gltf) => {
console.log(gltf);
scene.add(gltf.scene);
mixer1 = new THREE.AnimationMixer(gltf.scene);
const boolKF = new THREE.BooleanKeyframeTrack(
"Sketchfab_Scene.visible",
[0, 1, 2, 3, 4],
[true, false, true, false, true]
);
const clip = new THREE.AnimationClip("bool", 4, [boolKF]);
const action1 = mixer1.clipAction(clip);
action1.play();
}
);
|
颜色关键帧动画
ok,我们先将那个月球给去掉,来看看颜色关键帧动画的效果
1
2
3
4
5
6
7
8
9
10
11
12
|
const colorKF = new THREE.ColorKeyframeTrack(
"cube.material.color",
[0, 2, 4],
[1, 0, 1, 1, 1, 0, 1, 0, 1]
);
const clip = new THREE.AnimationClip("move", 4, [
positionKF,
rotationKF,
colorKF,
]);
|
数值动画
这里我们修改下物体的透明度,可能效果不是很明显,大家可以仔细看
1
2
3
4
5
6
7
8
9
10
11
12
| const opacityKF = new THREE.NumberKeyframeTrack(
"cube.material.opacity",
[0, 1, 2, 3, 4],
[1, 0, 1, 0, 1]
);
const clip = new THREE.AnimationClip("move", 4, [
positionKF,
rotationKF,
colorKF,
opacityKF
]);
|
控制模型丝滑切换动作
导入模型
首先我们导入一个有多个动作的模型
1
2
3
4
5
6
7
8
9
10
11
|
gltfLoader.load(
"./model/hilda_regular_00.glb",
(gltf) => {
console.log(gltf);
let girl = gltf.scene;
scene.add(gltf.scene);
}
);
|

定义动作
这里我导入了模型中的走路,跑步,站立,打招呼,摆pos的动作,设置了当前动作currentAction为站立动作,添加了timeScale的控制,这个是动画的播放速度,我们可以通过这个来控制动画的播放速度,相当于倍速,如果为负数,就是动画反过来。
1
2
3
4
5
6
7
8
9
10
11
12
13
14
15
16
17
18
19
20
21
22
23
| let walkAction, runAction, posAction, greetAction, idleAction;
let currentAction = null;
gltfLoader.load(
"./model/hilda_regular_00.glb",
(gltf) => {
console.log(gltf);
let girl = gltf.scene;
scene.add(gltf.scene);
mixer = new THREE.AnimationMixer(gltf.scene);
walkAction = mixer.clipAction(gltf.animations[37]);
runAction = mixer.clipAction(gltf.animations[27]);
idleAction = mixer.clipAction(gltf.animations[6]);
posAction = mixer.clipAction(gltf.animations[23]);
greetAction = mixer.clipAction(gltf.animations[0]);
currentAction = idleAction;
idleAction.play();
gui.add(mixer, "timeScale");
console.log(mixer);
}
);
|
添加事件切换和gui添加
这里其实很简单,就是添加事件,然后在事件中切换动作即可。
注意点就是我们每个动作都需要设置权重setEffectiveWeight,设置启用enabled,设置动画播放速度setEffectiveTimeScale,crossFadeTo用来过渡切换动作切换
1
2
3
4
5
6
7
8
9
10
11
12
13
14
15
16
17
18
19
20
21
22
23
24
25
26
27
28
29
30
31
32
33
34
35
36
37
38
39
40
41
42
43
44
45
46
47
48
49
50
51
52
53
54
55
56
57
58
59
60
|
const gui = new GUI();
let eventObj = {
stopAll: () => {
mixer.stopAllAction();
},
play: () => {
mixer._actions.forEach((action) => {
action.play();
});
},
playRun: () => {
runAction.enabled = true;
runAction.setEffectiveTimeScale(1);
runAction.setEffectiveWeight(1);
runAction.play();
currentAction.crossFadeTo(runAction, 0.5, true);
currentAction = runAction;
},
playWalk: () => {
walkAction.enabled = true;
walkAction.setEffectiveTimeScale(1);
walkAction.setEffectiveWeight(1);
walkAction.play();
currentAction.crossFadeTo(walkAction, 0.5, true);
currentAction = walkAction;
},
playGreet: () => {
greetAction.enabled = true;
greetAction.setEffectiveTimeScale(1);
greetAction.setEffectiveWeight(1);
greetAction.play();
currentAction.crossFadeTo(greetAction, 0.5, true);
currentAction = greetAction;
},
playIdle: () => {
idleAction.enabled = true;
idleAction.setEffectiveTimeScale(1);
idleAction.setEffectiveWeight(1);
idleAction.play();
currentAction.crossFadeTo(idleAction, 0.5, true);
currentAction = idleAction;
},
playPos: () => {
posAction.enabled = true;
posAction.setEffectiveTimeScale(1);
posAction.setEffectiveWeight(1);
posAction.play();
currentAction.crossFadeTo(posAction, 0.5, true);
currentAction = posAction;
},
};
gui.add(eventObj, "play");
gui.add(eventObj, "playRun");
gui.add(eventObj, "playWalk");
gui.add(eventObj, "playGreet");
gui.add(eventObj, "playIdle");
gui.add(eventObj, "playPos");
|
结语
好了,本篇关于动画的部分暂时就讲到这里,债见~


