前言
不知道大家是否遇到过那种菜单栏,就是挂在页面最顶部的,我想这种应该大家经常遇到,一般如果小屏其实我们都是变成一个按钮,点击之后再展开就行了,但是吧,有的时候就是内容太宽了,其实屏幕并不是很小导致的,这时候可以给菜单栏加上滚动效果来实现,本篇文章就给大家带来这一种思路。
简单绘制个页面
这里我先简单给大家绘制一个页面
1
2
3
4
5
6
7
8
9
10
11
12
13
14
15
16
17
18
19
20
21
22
23
24
25
26
27
28
29
30
31
32
33
34
35
36
37
38
39
40
41
42
43
44
45
46
47
48
49
50
51
52
53
54
55
56
| <template>
<t-head-menu v-model="menu2Value" theme="dark" height="120px">
<template #logo>
<img
height="28"
src="https://tdesign.gtimg.com/site/baseLogo-dark.png"
alt="logo"
/>
</template>
<t-menu-item :value="item" v-for="item in 16" :key="item">
菜单{{ item }}
</t-menu-item>
<template #operations>
<div class="t-demo-menu--dark">
<t-button variant="text" shape="square">
<template #icon><t-icon name="search" /></template>
</t-button>
<t-button variant="text" shape="square">
<template #icon><t-icon name="mail" /></template>
</t-button>
<t-button variant="text" shape="square">
<template #icon><t-icon name="user" /></template>
</t-button>
<t-button variant="text" shape="square">
<template #icon><t-icon name="ellipsis" /></template>
</t-button>
</div>
</template>
</t-head-menu>
</template>
<script setup>
import { ref } from "vue";
const menu2Value = ref(1);
const changeHandler = (active) => {
console.log("change", active);
};
</script>
<style lang="less" scoped>
.t-menu__operations {
.t-button {
margin-left: 8px;
}
}
.t-demo-menu--dark {
.t-button {
color: #fff;
&:hover {
background-color: #4b4b4b;
border-color: transparent;
--ripple-color: #383838;
}
}
}
</style>
|
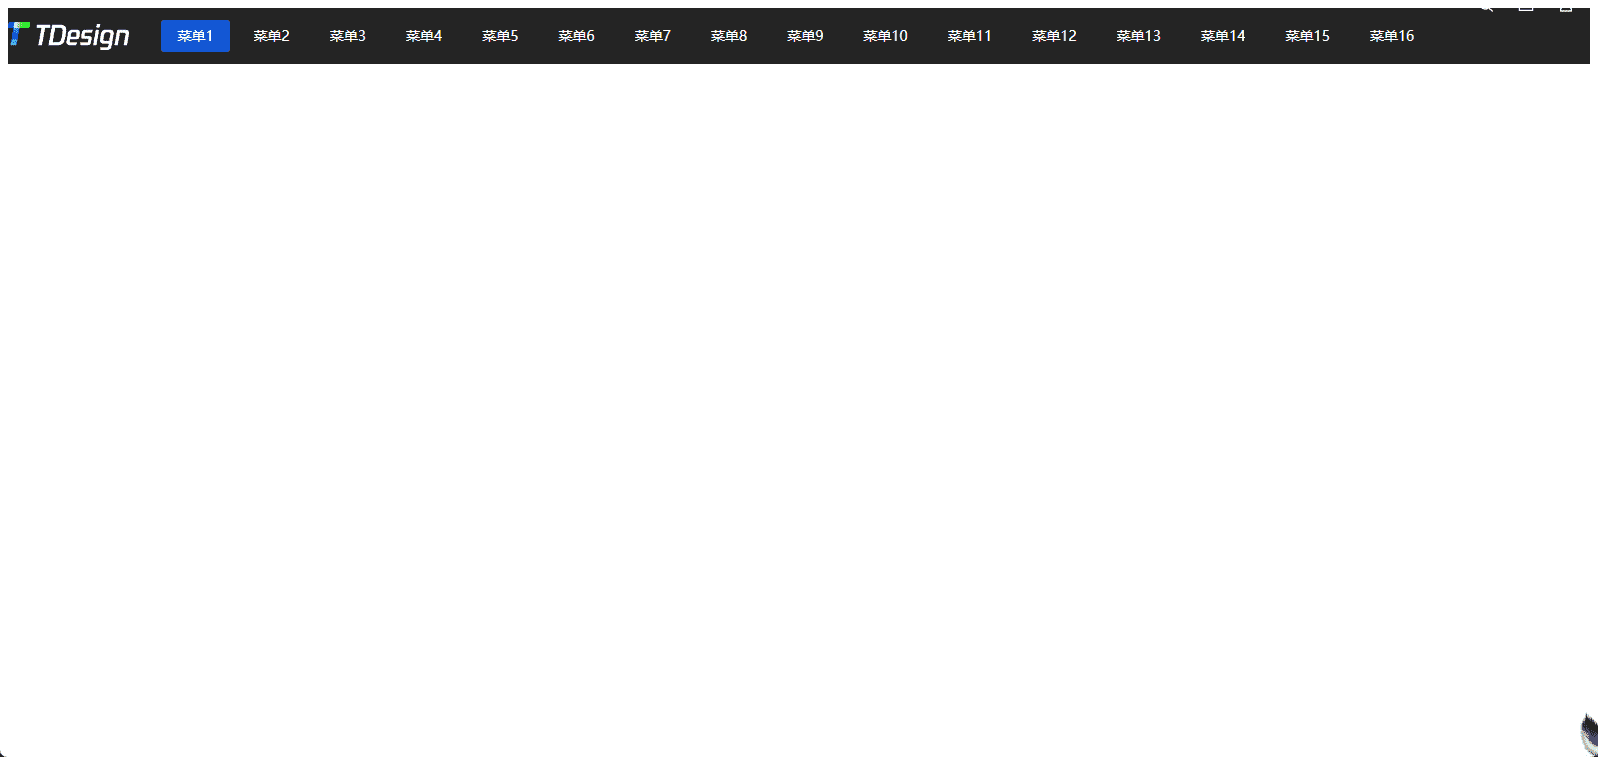
此时的页面效果如下图

bug 现象
这时候,我如果把屏幕缩小一点,就会出现问题,我们右边的样式出现了问题

解决方案
当屏幕变成一定大小的时候,将菜单栏进入滚动即可。
代码实现
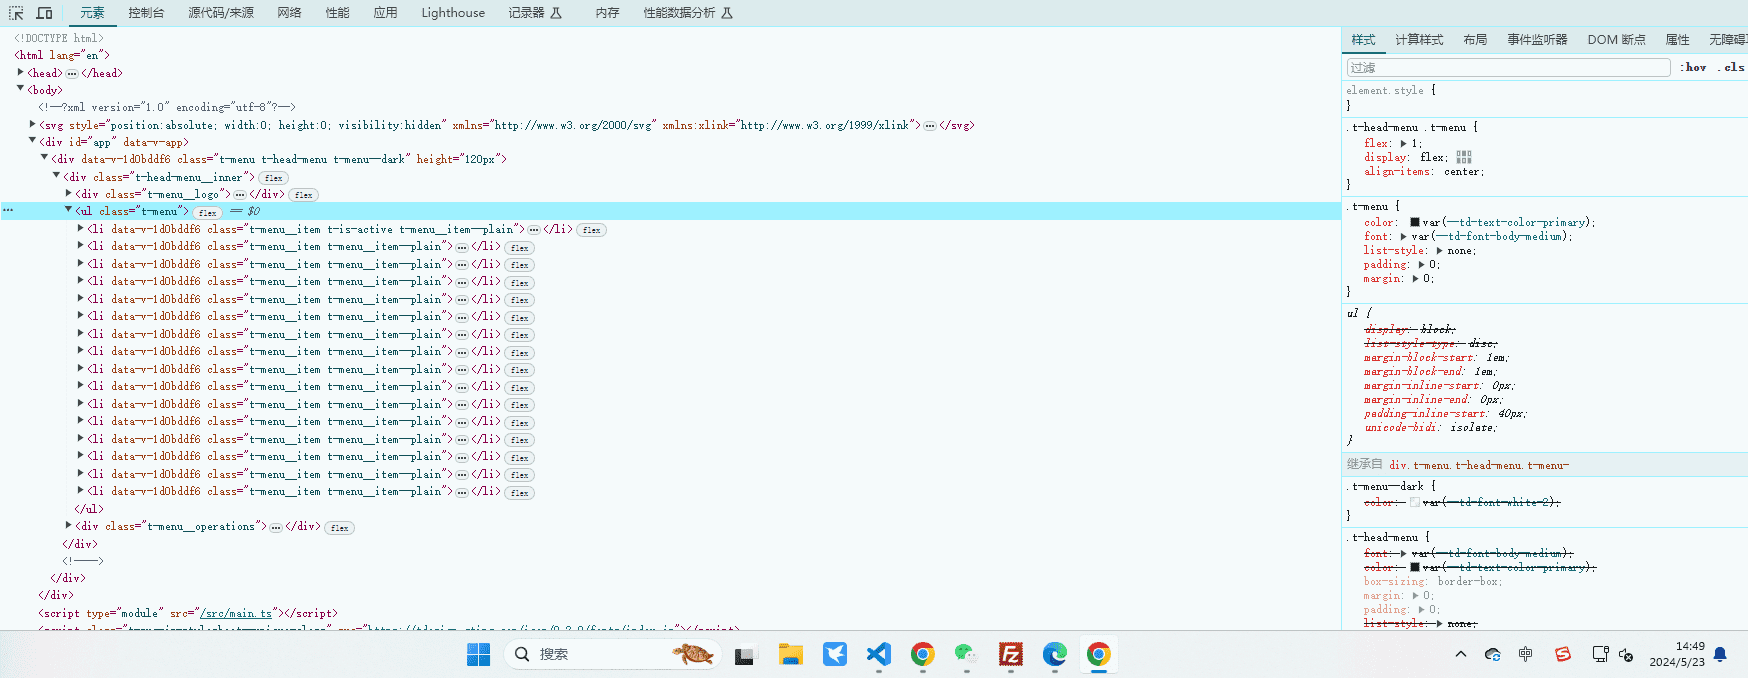
先来看一下 dom 结构,大概如下,后续为了代码简洁,我直接操作 dom 了,大家最好是使用 ref 来操作

根据屏幕大小设置最大宽度和显示 icon
这里我设置了t-menu为overflow:hidden,然后我根据运算,自己得到一个当前屏幕下的最大宽度,就可以将多余的内容进行隐藏了。
1
2
3
4
5
6
7
8
9
10
11
12
13
14
15
16
17
18
19
20
21
22
23
24
25
26
27
28
29
30
31
32
33
34
35
36
37
38
39
40
41
42
43
44
45
46
47
48
49
50
51
52
53
54
55
56
57
58
59
60
61
62
63
64
65
66
67
68
69
70
71
72
73
74
75
76
77
78
79
80
81
82
83
84
85
86
87
88
89
90
91
92
93
94
95
96
97
98
99
100
101
102
103
104
| <template>
<t-head-menu v-model="menu2Value" theme="dark" height="120px" class="my-menu">
<template #logo>
<img
height="28"
src="https://tdesign.gtimg.com/site/baseLogo-dark.png"
alt="logo"
/>
<ChevronLeftIcon
class="icon-move"
v-if="curWindowWidth < NEED_SHOW_ICON_WIDTH"
/>
</template>
<t-menu-item :value="item" v-for="item in 16" :key="item">
菜单{{ item }}
</t-menu-item>
<template #operations>
<ChevronRightIcon
class="icon-move"
v-if="curWindowWidth < NEED_SHOW_ICON_WIDTH"
/>
<div class="t-demo-menu--dark">
<t-button variant="text" shape="square">
<template #icon><t-icon name="search" /></template>
</t-button>
<t-button variant="text" shape="square">
<template #icon><t-icon name="mail" /></template>
</t-button>
<t-button variant="text" shape="square">
<template #icon><t-icon name="user" /></template>
</t-button>
<t-button variant="text" shape="square">
<template #icon><t-icon name="ellipsis" /></template>
</t-button>
</div>
</template>
</t-head-menu>
</template>
<script setup>
import { ref, computed, onMounted } from "vue";
import { ChevronRightIcon, ChevronLeftIcon } from "tdesign-icons-vue-next";
const menu2Value = ref(1);
// 需要显示icon的最大屏幕宽度
const NEED_SHOW_ICON_WIDTH = 1750;
// 当前屏幕的宽度
const curWindowWidth = ref(window.innerWidth);
// 当前menu应该有的宽度
const curMenuWidth = ref(0);
// 初始化以及屏幕变化之后的方法
const initMenuWidth = () => {
curWindowWidth.value = window.innerWidth;
const logoWidth = 180;
const rightWidth = 180;
// menu宽度应该为减去logo和右侧内容的宽度,再预留一些宽度
const menuWidth = curWindowWidth.value - (logoWidth + rightWidth + 150);
const menuDom = document.querySelector(".my-menu .t-menu");
menuDom.style.maxWidth = `${menuWidth}px`;
curMenuWidth.value = menuWidth;
};
onMounted(() => {
// 监听窗口变化
window.addEventListener("resize", initMenuWidth);
initMenuWidth();
});
</script>
<style lang="less">
.my-menu {
.t-menu {
overflow: hidden;
}
.t-head-menu__inner {
justify-content: space-between;
}
}
</style>
<style lang="less" scoped>
.t-menu__operations {
.t-button {
margin-left: 8px;
}
}
.t-demo-menu--dark {
.t-button {
color: #fff;
&:hover {
background-color: #4b4b4b;
border-color: transparent;
--ripple-color: #383838;
}
}
}
.icon-move {
color: white;
cursor: pointer;
font-size: 20px;
padding: 0 10px;
}
</style>
|
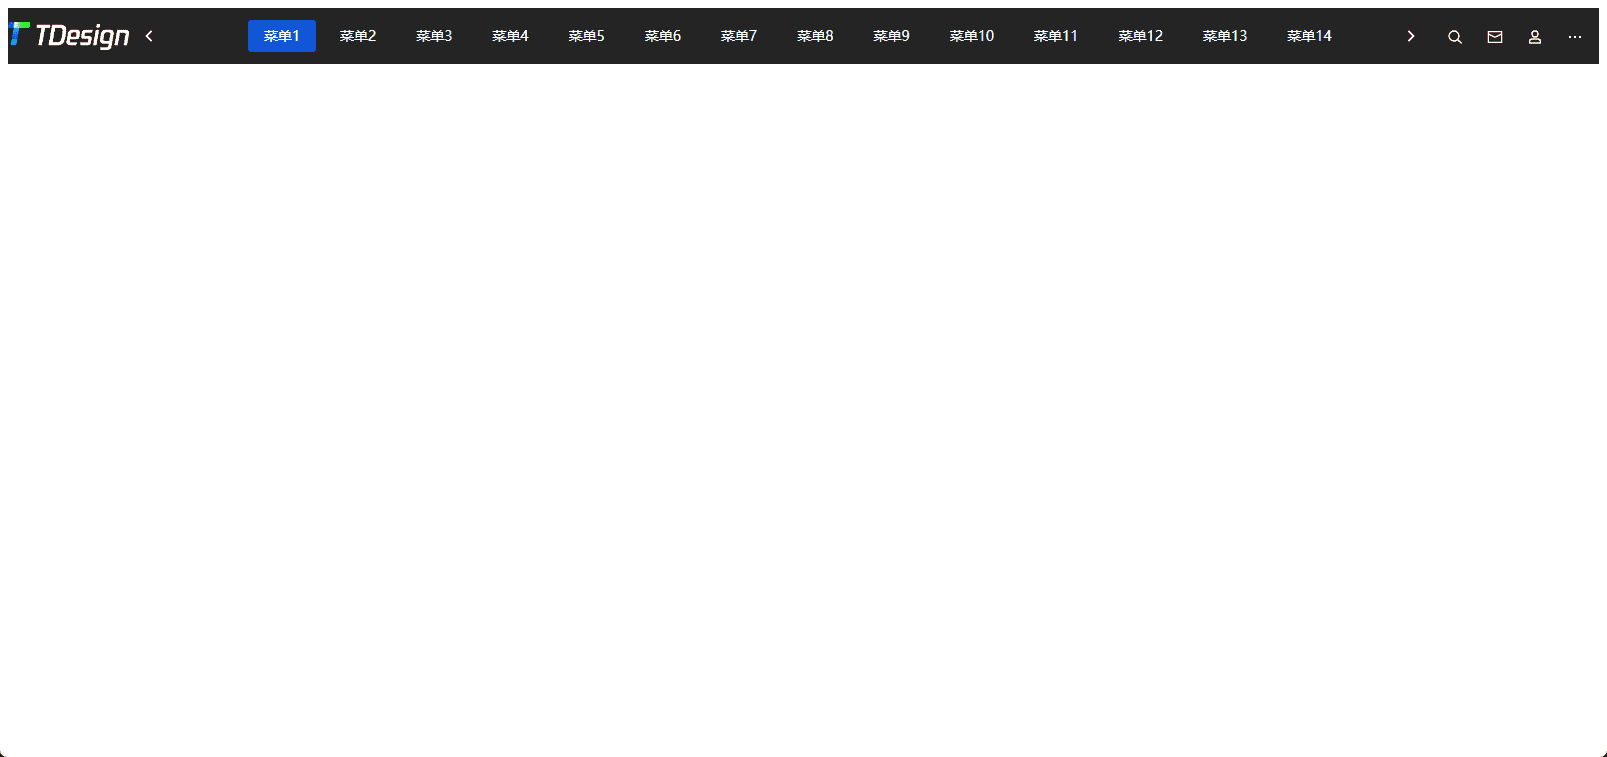
大家这时候可以看到,当我屏幕不够大的时候,样式也不会崩了,而且那俩个方向的 icon 也正常显示

添加滚动事件
逻辑分析
接下来,我们添加滚动事件,那如何添加呢,思路其实很简单,就是translateX就行了,但是问题是translateX到哪里呢,假如我们只有两部分,就是菜单显示的部分的长度大于我们隐藏的部分,那么就是很简单了,我们按下左边,那就是translateX(0),右边就是translateX(实际内容宽度-当前菜单栏的宽度),那以此类推,如果我们藏的内容比显示的内容多 1 倍但是不到 2 倍,多 2 倍不到 3 倍,这时候左右的逻辑又是怎么样的呢?此时我们就可以简单理解,每一次移动的距离都可以相等,我们按照实际内容宽度-当前菜单栏的宽度除以我们的倍数,比如1<x<2,那么就是除以 2,以此类推,然后当我们在第一页,也就是没有按下过右键移动的时候,那么此时左边的 icon 应该是不显示的,同理,我们在最后一页,我们右边的 icon 也就不该显示了,按照这个逻辑,我们来把代码实现一下
代码实现
1
2
3
4
5
6
7
8
9
10
11
12
13
14
15
16
17
18
19
20
21
22
23
24
25
26
27
28
29
30
31
32
33
34
35
36
37
38
39
40
41
42
43
44
45
46
47
48
49
50
51
52
53
54
55
56
57
58
59
60
61
62
63
64
65
66
67
68
69
70
71
72
73
74
75
76
77
78
79
80
81
82
83
84
85
86
87
88
89
90
91
92
93
94
95
96
97
98
99
100
101
102
103
104
105
106
107
108
109
110
111
112
113
114
115
116
117
118
119
120
121
122
123
124
125
126
127
128
129
130
131
132
133
134
135
136
137
138
139
140
141
142
143
144
145
146
147
148
149
150
151
152
153
154
155
156
157
158
159
160
161
162
| <template>
<t-head-menu v-model="menu2Value" theme="dark" height="120px" class="my-menu">
<template #logo>
<img
height="28"
src="https://tdesign.gtimg.com/site/baseLogo-dark.png"
alt="logo"
/>
<ChevronLeftIcon
class="icon-move"
v-if="curWindowWidth < NEED_SHOW_ICON_WIDTH && curScrollPage !== 0"
@click="handleScrollMenu('left')"
/>
</template>
<t-row justify="flex-start" style="flex-wrap: nowrap" class="menu-wrapper">
<t-menu-item :value="item" v-for="item in 16" :key="item">
菜单{{ item }}
</t-menu-item>
</t-row>
<template #operations>
<ChevronRightIcon
class="icon-move"
v-if="
curWindowWidth < NEED_SHOW_ICON_WIDTH &&
curScrollPage < curCanScrollPage
"
@click="handleScrollMenu('right')"
/>
<div class="t-demo-menu--dark">
<t-button variant="text" shape="square">
<template #icon><t-icon name="search" /></template>
</t-button>
<t-button variant="text" shape="square">
<template #icon><t-icon name="mail" /></template>
</t-button>
<t-button variant="text" shape="square">
<template #icon><t-icon name="user" /></template>
</t-button>
<t-button variant="text" shape="square">
<template #icon><t-icon name="ellipsis" /></template>
</t-button>
</div>
</template>
</t-head-menu>
</template>
<script setup>
import { ref, computed, onMounted } from "vue";
import { ChevronRightIcon, ChevronLeftIcon } from "tdesign-icons-vue-next";
const menu2Value = ref(1);
// 需要显示icon的最大屏幕宽度
const NEED_SHOW_ICON_WIDTH = 1750;
// 当前屏幕的宽度
const curWindowWidth = ref(window.innerWidth);
// 当前menu应该有的宽度
const curMenuWidth = ref(0);
// 当前的滚动页数
const curScrollPage = ref(0);
// 实际菜单栏的宽度
const trulyMenuWidth = ref(0);
// 当前能够滚动的页数
const curCanScrollPage = computed(() => {
if (curMenuWidth.value) {
// 当前藏的部分
const hideWidth = trulyMenuWidth.value - curMenuWidth.value;
// 藏的部分除以显示部分的倍数
return Math.ceil(hideWidth / curMenuWidth.value);
}
return 0;
});
// 初始化以及屏幕变化之后的方法
const initMenuWidth = () => {
const menuDom = document.querySelector(".my-menu .t-menu");
// 重置滚动页数
curScrollPage.value = 0;
// 重置滚动距离
menuDom.style.transform = `translateX(0px)`;
curWindowWidth.value = window.innerWidth;
const logoWidth = 180;
const rightWidth = 180;
// menu宽度应该为减去logo和右侧内容的宽度,再预留一些宽度
const menuWidth = curWindowWidth.value - (logoWidth + rightWidth + 150);
menuDom.style.maxWidth = `${menuWidth}px`;
curMenuWidth.value = menuWidth;
};
// 计算实际的菜单栏宽度
const calTrulyMenuWidth = () => {
// 将dom拿到
const menuDom = document.querySelector(".my-menu .t-menu");
trulyMenuWidth.value = menuDom.clientWidth;
};
// 处理滚动
const handleScrollMenu = (type) => {
// 每一次移动的距离(实际menu的长度-当前menu的长度)/当前能够滚动的页数
const eachMove =
(trulyMenuWidth.value - curMenuWidth.value) / curCanScrollPage.value;
const menuDom = document.querySelector(".my-menu .t-menu .menu-wrapper");
if (type === "left") {
curScrollPage.value--;
menuDom.style.transform = `translateX(${
-curScrollPage.value * eachMove
}px)`;
} else if (type === "right") {
curScrollPage.value++;
menuDom.style.transform = `translateX(${
-curScrollPage.value * eachMove
}px)`;
}
};
onMounted(() => {
calTrulyMenuWidth();
// 监听窗口变化
window.addEventListener("resize", initMenuWidth);
initMenuWidth();
});
</script>
<style lang="less">
.my-menu {
.t-menu {
flex: none;
overflow: hidden;
.menu-wrapper {
transition: transform 1s ease;
}
}
.t-head-menu__inner {
justify-content: space-between;
}
}
</style>
<style lang="less" scoped>
.t-menu__operations {
.t-button {
margin-left: 8px;
}
}
.t-demo-menu--dark {
.t-button {
color: #fff;
&:hover {
background-color: #4b4b4b;
border-color: transparent;
--ripple-color: #383838;
}
}
}
.icon-move {
color: white;
cursor: pointer;
font-size: 20px;
padding: 0 10px;
}
</style>
|
ok,下面俩个视频就可以看到我们不同的页数的滚动效果了
结语
本篇文章就到这里,这里给大家介绍了一种当我们横向菜单栏太长的解决方案,债见~


