前言 本篇将继续给大家带来 webgl 的深入学习。
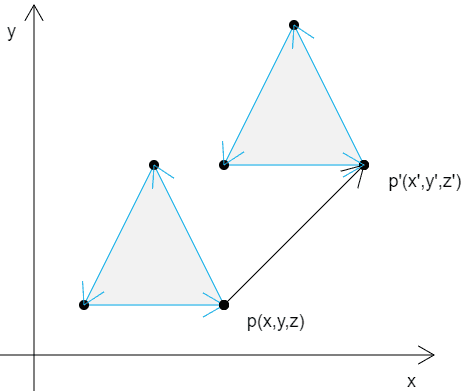
平移 案例一
顶点 p(x,y,z)
案例二 如果这个图形中并非只有一个顶点,而是有三个,或者更多,那么所有的顶点也是按照同样原理进行位移。
推导 我们可以由上面的案例推导出来一个结论,如果我们把这些点都看作是向量,那么图形的平移实际上就是向量的加法。
利用平移做一个平移动画 在顶点着色器暴露一个变量u_Translation 1 2 3 4 5 6 7 <script id="vertexShader" type="x-shader/x-vertex" > attribute vec4 a_Position; uniform vec4 u_Translation; void main ( gl_Position = a_Position+u_Translation; } </script>
获取变量赋值 1 2 3 4 const u_Translation = gl.getUniformLocation (gl.program , "u_Translation" );gl.uniform4f (u_Translation, 0 , 0.5 , 0 , 0 );
添加个动画 1 2 3 4 5 6 7 8 9 10 11 let y = 0 ;!(function ani ( y += 0.02 ; if (y > 1 ) { y = -1 ; } gl.uniform4f (u_Translation, 0 , y, 0 , 0 ); gl.clear (gl.COLOR_BUFFER_BIT ); gl.drawArrays (gl.TRIANGLES , 0 , 3 ); requestAnimationFrame (ani); })();
完整代码 1 2 3 4 5 6 7 8 9 10 11 12 13 14 15 16 17 18 19 20 21 22 23 24 25 26 27 28 29 30 31 32 33 34 35 36 37 38 39 40 41 42 43 44 45 46 47 48 49 50 51 52 53 54 55 56 57 58 59 60 61 62 63 64 65 66 67 68 69 70 71 72 <!DOCTYPE html > <html lang ="en" > <head > <meta charset ="UTF-8" /> <title > 位移</title > <style > body { margin : 0 ; overflow : hidden; } </style > </head > <body > <canvas id ="canvas" > </canvas > <script id ="vertexShader" type ="x-shader/x-vertex" > attribute vec4 a_Position; uniform vec4 u_Translation; void main ( gl_Position = a_Position+u_Translation; } </script > <script id ="fragmentShader" type ="x-shader/x-fragment" > void main ( gl_FragColor=vec4 (1.0 ,1.0 ,0.0 ,1.0 ); } </script > <script type ="module" > import { initShaders } from "../jsm/Utils.js" ; const canvas = document .getElementById ("canvas" ); canvas.width = window .innerWidth ; canvas.height = window .innerHeight ; const gl = canvas.getContext ("webgl" ); const vsSource = document .getElementById ("vertexShader" ).innerText ; const fsSource = document .getElementById ("fragmentShader" ).innerText ; initShaders (gl, vsSource, fsSource); const vertices = new Float32Array ([0.0 , 0.1 , -0.1 , -0.1 , 0.1 , -0.1 ]); const vertexBuffer = gl.createBuffer (); gl.bindBuffer (gl.ARRAY_BUFFER , vertexBuffer); gl.bufferData (gl.ARRAY_BUFFER , vertices, gl.STATIC_DRAW ); const a_Position = gl.getAttribLocation (gl.program , "a_Position" ); gl.vertexAttribPointer (a_Position, 2 , gl.FLOAT , false , 0 , 0 ); gl.enableVertexAttribArray (a_Position); const u_Translation = gl.getUniformLocation (gl.program , "u_Translation" ); gl.uniform4f (u_Translation, 0 , 0.5 , 0 , 0 ); gl.clearColor (0.0 , 0.0 , 0.0 , 1.0 ); gl.clear (gl.COLOR_BUFFER_BIT ); gl.drawArrays (gl.TRIANGLES , 0 , 3 ); let y = 0 ; !(function ani ( y += 0.02 ; if (y > 1 ) { y = -1 ; } gl.uniform4f (u_Translation, 0 , y, 0 , 0 ); gl.clear (gl.COLOR_BUFFER_BIT ); gl.drawArrays (gl.TRIANGLES , 0 , 3 ); requestAnimationFrame (ani); })(); </script > </body > </html >
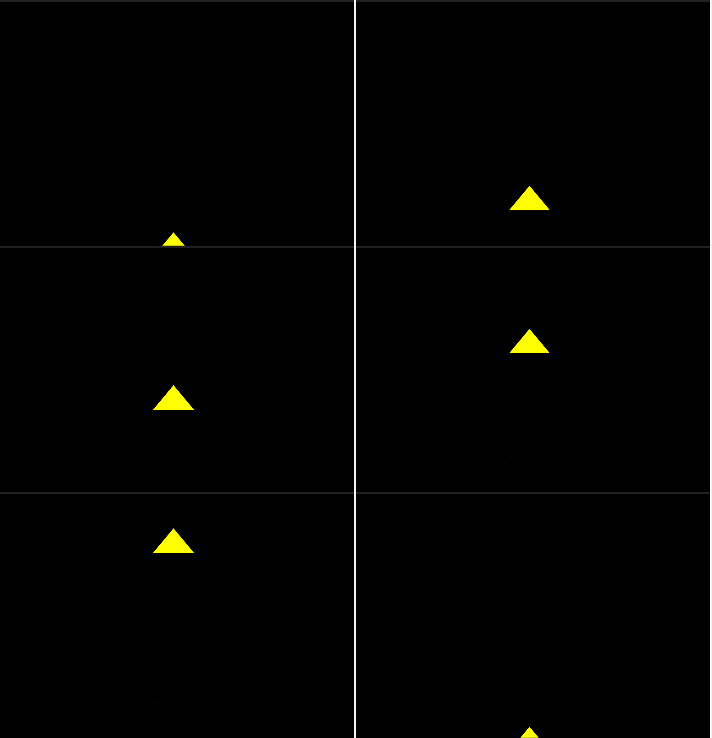
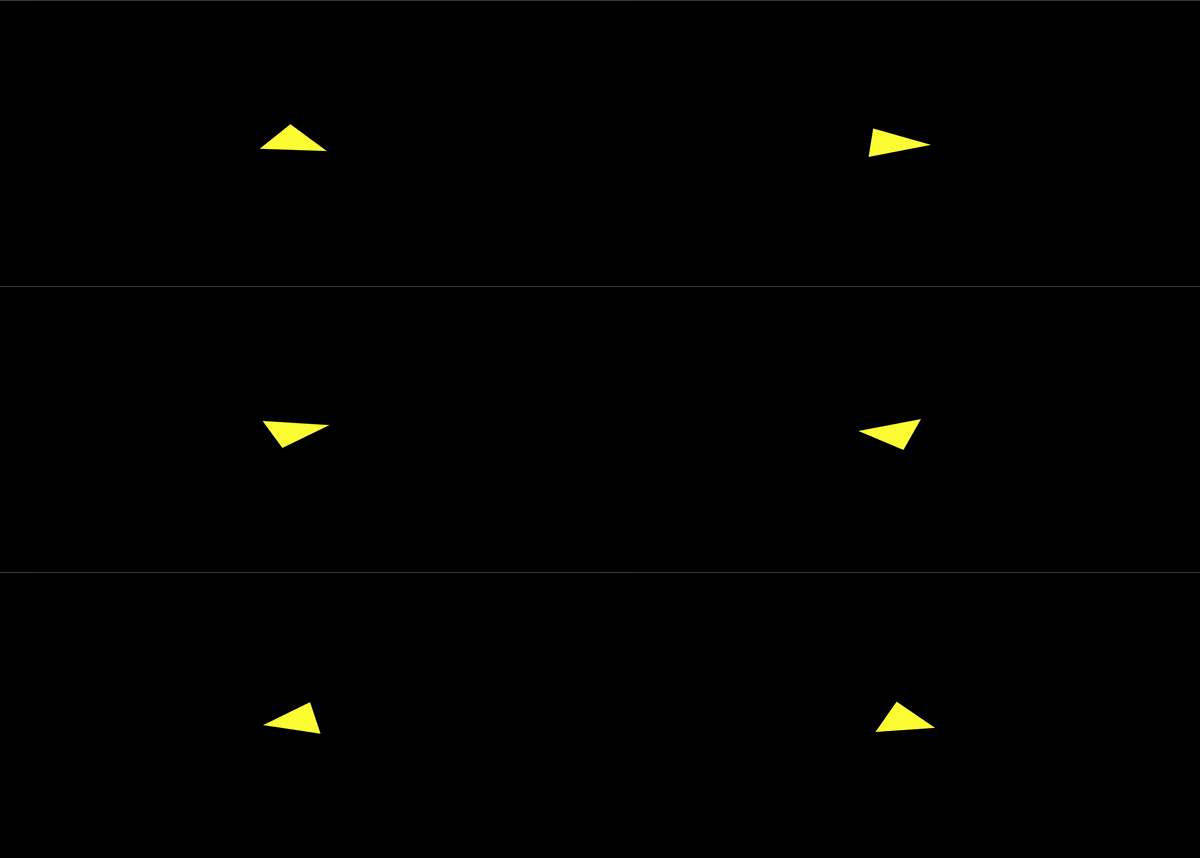
最终效果
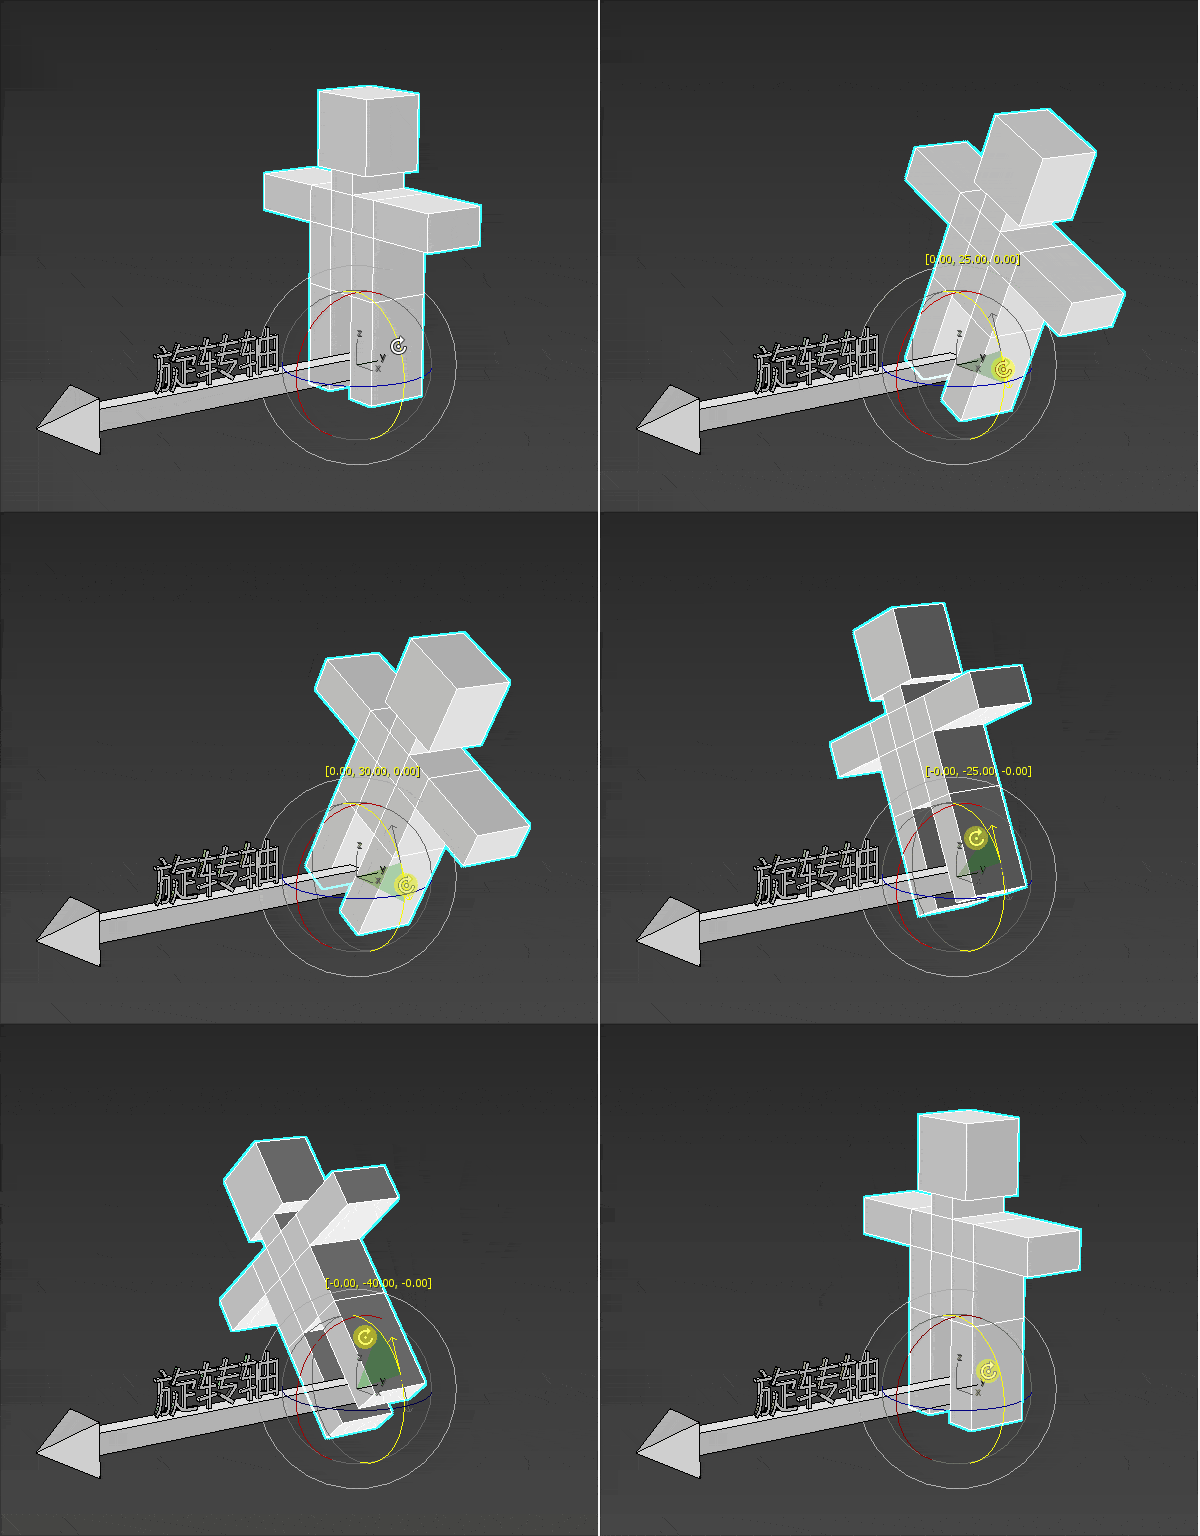
旋转 概念 三维物体的旋转要比位移复杂一点,因为三维物体的旋转需要知道以下条件:
旋转轴
一个小人站在旋转轴的起点进行旋转。
小人要往左转还是往右转,就是旋转的方向。
小人旋转的大小就是旋转角度。
旋转方向的正负 物体的旋转方向是有正负之分的。
那何时为正,何时为负呢?
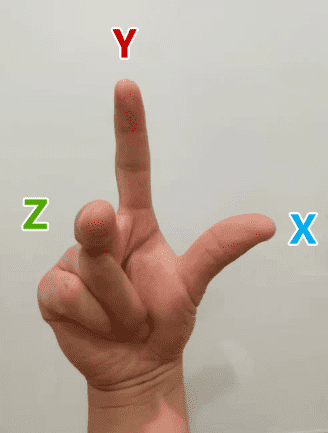
在 webgl 中,除裁剪空间之外的大部分功能都使用了右手坐标系。
所以,在我们初学 webgl 的时候,可以暂且将其当成右手坐标系,等讲到裁剪空间的时候,我再跟大家说左手坐标系。
下图就是右手坐标系:
以上图为例:
当物体绕 z 轴,从 x 轴正半轴向 y 轴正半轴逆时针旋转时,是正向旋转,反之为负。
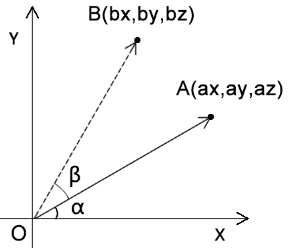
旋转公式
我们由结果逆推一下解题思路。
因为 ∠β 是已知的,∠α 可以通过点 A 得出。
所以我们可以得出:
那我们通过三角函数就可以推出 bx、by 坐标
1 2 bx=cosθ*|OA| by=sinθ*|OA|
然后因为 θ=α+β,所以
1 2 bx=cos(α+β)*|OA| by=sin(α+β)*|OA|
接下来运用和角公式
1 2 bx=(cosα*cosβ-sinα*sinβ)*|OA| by=(cosβ*sinα+sinβ*cosα)*|OA|
然后根据分配率,结合律以及 cosα*|OA|=ax,sinα*|OA|=ay,可以得到
1 2 bx=ax*cosβ-ay*sinβ by=ay*cosβ+ax*sinβ
利用旋转制作旋转动画 在我们已经有了旋转的概念之后,我们去代码里面实现一下旋转逻辑
着色器暴露参数 1 2 3 4 5 6 7 8 9 10 11 <script id="vertexShader" type="x-shader/x-vertex" > attribute vec4 a_Position; uniform float u_SinB; uniform float u_CosB; void main ( gl_Position.x =a_Position.x *u_CosB-a_Position.y *u_SinB; gl_Position.y =a_Position.y *u_CosB+a_Position.x *u_SinB; gl_Position.z =a_Position.z ; gl_Position.w =1.0 ; } </script>
radians(float degree) 将角度转弧度
sin(float angle) 正弦
cos(float angle) 余弦
js 中获取赋值参数 1 2 3 4 5 6 7 const u_SinB = gl.getUniformLocation (gl.program , "u_SinB" );const u_CosB = gl.getUniformLocation (gl.program , "u_CosB" );let angle = 0.3 ;gl.uniform1f (u_SinB, Math .sin (angle)); gl.uniform1f (u_CosB, Math .cos (angle));
添加动画 1 2 3 4 5 6 7 8 !(function ani ( angle += 0.01 ; gl.uniform1f (u_SinB, Math .sin (angle)); gl.uniform1f (u_CosB, Math .cos (angle)); gl.clear (gl.COLOR_BUFFER_BIT ); gl.drawArrays (gl.TRIANGLES , 0 , 3 ); requestAnimationFrame (ani); })();
完整代码 1 2 3 4 5 6 7 8 9 10 11 12 13 14 15 16 17 18 19 20 21 22 23 24 25 26 27 28 29 30 31 32 33 34 35 36 37 38 39 40 41 42 43 44 45 46 47 48 49 50 51 52 53 54 55 56 57 58 59 60 61 62 63 64 65 66 67 68 69 70 71 72 73 74 75 76 77 78 79 80 81 82 83 84 85 86 <!DOCTYPE html > <html lang ="en" > <head > <meta charset ="UTF-8" > <title > 旋转</title > <style > body { margin : 0 ; overflow : hidden } </style > </head > <body > <canvas id ="canvas" > </canvas > <script id ="vertexShader" type ="x-shader/x-vertex" > attribute vec4 a_Position; uniform float u_SinB; uniform float u_CosB; void main ( gl_Position.x =a_Position.x *u_CosB-a_Position.y *u_SinB; gl_Position.y =a_Position.y *u_CosB+a_Position.x *u_SinB; gl_Position.z =a_Position.z ; gl_Position.w =1.0 ; } </script > <script id ="fragmentShader" type ="x-shader/x-fragment" > void main ( gl_FragColor=vec4 (1.0 ,1.0 ,0.0 ,1.0 ); } </script > <script type ="module" > import { initShaders } from '../jsm/Utils.js' ; const canvas = document .getElementById ('canvas' ); canvas.width = window .innerWidth ; canvas.height = window .innerHeight ; const gl = canvas.getContext ('webgl' ); const vsSource = document .getElementById ('vertexShader' ).innerText ; const fsSource = document .getElementById ('fragmentShader' ).innerText ; initShaders (gl, vsSource, fsSource); const vertices = new Float32Array ([ 0.0 , 0.1 , -0.1 , -0.1 , 0.1 , -0.1 ]) const vertexBuffer = gl.createBuffer (); gl.bindBuffer (gl.ARRAY_BUFFER , vertexBuffer); gl.bufferData (gl.ARRAY_BUFFER , vertices, gl.STATIC_DRAW ); const a_Position = gl.getAttribLocation (gl.program , 'a_Position' ); gl.vertexAttribPointer (a_Position, 2 , gl.FLOAT , false , 0 , 0 ); gl.enableVertexAttribArray (a_Position); const u_SinB = gl.getUniformLocation (gl.program , 'u_SinB' ) const u_CosB = gl.getUniformLocation (gl.program , 'u_CosB' ) let angle = 0.3 gl.uniform1f (u_SinB, Math .sin (angle)) gl.uniform1f (u_CosB, Math .cos (angle)) gl.clearColor (0.0 , 0.0 , 0.0 , 1.0 ); gl.clear (gl.COLOR_BUFFER_BIT ); gl.drawArrays (gl.TRIANGLES , 0 , 3 ); !(function ani ( angle += 0.01 gl.uniform1f (u_SinB, Math .sin (angle)) gl.uniform1f (u_CosB, Math .cos (angle)) gl.clear (gl.COLOR_BUFFER_BIT ); gl.drawArrays (gl.TRIANGLES , 0 , 3 ); requestAnimationFrame (ani) })() </script > </body > </html >
效果
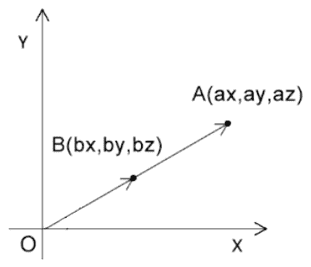
缩放 概念 缩放可以理解为对向量长度的改变,或者对向量坐标分量的同步缩放
点A的位置是(ax,ay,az)
解:
1 2 3 bx=ax*0.5 by=ay*0.5 bz=az*0.5
代码中实现缩放代码 1 2 3 4 5 6 7 <script id="vertexShader" type="x-shader/x-vertex" > attribute vec4 a_Position; uniform float u_Scale; void main ( gl_Position=vec4 (vec3 (a_Position)*u_Scale,1.0 ); } </script>
1 2 const u_Scale = gl.getUniformLocation (gl.program , 'u_Scale' )gl.uniform1f (u_Scale, 1.0 )
动画 1 2 3 4 5 6 7 8 9 let angle = 0 !(function ani ( angle += 0.05 const scale = Math .sin (n) + 1 gl.uniform1f (u_Scale, scale) gl.clear (gl.COLOR_BUFFER_BIT ); gl.drawArrays (gl.TRIANGLES , 0 , 3 ); requestAnimationFrame (ani) })()
完整代码 1 2 3 4 5 6 7 8 9 10 11 12 13 14 15 16 17 18 19 20 21 22 23 24 25 26 27 28 29 30 31 32 33 34 35 36 37 38 39 40 41 42 43 44 45 46 47 48 49 50 51 52 53 54 55 56 57 58 59 60 61 62 63 64 65 66 67 68 69 70 71 72 73 74 75 76 77 <!DOCTYPE html > <html lang ="en" > <head > <meta charset ="UTF-8" > <title > 缩放</title > <style > body { margin : 0 ; overflow : hidden } </style > </head > <body > <canvas id ="canvas" > </canvas > <script id ="vertexShader" type ="x-shader/x-vertex" > attribute vec4 a_Position; uniform float u_Scale; void main ( gl_Position=vec4 (vec3 (a_Position)*u_Scale,1.0 ); } </script > <script id ="fragmentShader" type ="x-shader/x-fragment" > void main ( gl_FragColor=vec4 (1.0 ,1.0 ,0.0 ,1.0 ); } </script > <script type ="module" > import { initShaders } from '../jsm/Utils.js' ; const canvas = document .getElementById ('canvas' ); canvas.width = window .innerWidth ; canvas.height = window .innerHeight ; const gl = canvas.getContext ('webgl' ); const vsSource = document .getElementById ('vertexShader' ).innerText ; const fsSource = document .getElementById ('fragmentShader' ).innerText ; initShaders (gl, vsSource, fsSource); const vertices = new Float32Array ([ 0.0 , 0.1 , -0.1 , -0.1 , 0.1 , -0.1 ]) const vertexBuffer = gl.createBuffer (); gl.bindBuffer (gl.ARRAY_BUFFER , vertexBuffer); gl.bufferData (gl.ARRAY_BUFFER , vertices, gl.STATIC_DRAW ); const a_Position = gl.getAttribLocation (gl.program , 'a_Position' ); gl.vertexAttribPointer (a_Position, 2 , gl.FLOAT , false , 0 , 0 ); gl.enableVertexAttribArray (a_Position); const u_Scale = gl.getUniformLocation (gl.program , 'u_Scale' ) gl.uniform1f (u_Scale, 1 ) gl.clearColor (0.0 , 0.0 , 0.0 , 1.0 ); gl.clear (gl.COLOR_BUFFER_BIT ); gl.drawArrays (gl.TRIANGLES , 0 , 3 ); let angle = 0 !(function ani ( angle += 0.05 const scale = Math .sin (angle) + 1 gl.uniform1f (u_Scale, scale) gl.clear (gl.COLOR_BUFFER_BIT ); gl.drawArrays (gl.TRIANGLES , 0 , 3 ); requestAnimationFrame (ani) })() </script > </body > </html >
效果
矩阵 概念 矩阵(Matrix)是一个按照矩形纵横排列的复数集合。
1维向量中有1个数字,对应的是单轴坐标系里的点位。
2维向量中有2个数字,对应的是2维坐标系里的点位。
3维向量中有3个数字,对应的是3维坐标系里的点位。
4维向量中有4个数字,对应的是3维坐标系里的点位,外加一个附加数据,至于这个数据是什么,要看我们的项目需求。
矩阵和向量的乘法
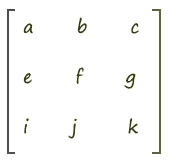
如上图向量v 是2维的,那么矩阵中就有2组向量,这两组向量可以是横着的两组向量,也可以是竖着的两组向量。
横着的两组向量是:向量(a,b)、向量(e,f)
横着的两组遵循的规则是行主序,即将矩阵中的一行数据视之为一个向量。
在webgl 里,矩阵元素的排列规则是列主序。
数学中常用的写法是行主序,所以我们接下来就用行主序举例子了。
矩阵和向量相乘的规则就是让矩阵中的每个向量和向量v相乘。
向量和向量相乘,就是在求向量的点积,其结果是一个实数,而不再是向量。
比如上图中,向量(a,b)乘以向量v(x,y)的结果是:
因为a、b、x、y都是实数,所以其结果也是实数。
上图中,矩阵m乘以向量v 会得到两个结果,即ax+by和ex+fy。
这两个结果会构成一个新的向量v’(x’,y’)
这时我们可以将其和数学里的旋转公式做一下比较。
点A(ax,ay)围绕z轴旋β度,其旋转后的位置是点B(bx,by),则:
1 2 bx=cosβ*ax-sinβ*ay by=sinβ*ax+cosβ*ay
对比上面的两组公式,试想一下:
向量v是不是可以当成一个点位呢?
答案是可以的。
那我现在就让向量v代表的位置,就是点A的位置。
那么矩阵m乘以向量v,是不是可以让向量v代表的这个点位旋转β度呢?
如果可以,那么矩阵里的元素应该满足什么条件呢?
满足以下条件即可:
1 2 3 4 a=cosβ b=-sinβ e=sinβ f=cosβ
这样,用矩阵乘以向量的方法得到的旋转结果和用数学公式得到的结果就是一样的,即;
1 2 a*x+b*y=cosβ*ax-sinβ*ay e*x+f*y=sinβ*ax+cosβ*ay
最终我们就可以用矩阵乘以向量的方式让点p旋转β度
代码中运用矩阵旋转 着色器添加矩阵对象 1 2 3 4 5 6 7 8 9 10 11 12 13 14 15 16 <script id="vertexShader" type="x-shader/x-vertex" > attribute vec4 a_Position; float angle=radians (40.0 ); float sinB=sin (angle); float cosB=cos (angle); mat2 m2=mat2 ( cosB, sinB, -sinB,cosB ); void main ( gl_Position = vec4 ( m2*vec2 (a_Position), a_Position.z ,a_Position.w ); } </script>
用js建立矩阵对象并传递给着色器 1 2 3 4 5 6 7 8 const u_Matrix = gl.getUniformLocation (gl.program , 'u_Matrix' )let angle = 0.2 const [sinB, cosB] = [Math .sin (angle), Math .cos (angle)]const matrix = [ cosB, sinB, -sinB, cosB ] gl.uniformMatrix2fv (u_Matrix, false , matrix)
添加动画 1 2 3 4 5 6 7 8 9 10 11 12 13 14 15 16 const u_Matrix = gl.getUniformLocation (gl.program , 'u_Matrix' )let angle = 0.2 !(function ani ( angle += 0.02 const [sinB, cosB] = [Math .sin (angle), Math .cos (angle)] const matrix = [ cosB, sinB, -sinB, cosB ] gl.uniformMatrix2fv (u_Matrix, false , matrix) gl.clear (gl.COLOR_BUFFER_BIT ); gl.drawArrays (gl.TRIANGLES , 0 , 3 ); requestAnimationFrame (ani) })()
完整代码 1 2 3 4 5 6 7 8 9 10 11 12 13 14 15 16 17 18 19 20 21 22 23 24 25 26 27 28 29 30 31 32 33 34 35 36 37 38 39 40 41 42 43 44 45 46 47 48 49 50 51 52 53 54 55 56 57 58 59 60 61 62 63 64 65 66 67 68 69 70 71 72 73 74 75 76 77 78 79 80 81 82 83 84 85 86 87 88 89 90 91 92 <!DOCTYPE html > <html lang ="en" > <head > <meta charset ="UTF-8" > <title > 二维矩阵</title > <style > body { margin : 0 ; overflow : hidden } </style > </head > <body > <canvas id ="canvas" > </canvas > <script id ="vertexShader" type ="x-shader/x-vertex" > attribute vec4 a_Position; uniform mat2 u_Matrix; void main ( gl_Position = vec4 ( u_Matrix*vec2 (a_Position), a_Position.z ,a_Position.w ); } </script > <script id ="fragmentShader" type ="x-shader/x-fragment" > void main ( gl_FragColor=vec4 (1.0 ,1.0 ,0.0 ,1.0 ); } </script > <script type ="module" > import { initShaders } from '../jsm/Utils.js' ; const canvas = document .getElementById ('canvas' ); canvas.width = window .innerWidth ; canvas.height = window .innerHeight ; const gl = canvas.getContext ('webgl' ); const vsSource = document .getElementById ('vertexShader' ).innerText ; const fsSource = document .getElementById ('fragmentShader' ).innerText ; initShaders (gl, vsSource, fsSource); const vertices = new Float32Array ([ 0.0 , 0.1 , -0.1 , -0.1 , 0.1 , -0.1 ]) const vertexBuffer = gl.createBuffer (); gl.bindBuffer (gl.ARRAY_BUFFER , vertexBuffer); gl.bufferData (gl.ARRAY_BUFFER , vertices, gl.STATIC_DRAW ); const a_Position = gl.getAttribLocation (gl.program , 'a_Position' ); gl.vertexAttribPointer (a_Position, 2 , gl.FLOAT , false , 0 , 0 ); gl.enableVertexAttribArray (a_Position); const u_Matrix = gl.getUniformLocation (gl.program , 'u_Matrix' ) let angle = 0.5 const sinB = Math .sin (angle) const cosB = Math .cos (angle) const matrix = [ cosB, sinB, -sinB, cosB ] gl.uniformMatrix2fv (u_Matrix, false , matrix) gl.clearColor (0.0 , 0.0 , 0.0 , 1.0 ); gl.clear (gl.COLOR_BUFFER_BIT ); gl.drawArrays (gl.TRIANGLES , 0 , 3 ); !(function ani ( angle += 0.05 const sinB = Math .sin (angle) const cosB = Math .cos (angle) const matrix = [ cosB, sinB, -sinB, cosB ] gl.uniformMatrix2fv (u_Matrix, false , matrix) gl.clear (gl.COLOR_BUFFER_BIT ); gl.drawArrays (gl.TRIANGLES , 0 , 3 ); requestAnimationFrame (ani) })() </script > </body > </html >
效果
四维矩阵 用二维矩阵我们可以类推一下四维矩阵的代码
四维矩阵旋转 1 2 3 4 5 6 7 8 9 10 11 12 13 14 15 16 17 18 19 20 21 22 23 24 25 26 27 28 29 30 31 32 33 34 35 36 37 38 39 40 41 42 43 44 45 46 47 48 49 50 51 52 53 54 55 56 57 58 59 60 61 62 63 64 65 66 67 68 69 70 71 72 73 74 75 76 77 78 79 80 81 82 83 84 85 86 87 88 89 90 91 92 93 <!DOCTYPE html > <html lang ="en" > <head > <meta charset ="UTF-8" > <title > 四维矩阵</title > <style > body { margin : 0 ; overflow : hidden } </style > </head > <body > <canvas id ="canvas" > </canvas > <script id ="vertexShader" type ="x-shader/x-vertex" > attribute vec4 a_Position; uniform mat4 u_Matrix; void main ( gl_Position = u_Matrix*a_Position; } </script > <script id ="fragmentShader" type ="x-shader/x-fragment" > void main ( gl_FragColor=vec4 (1.0 ,1.0 ,0.0 ,1.0 ); } </script > <script type ="module" > import { initShaders } from '../jsm/Utils.js' ; const canvas = document .getElementById ('canvas' ); canvas.width = window .innerWidth ; canvas.height = window .innerHeight ; const gl = canvas.getContext ('webgl' ); const vsSource = document .getElementById ('vertexShader' ).innerText ; const fsSource = document .getElementById ('fragmentShader' ).innerText ; initShaders (gl, vsSource, fsSource); const vertices = new Float32Array ([ 0.0 , 0.1 , -0.1 , -0.1 , 0.1 , -0.1 ]) const vertexBuffer = gl.createBuffer (); gl.bindBuffer (gl.ARRAY_BUFFER , vertexBuffer); gl.bufferData (gl.ARRAY_BUFFER , vertices, gl.STATIC_DRAW ); const a_Position = gl.getAttribLocation (gl.program , 'a_Position' ); gl.vertexAttribPointer (a_Position, 2 , gl.FLOAT , false , 0 , 0 ); gl.enableVertexAttribArray (a_Position); const u_Matrix = gl.getUniformLocation (gl.program , 'u_Matrix' ) let angle = 0.5 const sinB = Math .sin (angle) const cosB = Math .cos (angle) const matrix = [ cosB, sinB, 0 , 0 , -sinB, cosB, 0 , 0 , 0 , 0 , 1 , 0 , 0 , 0 , 0 , 1 ] gl.uniformMatrix4fv (u_Matrix, false , matrix) gl.clearColor (0.0 , 0.0 , 0.0 , 1.0 ); gl.clear (gl.COLOR_BUFFER_BIT ); gl.drawArrays (gl.TRIANGLES , 0 , 3 ); !(function ani ( angle += 0.05 const sinB = Math .sin (angle) const cosB = Math .cos (angle) const matrix = [ cosB, sinB, 0 , 0 , -sinB, cosB, 0 , 0 , 0 , 0 , 1 , 0 , 0 , 0 , 0 , 1 ] gl.uniformMatrix4fv (u_Matrix, false , matrix) gl.clear (gl.COLOR_BUFFER_BIT ); gl.drawArrays (gl.TRIANGLES , 0 , 3 ); requestAnimationFrame (ani) })() </script > </body > </html >
效果和上面是一样的
四维矩阵平移 推理的模式和旋转是一样的,比如我们需要平移tx,ty,tz的位置,那么此时的向量最后应该是x+tx,y+ty,z+tz
1 2 3 4 5 6 7 8 9 10 11 12 [ 1.0, 0.0, 0.0,tx, 0.0, 1.0, 0.0,ty, 0.0, 0.0, 1.0,tz, 0.0, 0.0, 0.0,1.0 ] *[ x, y, z, 1.0 ] 我们将矩阵和向量相乘,得到的就是(x+tx,y+ty,z+tz,1)
1 2 3 4 5 6 7 8 9 10 11 12 13 14 15 16 17 18 19 20 21 22 23 24 25 26 27 28 29 30 31 32 33 34 35 36 37 38 39 40 41 42 43 44 45 46 47 48 49 50 51 52 53 54 55 56 57 58 59 60 61 62 63 64 65 66 67 68 69 70 71 <!DOCTYPE html > <html lang ="en" > <head > <meta charset ="UTF-8" > <title > 矩阵平移</title > <link rel ="icon" href ="https://img.kaikeba.com/kkb_portal_icon.ico" > <style > body { margin : 0 ; overflow : hidden } </style > </head > <body > <canvas id ="canvas" > </canvas > <script id ="vertexShader" type ="x-shader/x-vertex" > attribute vec4 a_Position; float tx=0.4 ; float ty=0.3 ; float tz=0.2 ; mat4 m4=mat4 ( 1.0 , 0.0 , 0.0 ,0.0 , 0.0 , 1.0 , 0.0 ,0.0 , 0.0 , 0.0 , 1.0 ,0.0 , tx, ty, tz ,1.0 ); void main ( gl_Position = m4*a_Position; } </script > <script id ="fragmentShader" type ="x-shader/x-fragment" > void main ( gl_FragColor=vec4 (1.0 ,1.0 ,0.0 ,1.0 ); } </script > <script type ="module" > import { initShaders } from '../jsm/Utils.js' ; const canvas = document .getElementById ('canvas' ); canvas.width = window .innerWidth ; canvas.height = window .innerHeight ; const gl = canvas.getContext ('webgl' ); const vsSource = document .getElementById ('vertexShader' ).innerText ; const fsSource = document .getElementById ('fragmentShader' ).innerText ; initShaders (gl, vsSource, fsSource); const vertices = new Float32Array ([ 0.0 , 0.1 , -0.1 , -0.1 , 0.1 , -0.1 ]) const vertexBuffer = gl.createBuffer (); gl.bindBuffer (gl.ARRAY_BUFFER , vertexBuffer); gl.bufferData (gl.ARRAY_BUFFER , vertices, gl.STATIC_DRAW ); const a_Position = gl.getAttribLocation (gl.program , 'a_Position' ); gl.vertexAttribPointer (a_Position, 2 , gl.FLOAT , false , 0 , 0 ); gl.enableVertexAttribArray (a_Position); gl.clearColor (0.0 , 0.0 , 0.0 , 1.0 ); gl.clear (gl.COLOR_BUFFER_BIT ); gl.drawArrays (gl.TRIANGLES , 0 , 3 ); </script > </body > </html >
四维矩阵缩放 同理,我们可以得到缩放的逻辑
1 2 3 4 5 6 7 8 9 10 11 12 13 14 15 16 17 18 19 20 21 22 23 24 25 26 27 28 29 30 31 32 33 34 35 36 37 38 39 40 41 42 43 44 45 46 47 48 49 50 51 52 53 54 55 56 57 58 59 60 61 62 63 64 65 66 67 68 69 70 <!DOCTYPE html > <html lang ="en" > <head > <meta charset ="UTF-8" > <title > 矩阵缩放</title > <style > body { margin : 0 ; overflow : hidden } </style > </head > <body > <canvas id ="canvas" > </canvas > <script id ="vertexShader" type ="x-shader/x-vertex" > attribute vec4 a_Position; float sx=4.0 ; float sy=2.0 ; float sz=2.0 ; mat4 m4=mat4 ( sx, 0.0 , 0.0 ,0.0 , 0.0 , sy, 0.0 ,0.0 , 0.0 , 0.0 , sz, 0.0 , 0.0 , 0.0 , 0.0 ,1.0 ); void main ( gl_Position = m4*a_Position; } </script > <script id ="fragmentShader" type ="x-shader/x-fragment" > void main ( gl_FragColor=vec4 (1.0 ,1.0 ,0.0 ,1.0 ); } </script > <script type ="module" > import { initShaders } from '../jsm/Utils.js' ; const canvas = document .getElementById ('canvas' ); canvas.width = window .innerWidth ; canvas.height = window .innerHeight ; const gl = canvas.getContext ('webgl' ); const vsSource = document .getElementById ('vertexShader' ).innerText ; const fsSource = document .getElementById ('fragmentShader' ).innerText ; initShaders (gl, vsSource, fsSource); const vertices = new Float32Array ([ 0.0 , 0.1 , -0.1 , -0.1 , 0.1 , -0.1 ]) const vertexBuffer = gl.createBuffer (); gl.bindBuffer (gl.ARRAY_BUFFER , vertexBuffer); gl.bufferData (gl.ARRAY_BUFFER , vertices, gl.STATIC_DRAW ); const a_Position = gl.getAttribLocation (gl.program , 'a_Position' ); gl.vertexAttribPointer (a_Position, 2 , gl.FLOAT , false , 0 , 0 ); gl.enableVertexAttribArray (a_Position); gl.clearColor (0.0 , 0.0 , 0.0 , 1.0 ); gl.clear (gl.COLOR_BUFFER_BIT ); gl.drawArrays (gl.TRIANGLES , 0 , 3 ); </script > </body > </html >
利用threejs的Matrix4对象实现矩阵 1 2 3 4 5 6 7 8 9 10 11 12 13 14 15 16 17 18 19 20 21 22 23 24 25 26 27 28 29 30 31 32 33 34 35 36 37 38 39 40 41 42 43 44 45 46 47 48 49 50 51 52 53 54 55 56 57 58 59 60 61 62 63 64 65 66 67 68 69 70 71 72 73 74 75 76 77 78 79 80 <!DOCTYPE html > <html lang ="en" > <head > <meta charset ="UTF-8" > <title > 矩阵库</title > <style > body { margin : 0 ; overflow : hidden } </style > </head > <body > <canvas id ="canvas" > </canvas > <script id ="vertexShader" type ="x-shader/x-vertex" > attribute vec4 a_Position; uniform mat4 u_Matrix; void main ( gl_Position = u_Matrix*a_Position; } </script > <script id ="fragmentShader" type ="x-shader/x-fragment" > void main ( gl_FragColor=vec4 (1.0 ,1.0 ,0.0 ,1.0 ); } </script > <script type ="module" > import { initShaders } from '../jsm/Utils.js' ; import { Matrix4 } from 'https://unpkg.com/three/build/three.module.js' ; const canvas = document .getElementById ('canvas' ); canvas.width = window .innerWidth ; canvas.height = window .innerHeight ; const gl = canvas.getContext ('webgl' ); const vsSource = document .getElementById ('vertexShader' ).innerText ; const fsSource = document .getElementById ('fragmentShader' ).innerText ; initShaders (gl, vsSource, fsSource); const vertices = new Float32Array ([ 0.0 , 0.1 , -0.1 , -0.1 , 0.1 , -0.1 ]) const vertexBuffer = gl.createBuffer (); gl.bindBuffer (gl.ARRAY_BUFFER , vertexBuffer); gl.bufferData (gl.ARRAY_BUFFER , vertices, gl.STATIC_DRAW ); const a_Position = gl.getAttribLocation (gl.program , 'a_Position' ); gl.vertexAttribPointer (a_Position, 2 , gl.FLOAT , false , 0 , 0 ); gl.enableVertexAttribArray (a_Position); const u_Matrix = gl.getUniformLocation (gl.program , 'u_Matrix' ) let angle = 0.1 const m4 = new Matrix4 () m4.makeRotationZ (angle) gl.uniformMatrix4fv (u_Matrix, false , m4.elements ) gl.clearColor (0.0 , 0.0 , 0.0 , 1.0 ); gl.clear (gl.COLOR_BUFFER_BIT ); gl.drawArrays (gl.TRIANGLES , 0 , 3 ); !(function ani ( angle += 0.05 m4.makeRotationZ (angle) gl.uniformMatrix4fv (u_Matrix, false , m4.elements ) gl.clear (gl.COLOR_BUFFER_BIT ); gl.drawArrays (gl.TRIANGLES , 0 , 3 ); requestAnimationFrame (ani) })() </script > </body > </html >
结语 本篇文章就先到这里了,更多内容敬请期待,债见~

