【可视化学习】69-从入门到放弃WebGL(七)
发表于:2024-06-15 |

前言

本篇继续学习webgl的内容

多个点绘制不同的颜色

步骤

1.在顶点着色器中,建立一个名为a_Color 的attribute 变量,并通过varying 变量将其全局化,之后可以在片着色器中拿到。

1
2
3
4
5
6
7
8
9
10
<script id="vertexShader" type="x-shader/x-vertex">
attribute vec4 a_Position;
attribute vec4 a_Color;
varying vec4 v_Color;
void main(){
gl_Position=a_Position;
gl_PointSize=50.0;
v_Color=a_Color;
}
</script>

2.在片元着色器中获取顶点着色器中全局化的varying 变量,然后将其作为片元颜色。

1
2
3
4
5
6
7
<script id="fragmentShader" type="x-shader/x-fragment">
precision mediump float;
varying vec4 v_Color;
void main(){
gl_FragColor=v_Color;
}
</script>

3.在js中,将顶点数据批量传递给顶点着色器。

1
2
3
4
5
6
7
8
9
10
11
12
13
14
15
16
17
18
//顶点数据
const vertices = new Float32Array([
0, 0.2, 0,
-0.2, -0.1, 0,
0.2, -0.1, 0,
]);
//缓冲对象
const vertexBuffer = gl.createBuffer();
//绑定缓冲对象
gl.bindBuffer(gl.ARRAY_BUFFER, vertexBuffer);
//写入数据
gl.bufferData(gl.ARRAY_BUFFER, vertices, gl.STATIC_DRAW)
//获取attribute 变量
const a_Position = gl.getAttribLocation(gl.program, 'a_Position')
//修改attribute 变量
gl.vertexAttribPointer(a_Position, 3, gl.FLOAT, false, 0, 0)
//赋能-批处理
gl.enableVertexAttribArray(a_Position)

4.用同样原理将颜色数据批量传递给顶点着色器。

1
2
3
4
5
6
7
8
9
10
11
12
13
14
15
16
17
18
//颜色数据
const colors = new Float32Array([
1, 0, 0,
0, 1, 0,
0, 0, 1,
]);
//缓冲对象
const colorBuffer = gl.createBuffer();
//绑定缓冲对象
gl.bindBuffer(gl.ARRAY_BUFFER, colorBuffer);
//写入数据
gl.bufferData(gl.ARRAY_BUFFER, colors, gl.STATIC_DRAW)
//获取attribute 变量
const a_Color = gl.getAttribLocation(gl.program, 'a_Color')
//修改attribute 变量
gl.vertexAttribPointer(a_Color, 3, gl.FLOAT, false, 0, 0)
//赋能-批处理
gl.enableVertexAttribArray(a_Color)

5.绘制顶点

1
2
3
4
//刷底色
gl.clear(gl.COLOR_BUFFER_BIT);
//绘制顶点
gl.drawArrays(gl.POINTS, 0, 3);

完整代码

1
2
3
4
5
6
7
8
9
10
11
12
13
14
15
16
17
18
19
20
21
22
23
24
25
26
27
28
29
30
31
32
33
34
35
36
37
38
39
40
41
42
43
44
45
46
47
48
49
50
51
52
53
54
55
56
57
58
59
60
61
62
63
64
65
66
67
68
69
70
71
72
73
74
75
76
77
78
79
80
81
82
83
84
85
86
87
88
89
90
91
92
93
94
95
96
97
98
99
100
101
102
103
104
105
106
107
108
109
110
111
<!DOCTYPE html>
<html lang="en">

<head>
<meta charset="UTF-8" />
<title>多点异色</title>
<style>
body {
margin: 0;
overflow: hidden;
}

#canvas {
background-color: antiquewhite;
}
</style>
</head>

<body>
<canvas id="canvas"></canvas>
<!-- 顶点着色器 -->
<script id="vertexShader" type="x-shader/x-vertex">
attribute vec4 a_Position;
attribute vec4 a_Color;
varying vec4 v_Color;
void main(){
//点位
gl_Position=a_Position;
//尺寸
gl_PointSize=50.0;
v_Color=a_Color;
}
</script>
<!-- 片元着色器 -->
<script id="fragmentShader" type="x-shader/x-fragment">
precision mediump float;
varying vec4 v_Color;
void main(){
gl_FragColor=v_Color;
}
</script>
<script type="module">
import { initShaders } from "../jsm/Utils.js";

const canvas = document.querySelector("#canvas");
canvas.width = window.innerWidth;
canvas.height = window.innerHeight;

// 获取着色器文本
const vsSource = document.querySelector("#vertexShader").innerText;
const fsSource = document.querySelector("#fragmentShader").innerText;

//三维画笔
const gl = canvas.getContext("webgl");

//初始化着色器
initShaders(gl, vsSource, fsSource);
//声明颜色 rgba
gl.clearColor(0, 0, 0, 1);

//如何向attribute 变量中写入多点,并绘制多点
//顶点数据
const vertices = new Float32Array([
0, 0.2,
-0.2, -0.1,
0.2, -0.1,
]);
//缓冲对象
const vertexBuffer = gl.createBuffer();
//绑定缓冲对象
gl.bindBuffer(gl.ARRAY_BUFFER, vertexBuffer);
//写入数据
gl.bufferData(gl.ARRAY_BUFFER, vertices, gl.STATIC_DRAW)
//获取attribute 变量
const a_Position = gl.getAttribLocation(gl.program, 'a_Position')
//修改attribute 变量
gl.vertexAttribPointer(a_Position, 2, gl.FLOAT, false, 0, 0)
//赋能-批处理
gl.enableVertexAttribArray(a_Position)


//颜色数据
const colors = new Float32Array([
0, 0, 1, 1,
0, 1, 0, 1,
1, 1, 0, 1
]);
//缓冲对象
const colorBuffer = gl.createBuffer();
//绑定缓冲对象
gl.bindBuffer(gl.ARRAY_BUFFER, colorBuffer);
//写入数据
gl.bufferData(gl.ARRAY_BUFFER, colors, gl.STATIC_DRAW)
//获取attribute 变量
const a_Color = gl.getAttribLocation(gl.program, 'a_Color')
//修改attribute 变量
gl.vertexAttribPointer(a_Color, 4, gl.FLOAT, false, 0, 0)
//赋能-批处理
gl.enableVertexAttribArray(a_Color)


//刷底色
gl.clear(gl.COLOR_BUFFER_BIT);

//绘制顶点
gl.drawArrays(gl.POINTS, 0, 3);
</script>
</body>

</html>

效果

效果

多attribute数据合一

概念

在上面的代码中,我们写了一个顶点数据,又写了一个颜色数据,感觉非常的鸡肋,其实我们可以把这个attribute给合并起来。

1
2
3
4
5
const source = new Float32Array([
0, 0.2, 0, 1, 0, 0, 1,
-0.2, -0.1, 0, 0, 1, 0, 1,
0.2, -0.1, 0, 0, 0, 1, 1,
]);

我们可以看到,左半边是我们的position,右边是color。

对应上面的数据,我们要先有以下概念:

  1. 数据源:整个合而为一的数据source
  2. 元素字节数:32位浮点集合中每个元素的字节数
  3. 类目:一个顶点对应一个类目,也就是上面source中的每一行
  4. 系列:一个类目中所包含的每一种数据,比如顶点位置数据、顶点颜色数据
  5. 系列尺寸:一个系列所对应的向量的分量数目
  6. 类目尺寸:一个类目中所有系列尺寸的总和
  7. 类目字节数:一个类目的所有字节数量
  8. 系列元素索引位置:一个系列在一个类目中,以集合元素为单位的索引位置
  9. 系列字节索引位置:一个系列在一个类目中,以字节为单位的索引位置
  10. 顶点总数:数据源中的顶点总数
1
2
3
4
5
6
7
8
9
10
11
12
13
14
15
16
17
18
19
20
//数据源
const source = new Float32Array([
0, 0.2, 0, 1, 0, 0, 1,
-0.2, -0.1, 0, 0, 1, 0, 1,
0.2, -0.1, 0, 0, 0, 1, 1
]);
//元素字节数
const elementBytes = source.BYTES_PER_ELEMENT
//系列尺寸
const verticeSize = 3
const colorSize = 4
//类目尺寸
const categorySize = verticeSize + colorSize
//类目字节数
const categoryBytes = categorySize * elementBytes
//系列字节索引位置
const verticeByteIndex = 0
const colorByteIndex = verticeSize * elementBytes
//顶点总数
const sourseSize = source.length / categorySize

代码

1
2
3
4
5
6
7
8
9
10
11
12
13
14
15
16
17
18
19
20
21
22
23
24
25
26
27
28
29
30
31
32
33
34
35
36
37
38
39
40
41
42
43
44
45
46
47
48
49
50
51
52
53
54
55
56
57
58
59
60
61
62
63
64
65
66
67
68
69
70
71
72
73
74
75
76
77
78
79
80
81
82
83
84
85
86
87
88
89
90
91
92
93
94
95
96
97
98
99
100
101
102
103
104
105
106
107
108
109
110
111
112
113
114
115
116
117
118
119
120
121
122
123
124
125
126
<!DOCTYPE html>
<html lang="en">

<head>
<meta charset="UTF-8" />
<title>数据合一</title>
<style>
body {
margin: 0;
overflow: hidden;
}

#canvas {
background-color: antiquewhite;
}
</style>
</head>

<body>
<canvas id="canvas"></canvas>
<!-- 顶点着色器 -->
<script id="vertexShader" type="x-shader/x-vertex">
attribute vec4 a_Position;
attribute vec4 a_Color;
varying vec4 v_Color;
void main(){
//点位
gl_Position=a_Position;
//尺寸
gl_PointSize=50.0;
v_Color=a_Color;
}
</script>
<!-- 片元着色器 -->
<script id="fragmentShader" type="x-shader/x-fragment">
precision mediump float;
varying vec4 v_Color;
void main(){
gl_FragColor=v_Color;
}
</script>
<script type="module">
import { initShaders } from "../jsm/Utils.js";

const canvas = document.querySelector("#canvas");
canvas.width = window.innerWidth;
canvas.height = window.innerHeight;

// 获取着色器文本
const vsSource = document.querySelector("#vertexShader").innerText;
const fsSource = document.querySelector("#fragmentShader").innerText;

//三维画笔
const gl = canvas.getContext("webgl");

//初始化着色器
initShaders(gl, vsSource, fsSource);
//声明颜色 rgba
gl.clearColor(0, 0, 0, 1);

//数据源
const source = new Float32Array([
0, 0.4, 0, 0, 0, 1, 1,
-0.2, -0.1, 0, 0, 1, 0, 1,
0.2, -0.1, 0, 1, 1, 0, 1,
]);
//元素字节数
const elementBytes = source.BYTES_PER_ELEMENT
//系列尺寸
const verticeSize = 3
const colorSize = 4
//类目尺寸
const categorySize = verticeSize + colorSize
//类目字节数
const categoryBytes = categorySize * elementBytes
//系列字节索引位置
const verticeByteIndex = 0
const colorByteIndex = verticeSize * elementBytes
//顶点总数
const sourceSize = source.length / categorySize


//缓冲对象
const sourceBuffer = gl.createBuffer();
//绑定缓冲对象
gl.bindBuffer(gl.ARRAY_BUFFER, sourceBuffer);
//写入数据
gl.bufferData(gl.ARRAY_BUFFER, source, gl.STATIC_DRAW)

//获取attribute 变量
const a_Position = gl.getAttribLocation(gl.program, 'a_Position')
//修改attribute 变量
gl.vertexAttribPointer(
a_Position,
verticeSize,
gl.FLOAT,
false,
categoryBytes,
verticeByteIndex
)
//赋能-批处理
gl.enableVertexAttribArray(a_Position)

//获取attribute 变量
const a_Color = gl.getAttribLocation(gl.program, 'a_Color')
//修改attribute 变量
gl.vertexAttribPointer(
a_Color,
colorSize,
gl.FLOAT,
false,
categoryBytes,
colorByteIndex
)
//赋能-批处理
gl.enableVertexAttribArray(a_Color)

//刷底色
gl.clear(gl.COLOR_BUFFER_BIT);

//绘制顶点
gl.drawArrays(gl.POINTS, 0, sourceSize);
</script>
</body>

</html>

void gl.vertexAttribPointer(index, size, type, normalized, stride, offset)

  • index:attribute 变量,具体而言是指向存储attribute 变量的空间的指针
  • size:系列尺寸
  • type:元素的数据类型
  • normalized:是否归一化
  • stride:类目字节数
  • offset:系列索引位置

效果

效果

绘制彩色三角形

我们直接用上面的三个颜色的顶点来绘制三角形

1
2
//绘制顶点
gl.drawArrays(gl.TRIANGLES, 0, sourceSize);

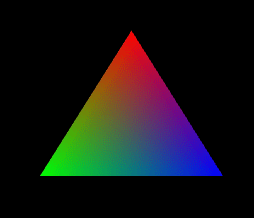
此时的三角形是这样的
效果

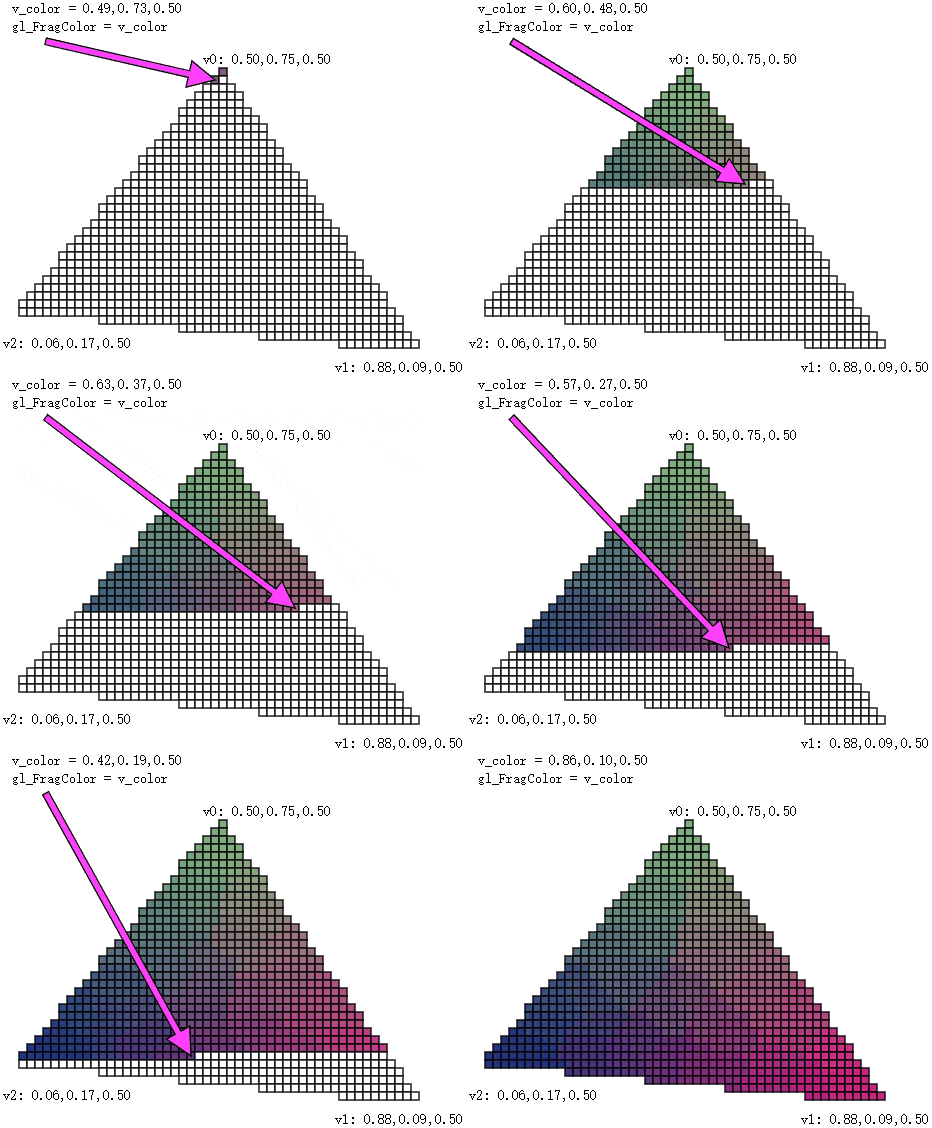
为什么会画出一个具有三种颜色的三角形呢?

这是因为我给三角形的三个顶点绑定了三种颜色。

那为什么这三种颜色可以平滑过渡呢?这其中的规律是什么?

我们通过下面这个图便可以很好的去理解,它就是在三个点之间做线性补间,将补间得出的颜色填充到三角形所围成的每个片元之中。
图示

一抹绿意

上一篇文章中,我们用sin函数实现了一个一池春水案例,接下来,我们将这个案例继续美化一下

修改Poly

首先我们根据上面的知识,重新写一个Poly.js出来

定义Poly的基本属性

1
2
3
4
5
6
7
8
9
10
const defAttr = () => ({
gl:null,
type:'POINTS',
source:[],
sourceSize:0,
elementBytes:4,
categorySize: 0,
attributes: {},
uniforms: {},
})
  • source 数据源
  • sourceSize 顶点数量,数据源尺寸
  • elementBytes 元素字节数
  • categorySize 类目尺寸
  • attributes attribute属性集合,其数据结构如下:
    1
    2
    3
    4
    5
    6
    7
    8
    9
    {
    a_Position: {
    size: 3,
    index:0
    }
    }
    // a_Position 对应attribute变量名
    // size 系列尺寸
    // index 系列的元素索引位置
  • uniforms uniform变量集合,其数据结构如下:
    1
    2
    3
    4
    5
    6
    7
    8
    9
    {
    u_Color: {
    type: 'uniform1f',
    value:1
    }
    }
    // u_Color 对应uniform变量名
    // type uniform变量的修改方法
    // value uniform变量的值

Poly对象的构造函数

1
2
3
4
constructor(attr){
Object.assign(this,defAttr(),attr)
this.init()
}

初始化方法

1
2
3
4
5
6
init(){
if (!this.gl) { return }
this.calculateSourceSize()
this.updateAttribute();
this.updateUniform();
}
calculateSize() 基于数据源计算类目尺寸、类目字节数、顶点总数
1
2
3
4
5
6
7
8
9
10
11
12
calculateSourceSize() {
const {attributes, elementBytes,source } = this
let categorySize = 0
Object.values(attributes).forEach(ele => {
const { size, index } = ele
categorySize += size
ele.byteIndex=index*elementBytes
})
this.categorySize = categorySize
this.categoryBytes=categorySize*elementBytes
this.sourceSize = source.length / categorySize
}
updateAttribute() 更新attribute 变量
1
2
3
4
5
6
7
8
9
10
11
12
13
14
15
16
17
18
updateAttribute() {
const { gl, attributes, categoryBytes, source } = this
const sourceBuffer = gl.createBuffer();
gl.bindBuffer(gl.ARRAY_BUFFER, sourceBuffer);
gl.bufferData(gl.ARRAY_BUFFER, new Float32Array(source), gl.STATIC_DRAW)
for (let [key, { size, byteIndex }] of Object.entries(attributes)) {
const attr = gl.getAttribLocation(gl.program, key)
gl.vertexAttribPointer(
attr,
size,
gl.FLOAT,
false,
categoryBytes,
byteIndex
)
gl.enableVertexAttribArray(attr)
}
}
updateUniform() 更新uniform变量
1
2
3
4
5
6
7
8
9
10
11
12
updateUniform() {
const {gl,uniforms}=this
for (let [key, val] of Object.entries(uniforms)) {
const { type, value } = val
const u = gl.getUniformLocation(gl.program, key)
if (type.includes('Matrix')) {
gl[type](u,false,value)
} else {
gl[type](u,value)
}
}
}
draw() 绘图方法
1
2
3
4
draw(type = this.type) {
const { gl, sourceSize } = this
gl.drawArrays(gl[type],0,sourceSize);
}
完整代码
1
2
3
4
5
6
7
8
9
10
11
12
13
14
15
16
17
18
19
20
21
22
23
24
25
26
27
28
29
30
31
32
33
34
35
36
37
38
39
40
41
42
43
44
45
46
47
48
49
50
51
52
53
54
55
56
57
58
59
60
61
62
63
64
65
66
67
68
69
70
71
72
73
74
75
76
77
78
79
80
81
82
83
/* 
attributes 数据结构:{
a_Position: {
size: 3,
index:0
}
}
uniforms 数据结构:{
u_Color: {
type: 'uniform1f',
value:1
},
}
*/
const defAttr = () => ({
gl:null,
type:'POINTS',
source:[],
sourceSize:0,
elementBytes:4,
categorySize: 0,
attributes: {},
uniforms: {},
})
export default class Poly{
constructor(attr){
Object.assign(this,defAttr(),attr)
this.init()
}
init(){
if (!this.gl) { return }
this.calculateSize()
this.updateAttribute();
this.updateUniform();
}
calculateSize() {
const {attributes, elementBytes,source } = this
let categorySize = 0
Object.values(attributes).forEach(ele => {
const { size, index } = ele
categorySize += size
ele.byteIndex=index*elementBytes
})
this.categorySize = categorySize
this.categoryBytes=categorySize*elementBytes
this.sourceSize = source.length / categorySize
}
updateAttribute() {
const { gl, attributes, categoryBytes, source } = this
const sourceBuffer = gl.createBuffer();
gl.bindBuffer(gl.ARRAY_BUFFER, sourceBuffer);
gl.bufferData(gl.ARRAY_BUFFER, new Float32Array(source), gl.STATIC_DRAW)
for (let [key, { size, byteIndex }] of Object.entries(attributes)) {
const attr = gl.getAttribLocation(gl.program, key)
gl.vertexAttribPointer(
attr,
size,
gl.FLOAT,
false,
categoryBytes,
byteIndex
)
gl.enableVertexAttribArray(attr)
}
}
updateUniform() {
const {gl,uniforms}=this
for (let [key, val] of Object.entries(uniforms)) {
const { type, value } = val
const u = gl.getUniformLocation(gl.program, key)
if (type.includes('Matrix')) {
gl[type](u,false,value)
} else {
gl[type](u,value)
}
}
}

draw(type = this.type) {
const { gl, sourceSize } = this
gl.drawArrays(gl[type],0,sourceSize);
}
}

实现逻辑

顶点着色器

1
2
3
4
5
6
7
8
9
10
11
<script id="vertexShader" type="x-shader/x-vertex">
attribute vec4 a_Position;
attribute vec4 a_Color;
uniform mat4 u_ViewMatrix;
varying vec4 v_Color;
void main(){
gl_Position = u_ViewMatrix*a_Position;
gl_PointSize=3.0;
v_Color=a_Color;
}
</script>

片元着色器

1
2
3
4
5
6
7
<script id="fragmentShader" type="x-shader/x-fragment">
precision mediump float;
varying vec4 v_Color;
void main(){
gl_FragColor=v_Color;
}
</script>

初始化着色器

1
2
3
4
5
6
7
8
9
const canvas = document.getElementById('canvas');
canvas.width = window.innerWidth;
canvas.height = window.innerHeight;
const gl = canvas.getContext('webgl');

const vsSource = document.getElementById('vertexShader').innerText;
const fsSource = document.getElementById('fragmentShader').innerText;
initShaders(gl, vsSource, fsSource);
gl.clearColor(0.0, 0.0, 0.0, 1.0);

建立视图矩阵

1
2
3
4
5
6
/* 视图矩阵 */
const viewMatrix = new Matrix4().lookAt(
new Vector3(0.2, 0.3, 1),
new Vector3(),
new Vector3(0, 1, 0)
)

建立在x,z方向上的比例尺,将空间坐标和弧度相映射

1
2
3
4
5
6
7
8
9
10
11
12
/* x,z 方向的空间坐标极值 */
const [minPosX, maxPosX, minPosZ, maxPosZ] = [
-0.7, 0.8, -1, 1
]
/* x,z 方向的弧度极值 */
const [minAngX, maxAngX, minAngZ, maxAngZ] = [
0, Math.PI * 4, 0, Math.PI * 2
]

/* 比例尺:将空间坐标和弧度相映射 */
const scalerX = ScaleLinear(minPosX, minAngX, maxPosX, maxAngX)
const scalerZ = ScaleLinear(minPosZ, minAngZ, maxPosZ, maxAngZ)

建立将y坐标和色相相映射的比例尺

1
2
3
4
5
6
7
8
/* y 方向的坐标极值 */
const [a1, a2] = [0.1, 0.03]
const a12 = a1 + a2
const [minY, maxY] = [-a12, a12]
/* 色相极值 */
const [minH, maxH] = [0.15, 0.5]
/* 比例尺:将y坐标和色相相映射 */
const scalerC = ScaleLinear(minY, minH, maxY, maxH)

建立颜色对象,可通过HSL获取颜色

1
const color = new Color()

建立波浪对象

1
2
3
4
5
6
7
8
9
10
11
12
13
14
15
16
17
18
19
20
21
22
23
24
25
26
27
28
/* 波浪对象的行数和列数 */
const [rows, cols] = [50, 50]

/* 波浪对象的两个attribute变量,分别是位置和颜色 */
const a_Position = { size: 3, index: 0 }
const a_Color = { size: 4, index: 3 }

/* 类目尺寸 */
const categorySize = a_Position.size + a_Color.size

/* 波浪对象 */
const wave = new Poly({
gl,
source: getSource(
cols, rows,
minPosX, maxPosX, minPosZ, maxPosZ
),
uniforms: {
u_ViewMatrix: {
type: 'uniformMatrix4fv',
value: viewMatrix.elements
},
},
attributes: {
a_Position,
a_Color,
}
})

getSource() 方法是基于行列数和坐标极值获取数据源的方法

1
2
3
4
5
6
7
8
9
10
11
12
13
14
/* 建立顶点集合 */
function getSource(cols, rows, minPosX, maxPosX, minPosZ, maxPosZ) {
const source = []
const spaceZ = (maxPosZ - minPosZ) / rows
const spaceX = (maxPosX - minPosX) / cols
for (let z = 0; z < rows; z++) {
for (let x = 0; x < cols; x++) {
const px = x * spaceX + minPosX
const pz = z * spaceZ + minPosZ
source.push(px, 0, pz, 1, 1, 1, 1)
}
}
return source
}

渲染

1
2
3
4
5
6
render()
/* 渲染 */
function render() {
gl.clear(gl.COLOR_BUFFER_BIT);
wave.draw()
}

制作定点起伏动画,并添加颜色

1
2
3
4
5
6
7
8
9
10
11
12
13
14
15
16
17
18
19
20
21
22
23
24
25
26
27
28
/* 动画:偏移phi */
let offset = 0
!(function ani() {
offset += 0.08
updateVertices(offset)
wave.updateAttribute()
render()
requestAnimationFrame(ani)
})()

/* 更新顶点高度和颜色 */
function updateVertices(offset = 0) {
const { source, categorySize } = wave
for (let i = 0; i < source.length; i += categorySize) {
const [posX, posZ] = [source[i], source[i + 2]]
const angZ = scalerZ(posZ)
const Omega = 2
const a = Math.sin(angZ) * a1 + a2
const phi = scalerX(posX) + offset
const y = SinFn(a, Omega, phi)(angZ)
source[i + 1] = y
const h = scalerC(y)
const { r, g, b } = color.setHSL(h, 1, 0.6)
source[i + 3] = r
source[i + 4] = g
source[i + 5] = b
}
}

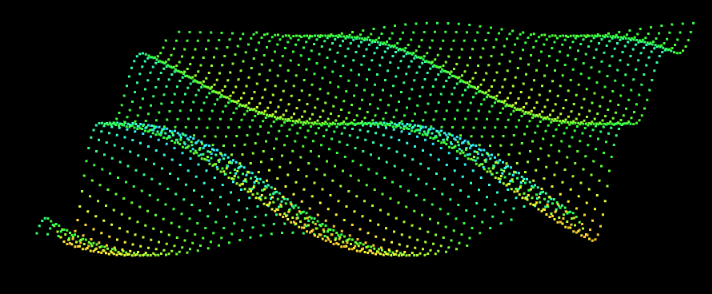
此时我们将我们的点给连接了起来
效果图

一片春色

有了上面连点成线的案例,接下来要连点成面了。

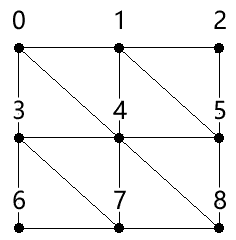
回顾怎么画独立三角形

比如这样的几个点
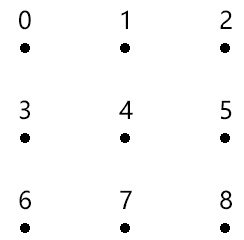
图示

根据画独立三角形的规则,可以划分成这样
图示

1
2
3
4
[
0,3,4, 0,4,1, 1,4,5, 1,5,2,
3,6,7, 3,7,4, 4,7,8, 4,8,5
]

代码实现

开启透明度合成

1
2
gl.enable(gl.BLEND);
gl.blendFunc(gl.SRC_ALPHA, gl.ONE);

建立基于行列获取顶点索引的方法

1
2
3
4
5
6
const getInd = GetIndexInGrid(cols, categorySize)
function GetIndexInGrid(w, size) {
return function (x, y) {
return (y * w + x) * size
}
}

获取顶点阵列和三角形的顶点索引集合

1
2
3
4
const { vertices, indexes } = crtBaseData(
cols, rows,
minPosX, maxPosX, minPosZ, maxPosZ
);

crtBaseData() 是基于行列数和空间极值获取顶点阵列和三角形的顶点索引集合的方法。
vertices 顶点阵列
indexes 三角形的顶点索引集合

1
2
3
4
5
6
7
8
9
10
11
12
13
14
15
16
17
18
19
20
21
22
23
24
25
function crtBaseData(cols, rows, minPosX, maxPosX, minPosZ, maxPosZ) {
const vertices = []
const indexes = []
const spaceZ = (maxPosZ - minPosZ) / rows
const spaceX = (maxPosX - minPosX) / cols
for (let z = 0; z < rows; z++) {
for (let x = 0; x < cols; x++) {
const px = x * spaceX + minPosX
const pz = z * spaceZ + minPosZ
vertices.push(px, 0, pz, 1, 1, 1, 0.5)
if (z && x) {
const [x0, z0] = [x - 1, z - 1]
indexes.push(
getInd(x0, z0),
getInd(x, z0),
getInd(x, z),
getInd(x0, z0),
getInd(x, z),
getInd(x0, z),
)
}
}
}
return { vertices, indexes }
}

建立波浪对象

1
2
3
4
5
6
7
8
9
10
11
12
13
14
const wave = new Poly({
gl,
source: getSource(indexes, vertices, categorySize),
uniforms: {
u_ViewMatrix: {
type: 'uniformMatrix4fv',
value: viewMatrix.elements
},
},
attributes: {
a_Position,
a_Color,
}
})

getSource() 是通过顶点阵列和三角形的顶点索引集合获取数据源的方法。

1
2
3
4
5
6
7
function getSource(vertices, indexes, categorySize) {
const arr = []
indexes.forEach(i => {
arr.push(...vertices.slice(i, i + categorySize))
})
return arr
}

渲染

1
2
3
4
5
6
function render() {
gl.clear(gl.COLOR_BUFFER_BIT);
// wave.draw()
wave.draw('LINES')
wave.draw('TRIANGLES')
}

完整代码

1
2
3
4
5
6
7
8
9
10
11
12
13
14
15
16
17
18
19
20
21
22
23
24
25
26
27
28
29
30
31
32
33
34
35
36
37
38
39
40
41
42
43
44
45
46
47
48
49
50
51
52
53
54
55
56
57
58
59
60
61
62
63
64
65
66
67
68
69
70
71
72
73
74
75
76
77
78
79
80
81
82
83
84
85
86
87
88
89
90
91
92
93
94
95
96
97
98
99
100
101
102
103
104
105
106
107
108
109
110
111
112
113
114
115
116
117
118
119
120
121
122
123
124
125
126
127
128
129
130
131
132
133
134
135
136
137
138
139
140
141
142
143
144
145
146
147
148
149
150
151
152
153
154
155
156
157
158
159
160
161
162
163
164
165
166
167
168
169
170
171
172
173
174
175
176
177
178
179
180
181
182
183
184
185
186
187
188
189
190
191
192
193
194
195
196
197
198
199
200
201
202
203
204
205
206
<!DOCTYPE html>
<html lang="en">

<head>
<meta charset="UTF-8">
<title>一片春色</title>
<style>
body {
margin: 0;
overflow: hidden
}
</style>
</head>

<body>
<canvas id="canvas"></canvas>
<script id="vertexShader" type="x-shader/x-vertex">
attribute vec4 a_Position;
attribute vec4 a_Color;
uniform mat4 u_ViewMatrix;
varying vec4 v_Color;
void main(){
gl_Position = u_ViewMatrix*a_Position;
gl_PointSize=3.0;
v_Color=a_Color;
}
</script>
<script id="fragmentShader" type="x-shader/x-fragment">
precision mediump float;
varying vec4 v_Color;
void main(){
gl_FragColor=v_Color;
}
</script>
<script type="module">
import { initShaders, getMousePosInWebgl, ScaleLinear, SinFn, GetIndexInGrid } from '../jsm/Utils.js';
import { Matrix4, Vector3, Quaternion, Plane, Ray, Color } from 'https://unpkg.com/three/build/three.module.js';
import Poly from './jsm/Poly.js';

const canvas = document.getElementById('canvas');
canvas.width = window.innerWidth;
canvas.height = window.innerHeight;
const gl = canvas.getContext('webgl');


const vsSource = document.getElementById('vertexShader').innerText;
const fsSource = document.getElementById('fragmentShader').innerText;
initShaders(gl, vsSource, fsSource);
gl.enable(gl.BLEND);
gl.blendFunc(gl.SRC_ALPHA, gl.ONE);
gl.clearColor(0.0, 0.0, 0.0, 1.0);


/* 视图矩阵 */
const viewMatrix = new Matrix4().lookAt(
new Vector3(0.2, 0.3, 1),
new Vector3(),
new Vector3(0, 1, 0)
)

/* x,z 方向的空间坐标极值 */
const [minPosX, maxPosX, minPosZ, maxPosZ] = [
-0.7, 0.8, -0.9, 1
]
/* x,z 方向的弧度极值 */
const [minAngX, maxAngX, minAngZ, maxAngZ] = [
0, Math.PI * 4, 0, Math.PI * 2
]
/* 比例尺:将空间坐标和弧度相映射 */
const scalerX = ScaleLinear(minPosX, minAngX, maxPosX, maxAngX)
const scalerZ = ScaleLinear(minPosZ, minAngZ, maxPosZ, maxAngZ)


/* y 方向的坐标极值 */
const [a1, a2] = [0.1, 0.03]
const a12 = a1 + a2
const [minY, maxY] = [-a12, a12]

/* 色相极值 */
const [minH, maxH] = [0.5, 0.2]

/* 比例尺:将y坐标和色相相映射 */
const scalerC = ScaleLinear(minY, minH, maxY, maxH)

/* 颜色对象,可通过HSL获取颜色 */
const color = new Color()

/* 波浪对象的行数和列数 */
const [rows, cols] = [40, 40]

/* 波浪对象的两个attribute变量,分别是位置和颜色 */
const a_Position = { size: 3, index: 0 }
const a_Color = { size: 4, index: 3 }

/* 类目尺寸 */
const categorySize = a_Position.size + a_Color.size

//获取索引位置的方法
const getInd = GetIndexInGrid(cols, categorySize)

/* 获取基础数据
vertices 按照行列形式排列的顶点集合
indexes 三角网格的顶点索引,其元素为顶点在vertices中的索引
*/
const { vertices, indexes } = crtBaseData(
cols, rows,
minPosX, maxPosX, minPosZ, maxPosZ
);

/* 建立波浪对象 */
const wave = new Poly({
gl,
source: getSource(vertices, indexes, categorySize),
uniforms: {
u_ViewMatrix: {
type: 'uniformMatrix4fv',
value: viewMatrix.elements
},
},
attributes: {
a_Position,
a_Color,
}
})

//渲染
render()


/* 动画:偏移phi */
let offset = 0
!(function ani() {
offset += 0.08
updateSource(offset)
wave.updateAttribute()
render()
requestAnimationFrame(ani)
})()

/* 渲染 */
function render() {
gl.clear(gl.COLOR_BUFFER_BIT);
wave.draw()
wave.draw('LINES')
// wave.draw('TRIANGLES')
}

/* 建立基础数据 */
function crtBaseData(cols, rows, minPosX, maxPosX, minPosZ, maxPosZ) {
const vertices = []
const indexes = []
const spaceZ = (maxPosZ - minPosZ) / rows
const spaceX = (maxPosX - minPosX) / cols
for (let z = 0; z < rows; z++) {
for (let x = 0; x < cols; x++) {
const px = x * spaceX + minPosX
const pz = z * spaceZ + minPosZ
vertices.push(px, 0, pz, 1, 1, 1, 0.5)
if (z && x) {
const [x0, z0] = [x - 1, z - 1]
indexes.push(
getInd(x0, z0),
getInd(x, z0),
getInd(x, z),
getInd(x0, z0),
getInd(x, z),
getInd(x0, z),
)
}
}
}
return { vertices, indexes }
}


/* 建立顶点集合 */
function getSource(vertices, indexes, categorySize) {
const arr = []
indexes.forEach(i => {
arr.push(...vertices.slice(i, i + categorySize))
})
return arr
}

//更新顶点高度
function updateSource(offset = 0) {
const { source, categorySize } = wave
for (let i = 0; i < source.length; i += categorySize) {
const [posX, posZ] = [source[i], source[i + 2]]
const angZ = scalerZ(posZ)
const Omega = 2
const a = Math.sin(angZ) * a1 + a2
const phi = scalerX(posX) + offset
const y = SinFn(a, Omega, phi)(angZ)
source[i + 1] = y
const h = scalerC(y)
const { r, g, b } = color.setHSL(h, 1, 0.6)
source[i + 3] = r
source[i + 4] = g
source[i + 5] = b
}
}
</script>
</body>

</html>

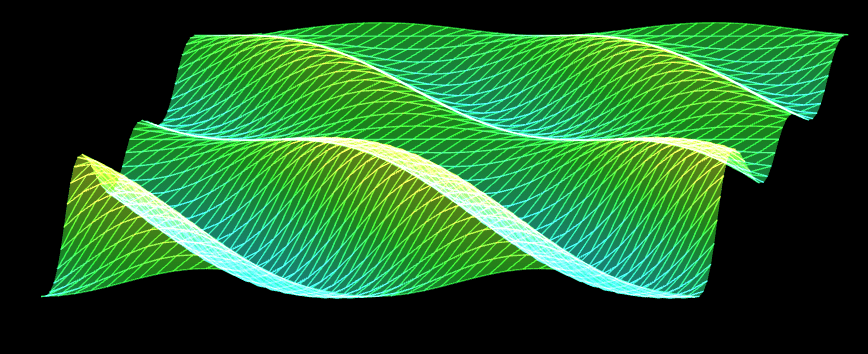
效果

效果

了解纹理需要的基础概念

栅格系统

我们在说图像的时候,往往都是指点阵图、栅格图、位图(png,jpg这种)。

而与其相对应的是图形,也做矢量图(svg这种)。

我接下来说的纹理,就是属于图像,其图像的建立和显示会遵循栅格系统里的规范。

比如,所有图像都是由像素组成的,在webgl里我们把像素称为片元,像素是按照相互垂直的行列排列的。

如下图
图示
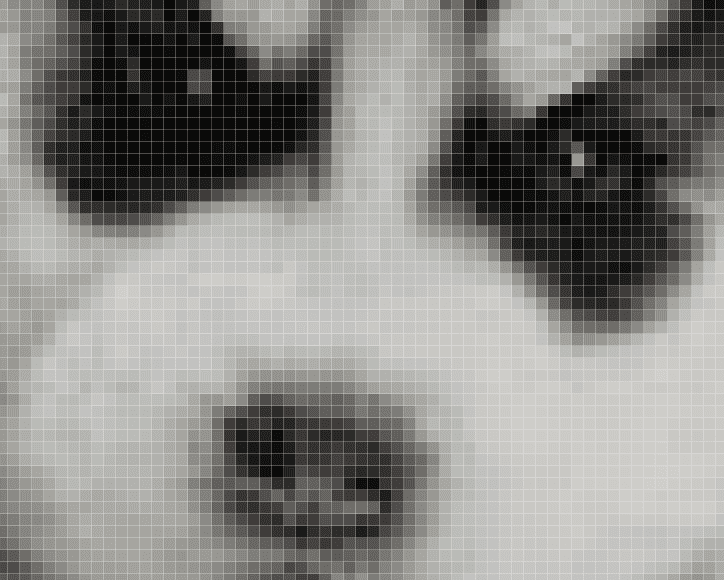
当我们把图片在PS中放大之后,可以很明显的看到像素点
图示

图像中的每个像素都可以通过行数y和列数x来找到,由(x,y) 构成的点位,就是图像的像素坐标。

因为canvas画布也是一张图像,所以图像的栅格坐标系和我们之前说过的canvas2d的坐标系是一样的,我们可以简单回顾一下:
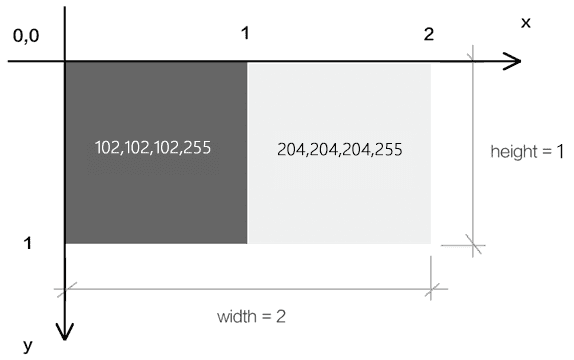
图示
栅格坐标系的原点在左上角。

栅格坐标系的y 轴方向是朝下的。

栅格坐标系的坐标基底由两个分量组成,分别是一个像素的宽和一个像素的高。

图钉概念

在webgl中实际上是没有图钉概念的,这个概念是为了方便我们理解webgl引入的,这里拿ps的图钉举例

在ps中,我们可以添加这样一个图钉,然后给图片进行变形
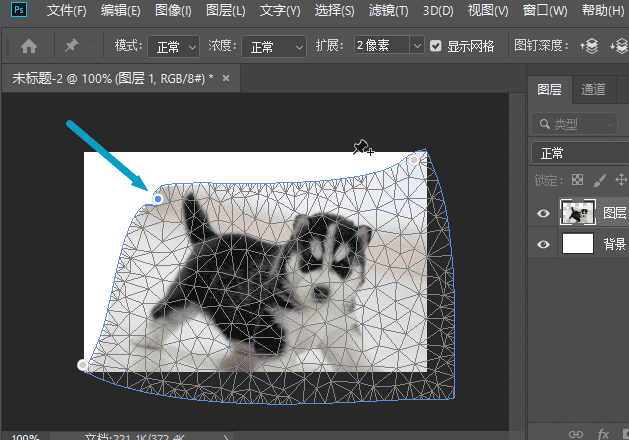
图示

webgl中,图钉的位置是通过uv坐标来控制的,图钉的uv坐标和顶点的webgl坐标是两种不同的坐标系统,之后我们会其相互映射,从而将图像特定的一块区域贴到webgl图形中。

比如我将其映射到下面的蓝色三角形中:
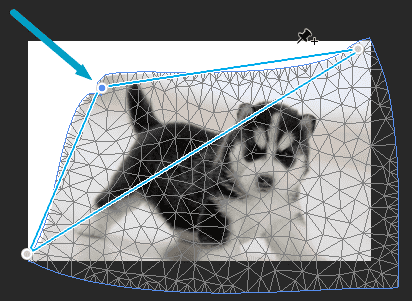
图示
注:我们在webgl里打图钉的时候不会发生边界线的扭曲,上图重在示意。

uv坐标系

我们在webgl里打图钉的时候,要考虑图钉在图像中的定位。

说到定位,大家不要先想位置,而是要先想坐标系,咱们接下来说一下图钉使用的uv坐标系。
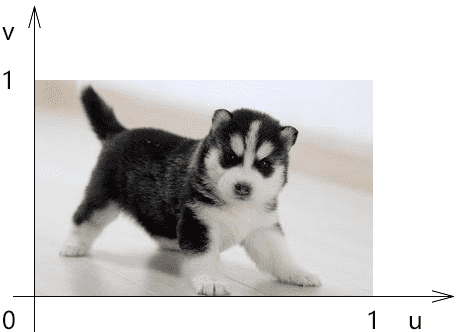
图示

uv坐标系,也叫st坐标系,大家以后见到了知道是一回事即可。

uv坐标系的坐标原点在图像的左下角,u轴在右,v轴在上。

u轴上的1个单位是图像的宽;

v轴上的一个单位是图像的高。

采样器

采样器是按照图钉位置从图像中获取片元的方式。

我们在图像中所打的图钉位置,并不是图像中某一个片元的位置,因为片元位置走的是栅格坐标系。

所以我们需要一个采样器去对图钉的uv坐标系和像素的栅格坐标系做映射,从而去采集图像中图钉所对应的片元。

着色器基于一张图像可以建立一个,或多个采样器,不同的采样器可以定义不同的规则去获取图像中的片元。

采样器在着色器中是一种变量类型,写做sampler2D,它就像我们之前写过的vec4 类型一样,可以在片元着色器中通过uniform变量暴露给js,让js对其进行修改。

既然js可以对采样器进行修改了,那js必然会以某种方式向着色器传递其建立采样器所需的数据。

接下来咱们就先说一下这种的数据。

纹理对象

着色器使用一个纹理对象,就可以建立一个采样器。

纹理对象的建立需要一个图像源,比如Image 对象。

同是,我们还需要设置纹理对象和图钉进行数据映射的方式。

纹理对象是通过js 来建立的,js并不能直接将纹理对象传递给着色器。因为纹理对象说的是js 语言,说glsl es语言的着色器是不认识这种语言的。

所以,webgl 在浏览器底层为纹理对象建立了一块缓冲区,缓存区可以理解为用于存放纹理对象的磁盘空间,这块空间可以将纹理对象翻译成着色器可以读懂的数据。

之后我们会把这个空间的索引位置传给着色器,让着色器基于这个空间的索引位置,找到这个空间,然后再从空间中找到纹理对象,最后通过纹理对象建立采样器。

接下来咱们就说一下这个用于存储纹理对象的空间-纹理单元。

纹理单元

纹理单元是一种专门用来存放纹理对象的缓冲区,就像我们之前用createBuffer()方法建立的用于存储数据源的缓冲区一样。

纹理单元是由webgl提前建立好的,只有固定的几个,如TEXTURE0|1|2|3|4|5|6|7|8,(最好不要超过8个),这就像我们实际中住的楼房单元一样,已经被webgl提前在浏览器中建立起来了,数量有限。

纹理单元虽然无需我们自己建立,但需要我们自己激活,让其进入使用状态。

基本概念咱们就说到这,接下来咱们看一下整体的代码实现。

使用纹理的代码逻辑

顶点着色器

1
2
3
4
5
6
7
8
9
<script id="vertexShader" type="x-shader/x-vertex">
attribute vec4 a_Position;
attribute vec2 a_Pin;
varying vec2 v_Pin;
void main(){
gl_Position = a_Position;
v_Pin=a_Pin;
}
</script>

a_Pin 图钉位置

片元着色器

1
2
3
4
5
6
7
8
<script id="fragmentShader" type="x-shader/x-fragment">
precision mediump float;
uniform sampler2D u_Sampler;
varying vec2 v_Pin;
void main(){
gl_FragColor=texture2D(u_Sampler,v_Pin);
}
</script>

sampler2D 是uniform 变量的类型,叫做二维取样器
texture2D() 基于图钉从取样器中获取片元颜色

初始化着色器

1
2
3
4
5
6
7
8
9
const canvas = document.getElementById('canvas');
canvas.width = window.innerWidth;
canvas.height = window.innerHeight;
const gl = canvas.getContext('webgl');

const vsSource = document.getElementById('vertexShader').innerText;
const fsSource = document.getElementById('fragmentShader').innerText;
initShaders(gl, vsSource, fsSource);
gl.clearColor(0.0, 0.0, 0.0, 1.0);

建立数据源,并计算相应尺寸

1
2
3
4
5
6
7
8
9
10
11
12
13
14
15
16
17
18
19
20
21
22
//数据源
const source = new Float32Array([
-0.5, 0.5, 0.0, 1.0,
-0.5, -0.5, 0.0, 0.0,
0.5, 0.5, 1.0, 1.0,
0.5, -0.5, 1.0, 0.0,
]);
const FSIZE = source.BYTES_PER_ELEMENT;
//元素字节数
const elementBytes = source.BYTES_PER_ELEMENT
//系列尺寸
const posSize = 2
const PinSize = 2
//类目尺寸
const categorySize = posSize + PinSize
//类目字节数
const categoryBytes = categorySize * elementBytes
//系列字节索引位置
const posByteIndex = 0
const pinByteIndex = posSize * elementBytes
//顶点总数
const sourceSize = source.length / categorySize

数据源中有两个系列,分别是顶点位置系列和图钉位置系列。左边俩个是顶点位置,右边俩个是图钉位置

将数据源写入到缓冲区,让attribute变量从其中寻找数据

1
2
3
4
5
6
7
8
9
10
11
12
13
14
15
16
17
18
19
20
21
22
23
24
25
const sourceBuffer = gl.createBuffer();
gl.bindBuffer(gl.ARRAY_BUFFER, sourceBuffer);
gl.bufferData(gl.ARRAY_BUFFER, source, gl.STATIC_DRAW);

const a_Position = gl.getAttribLocation(gl.program, 'a_Position');
gl.vertexAttribPointer(
a_Position,
posSize,
gl.FLOAT,
false,
categoryBytes,
posByteIndex
);
gl.enableVertexAttribArray(a_Position);

const a_Pin = gl.getAttribLocation(gl.program, 'a_Pin');
gl.vertexAttribPointer(
a_Pin,
pinSize,
gl.FLOAT,
false,
categoryBytes,
pinByteIndex
);
gl.enableVertexAttribArray(a_Pin);

建立Image 图像作为图像源,当图像源加载成功后再贴图

1
2
3
4
5
6
7
8
9
10
11
12
13
14
15
16
17
18
19
20
21
22
23
24
25
26
27
28
29
30
31
32
33
34
35
36
37
38
39
40
41
42
43
44
45
46
47
48
49
50
//对纹理图像垂直翻转
gl.pixelStorei(gl.UNPACK_FLIP_Y_WEBGL, 1);

//纹理单元
gl.activeTexture(gl.TEXTURE0);

//纹理对象
const texture = gl.createTexture();
//把纹理对象装进纹理单元里
gl.bindTexture(gl.TEXTURE_2D, texture);

//image 对象
const image = new Image();
image.src = './images/erha2.jpg';
image.onload = function () {
showMap()
}

//贴图
function showMap() {
//配置纹理图像
gl.texImage2D(
gl.TEXTURE_2D,
0,
gl.RGB,
gl.RGB,
gl.UNSIGNED_BYTE,
image
);

//配置纹理参数
gl.texParameteri(
gl.TEXTURE_2D,
gl.TEXTURE_MIN_FILTER,
gl.LINEAR
);

//获取u_Sampler
const u_Sampler = gl.getUniformLocation(gl.program, 'u_Sampler');
//将0号纹理分配给着色器,0 是纹理单元编号
gl.uniform1i(u_Sampler, 0);

//渲染
render()
}

function render() {
gl.clear(gl.COLOR_BUFFER_BIT);
gl.drawArrays(gl.TRIANGLE_STRIP, 0, sourceSize);
}

贴图详解

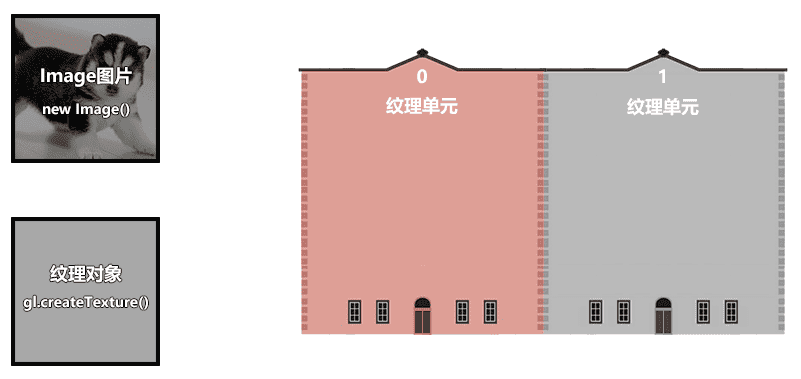
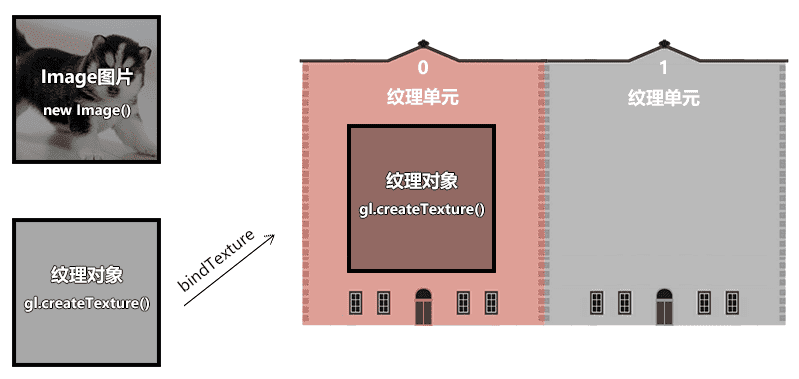
准备三个角色

Image 图像
纹理对象
纹理单元
图示

1
2
3
4
5
6
7
8
9
//纹理单元
gl.activeTexture(gl.TEXTURE0);

//纹理对象
const texture = gl.createTexture();

//image 对象
const image = new Image();
image.src = './images/erha.jpg';
  • activeTexture(gl.TEXTURE0) 激活0号单元
  • createTexture() 创建纹理对象

把纹理对象装进当前已被激活的纹理单元里
图示

1
2
const texture = gl.createTexture();
gl.bindTexture(gl.TEXTURE_2D, texture);

TEXTURE_2D 纹理对象的类型

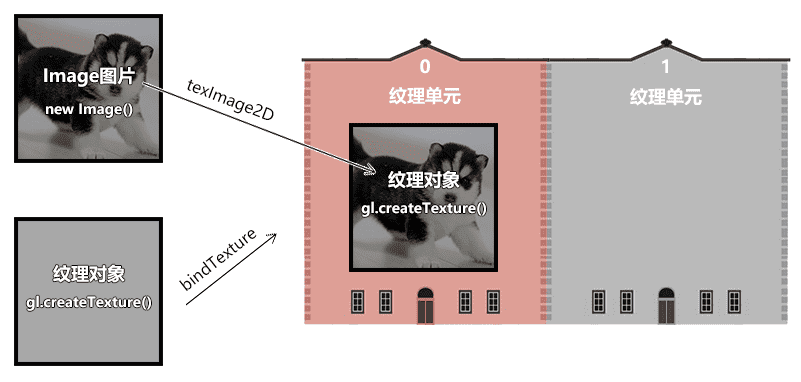
当Image 图像加载成功后,把图像装进当前纹理单元的纹理对象里
图示

1
2
3
4
5
6
7
8
gl.texImage2D(
gl.TEXTURE_2D,
0,
gl.RGB,
gl.RGB,
gl.UNSIGNED_BYTE,
image
);

texImage2D(type, level, internalformat, format, type, pixels)

  • type 纹理类型
  • level 基本图像等级
  • internalformat 纹理中的颜色组件
  • format 纹理数据格式,必须和internalformat 一样
  • type 纹理数据的数据类型
  • UNSIGNED_BYTE 无符号字节
  • pixels 图像源

纹理对象还有一些相应参数需要设置一下

1
2
3
4
5
gl.texParameteri(
gl.TEXTURE_2D,
gl.TEXTURE_MIN_FILTER,
gl.LINEAR
);

texParameteri(type, pname, param)

  • type 纹理类型
    TEXTURE_2D 二维纹理
  • pname 纹理参数的名称
    TEXTURE_MIN_FILTER 纹理缩小滤波器
  • param 与pname相对应的纹理参数值
    gl.LINEAR 线性

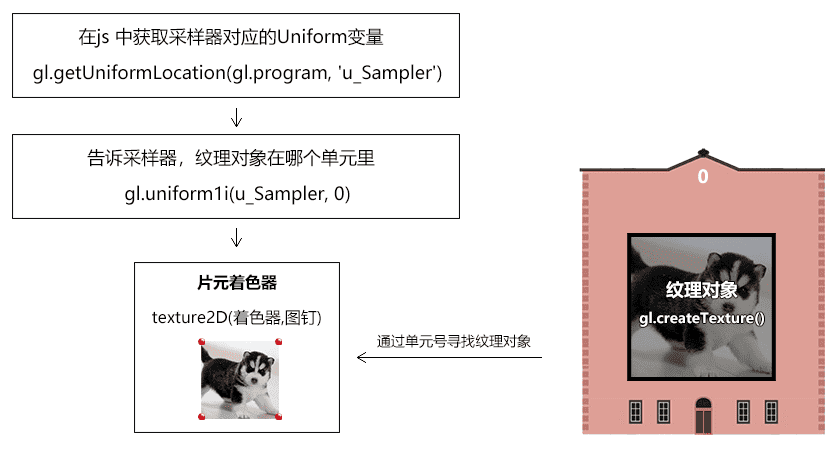
在js 中获取采样器对应的Uniform变量

告诉片元着色器中的采样器,纹理对象在哪个单元里。之后采样器便会根据单元号去单元对象中寻找纹理对象
图示

1
2
const u_Sampler = gl.getUniformLocation(gl.program, 'u_Sampler');
gl.uniform1i(u_Sampler, 0);

渲染

1
2
3
4
5
render()
function render() {
gl.clear(gl.COLOR_BUFFER_BIT);
gl.drawArrays(gl.TRIANGLE_STRIP, 0, sourceSize);
}

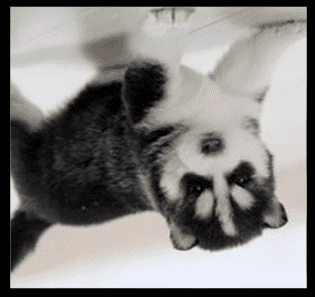
此时的效果如下,我们发现图片反了过来
图示
这是由于Image对象遵守的是栅格坐标系,栅格坐标系的y轴朝下,而uv坐标系的y朝上,两者相反,所以画出的图形反了。

对图像进行预处理,将图像垂直翻转

1
gl.pixelStorei(gl.UNPACK_FLIP_Y_WEBGL, 1);

pixelStorei(pname, param) 图像预处理

pname 参数名
gl.UNPACK_FLIP_Y_WEBGL 是否垂直翻,布尔值,1|0
param 参数值
图示

纹理容器

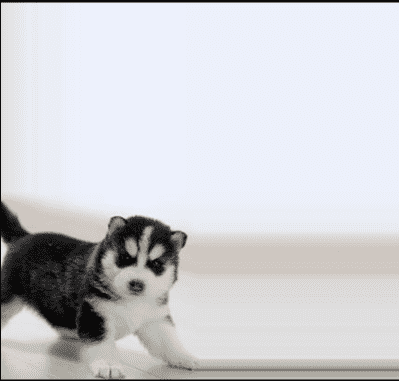
我们之前在贴图的时候,默认图像源的尺寸只能是2的n次方,比如2、4、8、16、……、256、512等。

如果我们把图像的尺寸改成非2次幂尺寸,如300*300,那贴图就无法显示。

我们要想解决这种问题,就得设置一下纹理的容器。

我们在图像上打图钉的时候,形成一块uv区域,这块区域可以理解为纹理容器。

纹理容器可以定义图钉区域的纹理如何显示在webgl图形中。

通过对纹理容器的设置,我们可以实现以下功能:

  • 非二次幂图像源的显示
  • 纹理的复制
  • 纹理的镜像

非二次幂图像源的显示

1
2
3
4
5
6
7
8
9
10
gl.texParameteri(
gl.TEXTURE_2D,
gl.TEXTURE_WRAP_S,
gl.CLAMP_TO_EDGE
)
gl.texParameteri(
gl.TEXTURE_2D,
gl.TEXTURE_WRAP_T,
gl.CLAMP_TO_EDGE
)

TEXTURE_WRAP_S和TEXTURE_WRAP_T 就是纹理容器在s方向和t方向的尺寸,这里的s、t就是st坐标系里的s、t,st坐标系和uv坐标系是一回事。

CLAMP_TO_EDGE 翻译过来就是边缘夹紧的意思,可以理解为任意尺寸的图像源都可以被宽高为1的uv尺寸夹紧。

注:只有CLAMP_TO_EDGE 才能实现非二次幂图像源的显示,其它的参数都不可以。

纹理的复制

我们之前说过,uv坐标系的坐标基底分别是1个图片的宽和1个图片的高,可是如果我们将2个图片的宽高映射到了图形上会是什么结果呢?
我这里设置了maxV,和maxU就是会把2个图片的宽高映射到了图形上

1
2
3
4
5
6
7
8
9
10
11
12
13
14
15
16
17
18
19
20
21
22
23
24
25
26
27
28
29
30
31
32
33
34
35
36
37
38
39
40
41
42
//数据源
const maxV = 2
const maxU = 2
const source = new Float32Array([
-0.5, 0.5, 0, maxV,
-0.5, -0.5, 0, 0.0,
0.5, 0.5, maxU, maxV,
0.5, -0.5, maxU, 0.0,
]);
const FSIZE = source.BYTES_PER_ELEMENT;
//元素字节数
const elementBytes = source.BYTES_PER_ELEMENT
//系列尺寸
const posSize = 2
const pinSize = 2
//类目尺寸
const categorySize = posSize + pinSize
//类目字节数
const categoryBytes = categorySize * elementBytes
//系列字节索引位置
const posByteIndex = 0
const pinByteIndex = posSize * elementBytes
//顶点总数
const sourceSize = source.length / categorySize

gl.texParameteri(
gl.TEXTURE_2D,
gl.TEXTURE_MIN_FILTER,
gl.LINEAR
)

gl.texParameteri(
gl.TEXTURE_2D,
gl.TEXTURE_WRAP_S,
gl.CLAMP_TO_EDGE
)
gl.texParameteri(
gl.TEXTURE_2D,
gl.TEXTURE_WRAP_T,
gl.CLAMP_TO_EDGE
)

图示

如果我们不设置 gl.TEXTURE_WRAP_S,gl.TEXTURE_WRAP_T,那他的默认值就会是

1
2
3
4
5
6
7
8
9
10
gl.texParameteri(
gl.TEXTURE_2D,
gl.TEXTURE_WRAP_S,
gl.REPEAT
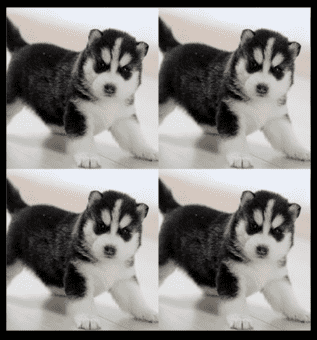
)
gl.texParameteri(
gl.TEXTURE_2D,
gl.TEXTURE_WRAP_T,
gl.REPEAT
)

效果就是如下
图示

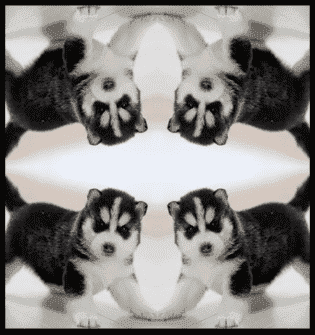
我们还可以对纹理进行镜像的复制

1
2
3
4
5
6
7
8
9
10
gl.texParameteri(
gl.TEXTURE_2D,
gl.TEXTURE_WRAP_S,
gl.MIRRORED_REPEAT
)
gl.texParameteri(
gl.TEXTURE_2D,
gl.TEXTURE_WRAP_T,
gl.MIRRORED_REPEAT
)

图示
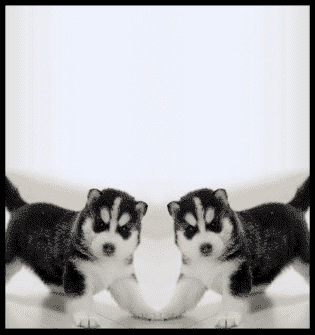
当然,我们也可以进行仅仅一边的复制

1
2
3
4
5
6
7
8
9
10
gl.texParameteri(
gl.TEXTURE_2D,
gl.TEXTURE_WRAP_S,
gl.MIRRORED_REPEAT
)
gl.texParameteri(
gl.TEXTURE_2D,
gl.TEXTURE_WRAP_T,
gl.CLAMP_TO_EDGE
)

图示

分子贴图

分子贴图mipmap 是一种纹理映射技术。

比如:

webgl中有一个正方形,它在canvas画布中显示的时候,占据了22个像素,我们要将一个88的图像源贴上去。

正方形中肯定不能显示图像源中的所有像素,因为它只有2*2=4个像素。

在Photoshop 中,会将图像源切割成2行、2列的色块,然后将每个色块的均值交个正方形。

在webgl 中也有类似的方法,并且它还有一层渲染性能的优化(Photoshop底层是否有这层优化我尚且不知)。

接下来咱们就说一下这层优化优化的是什么。

先想象一个场景,我要把10241024的图像源映射到canvas画布上22的正方形中,若把图像源分割求均值会产生庞大的数据运算,我们需要想办法把和正方形相映射的图像源的尺寸降到最小,比如就是2*2的。

因此,我们就需要分子贴图了。

分子贴图是一个基于分辨率等比排列的图像集合,集合中每一项的宽高与其前一项宽高的比值都是1/2。
如图所示:
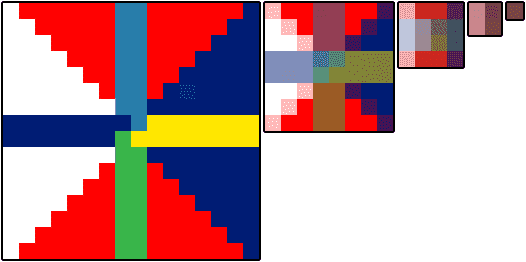
分子贴图
在webgl 中,我们可以使用gl.generateMipmap() 方法为图像源创建分子贴图,

有了分子贴图后,之前2*2的正方形便会从分子集合中寻找与其分辨率最接近的分子图像。

在找到分子图像后,就需要基于webgl图形的片元尺寸对其分割取色了。

对于取色的方法,咱们之前说一个均值算法,其实还有其它算法。

我们看一下webgl 给提供的方法。

1
2
3
4
5
6
7
8
9
10
11
12
13
//创建分子贴图
gl.generateMipmap(gl.TEXTURE_2D);
//定义从分子图像中取色的方法
gl.texParameteri(
gl.TEXTURE_2D,
gl.TEXTURE_MAG_FILTER,
gl.LINEAR
)
gl.texParameteri(
gl.TEXTURE_2D,
gl.TEXTURE_MIN_FILTER,
gl.LINEAR
)

gl.texParameteri()方法中的第2个参数和第3个参数是键值对的关系。

TEXTURE_MAG_FILTER和TEXTURE_MIN_FILTER,对应的是纹理在webgl图形中的缩放情况。

  • TEXTURE_MAG_FILTER 纹理放大滤波器,是纹理在webgl图形中被放大的情况。
  • TEXTURE_MIN_FILTER 纹理缩小滤波器,是纹理在webgl图形中被缩小的情况。

TEXTURE_MAG_FILTER 具备以下参数:

  • LINEAR (默认值) ,线性滤镜, 获取纹理坐标点附近4个像素的加权平均值,效果平滑
  • NEAREST 最近滤镜, 获得最靠近纹理坐标点的像素 ,效果锐利

TEXTURE_MIN_FILTER 具备以下参数:

  • LINEAR 线性滤镜,获取纹理坐标点附近4个像素的加权平均值,效果平滑
  • NEAREST 最近滤镜, 获得最靠近纹理坐标点的像素,效果锐利
  • NEAREST_MIPMAP_NEAREST Select the nearest mip level and perform nearest neighbor filtering .
  • NEAREST_MIPMAP_LINEAR (默认值) Perform a linear interpolation between mip levels and perform nearest neighbor filtering within each .
  • LINEAR_MIPMAP_NEAREST Select the nearest mip level and perform linear filtering within it .
  • LINEAR_MIPMAP_LINEAR Perform a linear interpolation between mip levels and perform linear filtering : also called trilinear filtering .

注:后面这4个与分子贴图相关的参数适合比较大的贴图,若是比较小的贴图,使用LINEAR 或NEAREST 就好。

注:缩小滤波器的默认值取色方法是NEAREST_MIPMAP_LINEAR ,这个方法会从分子贴图里找分子图像,然后从其中取色,然而当我们没有使用gl.generateMipmap()方法建立分子贴图的时候,就得给它一个不需要从分子贴图中去色的方法,如LINEAR或NEAREST。

多纹理模型

比如我们要实现这样一个魔方,每个面的材质都不相同
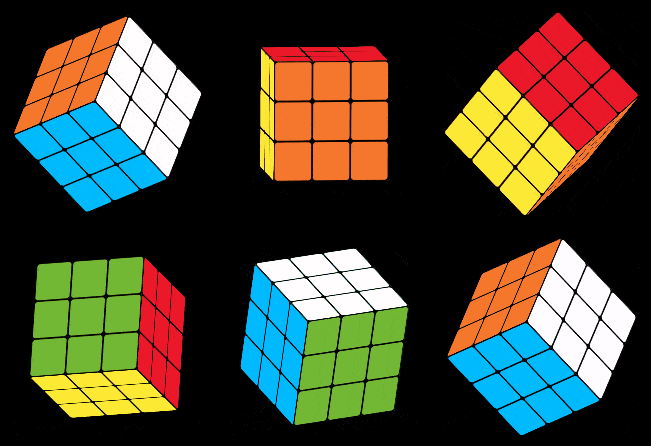
魔方
有时候我们会很自然的想到一个面给它一个贴图,而实际上,最高效的方式是一个物体给它一个贴图,如下图:
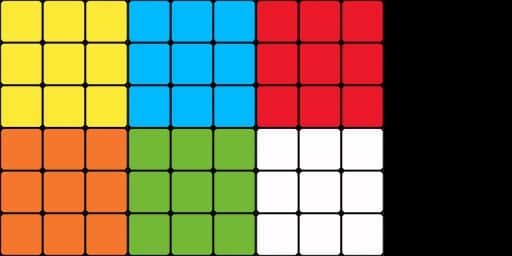
贴图
这样我们只需要加载一次图片,建立一个纹理对象,做一次纹理和顶点数据的映射就可以了。
这里面没有涉及任何新的知识点,但这是一种很重要的项目开发经验。
整体代码如下:

1
2
3
4
5
6
7
8
9
10
11
12
13
14
15
16
17
18
19
20
21
22
23
24
25
26
27
28
29
30
31
32
33
34
35
36
37
38
39
40
41
42
43
44
45
46
47
48
49
50
51
52
53
54
55
56
57
58
59
60
61
62
63
64
65
66
67
68
69
70
71
72
73
74
75
76
77
78
79
80
81
82
83
84
85
86
87
88
89
90
91
92
93
94
95
96
97
98
99
100
101
102
103
104
105
106
107
108
109
110
111
112
113
114
115
116
117
118
119
120
121
122
123
124
125
126
127
128
129
130
131
132
133
134
135
136
137
138
139
140
141
142
143
144
145
146
147
148
149
150
151
152
153
154
155
156
157
158
159
160
161
162
163
164
165
166
167
168
169
170
171
172
173
174
175
176
177
178
179
180
181
182
183
184
185
186
<script id="vertexShader" type="x-shader/x-vertex">
attribute vec4 a_Position;
attribute vec2 a_Pin;
uniform mat4 u_ModelMatrix;
varying vec2 v_Pin;
void main(){
gl_Position = u_ModelMatrix*a_Position;
v_Pin=a_Pin;
}
</script>
<script id="fragmentShader" type="x-shader/x-fragment">
precision mediump float;
uniform sampler2D u_Sampler;
varying vec2 v_Pin;
void main(){
gl_FragColor=texture2D(u_Sampler,v_Pin);
}
</script>
<script type="module">
import { initShaders } from '../jsm/Utils.js';
import { Matrix4, Vector3, Quaternion } from 'https://unpkg.com/three/build/three.module.js';

const canvas = document.getElementById('canvas');
canvas.width = window.innerWidth;
canvas.height = window.innerHeight;
const gl = canvas.getContext('webgl');

const vsSource = document.getElementById('vertexShader').innerText;
const fsSource = document.getElementById('fragmentShader').innerText;
initShaders(gl, vsSource, fsSource);
gl.clearColor(0.0, 0.0, 0.0, 1.0);
gl.enable(gl.CULL_FACE);
gl.enable(gl.DEPTH_TEST);

//数据源
const source = new Float32Array([
-0.5, -0.5, -0.5, 0, 0,
-0.5, 0.5, -0.5, 0, 0.5,
0.5, -0.5, -0.5, 0.25, 0,
-0.5, 0.5, -0.5, 0, 0.5,
0.5, 0.5, -0.5, 0.25, 0.5,
0.5, -0.5, -0.5, 0.25, 0,

-0.5, -0.5, 0.5, 0.25, 0,
0.5, -0.5, 0.5, 0.5, 0,
-0.5, 0.5, 0.5, 0.25, 0.5,
-0.5, 0.5, 0.5, 0.25, 0.5,
0.5, -0.5, 0.5, 0.5, 0,
0.5, 0.5, 0.5, 0.5, 0.5,

-0.5, 0.5, -0.5, 0.5, 0,
-0.5, 0.5, 0.5, 0.5, 0.5,
0.5, 0.5, -0.5, 0.75, 0,
-0.5, 0.5, 0.5, 0.5, 0.5,
0.5, 0.5, 0.5, 0.75, 0.5,
0.5, 0.5, -0.5, 0.75, 0,

-0.5, -0.5, -0.5, 0, 0.5,
0.5, -0.5, -0.5, 0.25, 0.5,
-0.5, -0.5, 0.5, 0, 1,
-0.5, -0.5, 0.5, 0, 1,
0.5, -0.5, -0.5, 0.25, 0.5,
0.5, -0.5, 0.5, 0.25, 1,

-0.5, -0.5, -0.5, 0.25, 0.5,
-0.5, -0.5, 0.5, 0.25, 1,
-0.5, 0.5, -0.5, 0.5, 0.5,
-0.5, -0.5, 0.5, 0.25, 1,
-0.5, 0.5, 0.5, 0.5, 1,
-0.5, 0.5, -0.5, 0.5, 0.5,

0.5, -0.5, -0.5, 0.5, 0.5,
0.5, 0.5, -0.5, 0.75, 0.5,
0.5, -0.5, 0.5, 0.5, 1,
0.5, -0.5, 0.5, 0.5, 1,
0.5, 0.5, -0.5, 0.75, 0.5,
0.5, 0.5, 0.5, 0.75, 1,
]);
const FSIZE = source.BYTES_PER_ELEMENT;
//元素字节数
const elementBytes = source.BYTES_PER_ELEMENT
//系列尺寸
const posSize = 3
const pinSize = 2
//类目尺寸
const categorySize = posSize + pinSize
//类目字节数
const categoryBytes = categorySize * elementBytes
//系列字节索引位置
const posByteIndex = 0
const pinByteIndex = posSize * elementBytes
//顶点总数
const sourceSize = source.length / categorySize


const sourceBuffer = gl.createBuffer();
gl.bindBuffer(gl.ARRAY_BUFFER, sourceBuffer);
gl.bufferData(gl.ARRAY_BUFFER, source, gl.STATIC_DRAW);

const a_Position = gl.getAttribLocation(gl.program, 'a_Position');
gl.vertexAttribPointer(
a_Position,
posSize,
gl.FLOAT,
false,
categoryBytes,
posByteIndex
);
gl.enableVertexAttribArray(a_Position);

const a_Pin = gl.getAttribLocation(gl.program, 'a_Pin');
gl.vertexAttribPointer(
a_Pin,
pinSize,
gl.FLOAT,
false,
categoryBytes,
pinByteIndex
);
gl.enableVertexAttribArray(a_Pin);


//模型矩阵
const modelMatrix = new Matrix4()
const mx = new Matrix4().makeRotationX(0.02)
const my = new Matrix4().makeRotationY(0.02)
modelMatrix.multiply(mx)
const u_ModelMatrix = gl.getUniformLocation(gl.program, 'u_ModelMatrix')
gl.uniformMatrix4fv(u_ModelMatrix, false, modelMatrix.elements)

/* 图像预处理 */
gl.pixelStorei(gl.UNPACK_FLIP_Y_WEBGL, 1)


/* 准备三个角色 */
gl.activeTexture(gl.TEXTURE0)
const texture = gl.createTexture()
gl.bindTexture(gl.TEXTURE_2D, texture)
const image = new Image()
image.src = './images/mf.jpg'
image.onload = function () {
gl.texImage2D(
gl.TEXTURE_2D,
0,
gl.RGBA,
gl.RGBA,
gl.UNSIGNED_BYTE,
image
)

gl.texParameteri(
gl.TEXTURE_2D,
gl.TEXTURE_WRAP_S,
gl.CLAMP_TO_EDGE
);
gl.texParameteri(
gl.TEXTURE_2D,
gl.TEXTURE_WRAP_T,
gl.CLAMP_TO_EDGE
);
gl.texParameteri(
gl.TEXTURE_2D,
gl.TEXTURE_MIN_FILTER,
gl.LINEAR
);

const u_Sampler = gl.getUniformLocation(gl.program, 'u_Sampler')
gl.uniform1i(u_Sampler, 0)

render()
}

//渲染
function render() {
gl.clear(gl.COLOR_BUFFER_BIT);
gl.drawArrays(gl.TRIANGLES, 0, sourceSize);
}

// 连续渲染
!(function ani() {
modelMatrix.multiply(my).multiply(mx)
gl.uniformMatrix4fv(u_ModelMatrix, false, modelMatrix.elements)
render()
requestAnimationFrame(ani)
})()
</script>

纹理模块化

这里修改一下我们的Poly

1
2
3
4
const defAttr = () => ({
...,
maps: {}
})

这里的map对象是这样的一个对象

1
2
3
4
5
6
7
8
9
10
11
{
u_Sampler:{
image,
format= gl.RGB,
wrapS,
wrapT,
magFilter,
minFilter
},
……
}
  • image 图形源
  • format 数据类型,默认gl.RGB
  • wrapS 对应纹理对象的TEXTURE_WRAP_S 属性
  • wrapT 对应纹理对象的TEXTURE_WRAP_T 属性
  • magFilter 对应纹理对象的TEXTURE_MAG_FILTER 属性
  • minFilter对应纹理对象的TEXTURE_MIN_FILTER属性

然后添加一个更新贴图的方法

1
2
3
4
5
6
7
8
9
10
11
12
13
14
15
16
17
18
19
20
21
22
23
24
25
26
27
28
29
30
31
32
33
34
35
36
37
38
39
40
41
42
43
44
45
46
47
48
49
50
51
52
53
54
55
56
57
58
updateMaps() {
const { gl, maps } = this
Object.entries(maps).forEach(([key, val], ind) => {
const {
format = gl.RGB,
image,
wrapS,
wrapT,
magFilter,
minFilter
} = val

gl.pixelStorei(gl.UNPACK_FLIP_Y_WEBGL, 1)
gl.activeTexture(gl[`TEXTURE${ind}`])

const texture = gl.createTexture()
gl.bindTexture(gl.TEXTURE_2D, texture)

gl.texImage2D(
gl.TEXTURE_2D,
0,
format,
format,
gl.UNSIGNED_BYTE,
image
)

wrapS&&gl.texParameteri(
gl.TEXTURE_2D,
gl.TEXTURE_WRAP_S,
wrapS
)
wrapT&&gl.texParameteri(
gl.TEXTURE_2D,
gl.TEXTURE_WRAP_T,
wrapT
)

magFilter&&gl.texParameteri(
gl.TEXTURE_2D,
gl.TEXTURE_MAG_FILTER,
magFilter
)

if (!minFilter || minFilter > 9729) {
gl.generateMipmap(gl.TEXTURE_2D)
}

minFilter&&gl.texParameteri(
gl.TEXTURE_2D,
gl.TEXTURE_MIN_FILTER,
minFilter
)

const u = gl.getUniformLocation(gl.program, key)
gl.uniform1i(u, ind)
})
}

这样就可以在外部调用了

1
2
3
4
5
6
7
8
9
10
11
12
13
14
15
16
17
18
19
20
21
22
23
24
25
26
27
28
29
30
31
32
33
34
35
36
37
const source = new Float32Array([
-0.5, 0.5, 0, 1,
-0.5, -0.5, 0, 0.0,
0.5, 0.5, 1.0, 1,
0.5, -0.5, 1.0, 0.0,
]);

const rect = new Poly({
gl,
source,
type: 'TRIANGLE_STRIP',
attributes: {
a_Position: {
size: 2,
index: 0
},
a_Pin: {
size: 2,
index: 2
},
}
})

const image = new Image()
image.src = './images/erha.jpg'
image.onload = function () {
rect.maps = {
u_Sampler: { image },
}
rect.updateMaps()
render()
}

function render() {
gl.clear(gl.COLOR_BUFFER_BIT);
rect.draw()
}

纹理合成

纹理合成就是按照某种规则将多张图片合在一起。

合成案例

比如这样:
图示
或者:
图示
又或者:
图示

多图加载

纹理合成是需要多张图像源的,因此我们需要多张图像源都加载成功后,再去合成纹理。

我接下来就要使用Promise.all() 来实现这个逻辑。
1.将图像的加载方法封装进一个Promise 中,等图像加载成功后,再resolve。

1
2
3
4
5
6
7
function imgPromise(img){
return new Promise((resolve)=>{
img.onload=function(){
resolve(img);
}
});
}

2.建立多个Image 对象

1
2
3
4
5
const originImg = new Image()
originImg.src = 'https://blog-st.oss-cn-beijing.aliyuncs.com/16276521220864486294203747374.jpg'

const pattern = new Image()
pattern.src = 'https://blog-st.oss-cn-beijing.aliyuncs.com/162765212208607808738891255484.jpg'

3.利用Promise.all 监听所有图片的记载成功

1
2
3
4
5
6
7
8
9
10
11
Promise.all([
imgPromise(originImg),
imgPromise(pattern),
]).then(() => {
rect.maps = {
u_Sampler: { image: originImg },
u_Pattern: { image: pattern },
}
rect.updateMaps()
render()
})

片元着色器合成纹理

1
2
3
4
5
6
7
8
9
10
11
<script id="fragmentShader" type="x-shader/x-fragment">
precision mediump float;
uniform sampler2D u_Sampler;
uniform sampler2D u_Pattern;
varying vec2 v_Pin;
void main(){
vec4 o=texture2D(u_Sampler,v_Pin);
vec4 p=texture2D(u_Pattern,v_Pin);
gl_FragColor=p*o;
}
</script>

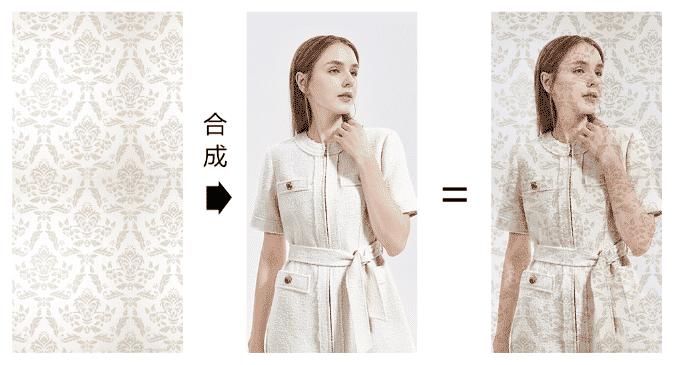
u_Sampler 是原始图片采样器,对应下图:
图示
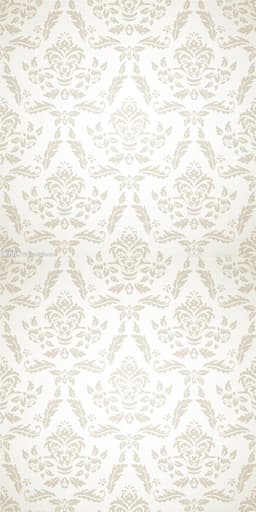
u_Pattern 是纹理图案采样器,对应下图:
图示
之后,我通过采样器找到原始图片和纹理图案的片元后,便可以对其进行运算;

1
2
3
vec4 o=texture2D(u_Sampler,v_Pin);
vec4 p=texture2D(u_Pattern,v_Pin);
gl_FragColor=p*o;

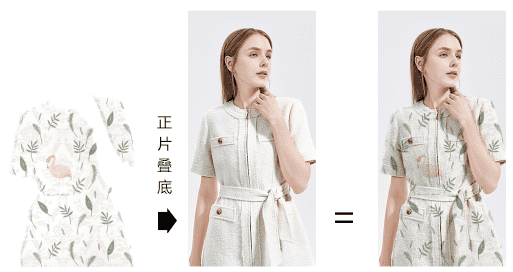
上面的po便是在对片元做分量相乘的运算,这种算法会让原始图片的亮度变暗,有点类似于ps里的正片叠底。
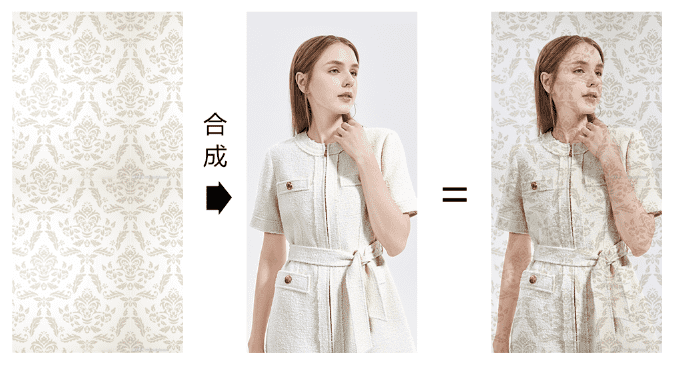
图示
就是俩个向量相乘,因为在webgl中,因为片元分量的值域为[0,1],所以p
o 的亮度小于等于p和o

纹理混合

纹理混合就是按照一定比例,将第一张图像合到另一张图像上,这类似于ps 里的透明度合成。

我们直接看一下纹理在片元着色里的合成方法。

1
2
3
4
5
6
7
8
9
10
11
<script id="fragmentShader" type="x-shader/x-fragment">
precision mediump float;
uniform sampler2D u_Sampler;
uniform sampler2D u_Pattern;
varying vec2 v_Pin;
void main(){
vec4 o=texture2D(u_Sampler,v_Pin);
vec4 p=texture2D(u_Pattern,v_Pin);
gl_FragColor=mix(o,p,1.0);
}
</script>

上面的mix() 方法便是按照比例对两个纹理的合成方法。

mix() 方法的返回数据类型会因其合成对象的不同而不同。

其规则如下:

1
mix(m,n,a)=m+(n-m)*a

举个例子:

已知:

m=3
n=5
a=0.5
求:mix(m,n,a)

1
2
3
mix(m,n,a)=3+(5-3)*0.5
mix(m,n,a)=3+2*0.5
mix(m,n,a)=4

利用纹理合成完成转场动画

转场动画就是场景的淡入、淡出。

我们可以将一个纹理理解为一个场景,利用转场动画实现淡入、淡出效果。

在片元着色器中,将mix()方法中的比值设置为uniform 变量。

1
2
3
4
5
6
7
8
9
10
11
12
<script id="fragmentShader" type="x-shader/x-fragment">
precision mediump float;
uniform sampler2D u_Sampler;
uniform sampler2D u_Pattern;
uniform float u_Ratio;
varying vec2 v_Pin;
void main(){
vec4 o=texture2D(u_Sampler,v_Pin);
vec4 p=texture2D(u_Pattern,v_Pin);
gl_FragColor=mix(o,p,u_Ratio);
}
</script>

声明基础数据

1
2
3
4
let n = 0
let len = 5
const obj = { ratio: 0 }
let track = null
  • n 当前显示的图片
  • len 图片数量
  • obj 混合比例的存储对象
  • track 时间轨,我们在讲星空的时候讲过

建立矩形面

1
2
3
4
5
6
7
8
9
10
11
12
13
14
15
16
17
18
19
20
21
const rect = new Poly({
gl,
source,
type: 'TRIANGLE_STRIP',
uniforms: {
u_Ratio: {
type: 'uniform1f',
value: obj.ratio
}
},
attributes: {
a_Position: {
size: 2,
index: 0
},
a_Pin: {
size: 2,
index: 2
},
}
})

加载图片

1
2
3
4
5
6
7
8
9
10
11
12
13
14
15
16
17
18
19
20
21
loadImg()

function loadImg() {
n++;
const i1 = n % len
const i2 = (n + 1) % len

const originImg = new Image()
originImg.src = `./images/pattern${i1}.jpg`

const pattern = new Image()
pattern.src = `./images/pattern${i2}.jpg`

Promise.all([
imgPromise(originImg),
imgPromise(pattern),
]).then(() => {
changeImg(originImg, pattern)
ani()
})
}

当图片加载完成后,会先更新图片,并连续渲染

1
2
3
4
5
6
7
8
9
10
11
12
13
14
15
16
17
18
19
20
21
22
23
24
25
function changeImg(...imgs) {
// 将ratio 归0
obj.ratio = 0
//重置矩形面的贴图集合
rect.maps = {
u_Sampler: { image: imgs[0] },
u_Pattern: { image: imgs[1] },
}
rect.updateMaps()
// 建立轨道对象
track = new Track(obj);
track.start = new Date();
// 轨道对象的时长timeLen 是1500,到时间结束后,会再去loadImg 加载新的图像。轨道对象会在700毫秒内完成淡入效果。
track.timeLen = 1500;
track.onEnd = loadImg
track.keyMap = new Map([
[
"ratio",
[
[0, 0],
[700, 1]
],
],
]);
}

使用蒙版转场

蒙版是一种为图像的提供合成数据辅助图像。

蒙版通常是黑白的,若是彩色,还需要将其转灰。

蒙版中的片元数据是一种插值,并不是一种具备特定功能的数据。

比如,我们可以将蒙版中的片元数据做为两张图像的亮度合成插值、饱和度合成插值、透明度合成插值等等。

大家通常会将蒙版和遮罩混为一谈,其实那也无可厚非,蒙版和遮罩的底层原理都是一样的。

只是,遮罩一般会被当成透明度合成的数据,它遵守黑透白不透的规律。
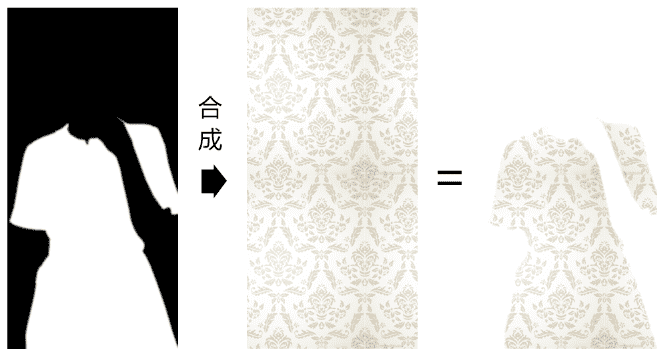
图示
接下来,我就通过蒙版来实现纹理的花样转场。

1.建立一个蒙版图像,用作图案淡入的辅助数据

1
2
3
4
5
6
7
8
9
10
11
12
13
14
15
16
17
18
19
20
21
22
23
24
25
26
27
28
29
30
31
32
33
34
35
36
37
38
39
40
41
42
43
44
45
46
47
loadImg()

function loadImg() {
n++;
const i1 = n % len
const i2 = (n + 1) % len
const i3 = Math.round(Math.random() * 4)

const originImg = new Image()
originImg.src = `./images/pattern${i1}.jpg`

const pattern = new Image()
pattern.src = `./images/pattern${i2}.jpg`

const gradient = new Image()
gradient.src = `./images/mask${i3}.jpg`

Promise.all([
imgPromise(originImg),
imgPromise(pattern),
]).then(() => {
changeImg(originImg, pattern, gradient)
ani()
})
}
function changeImg(...imgs) {
obj.ratio = 0
rect.maps = {
u_Sampler: { image: imgs[0] },
u_Pattern: { image: imgs[1] },
u_Gradient: { image: imgs[2] },
}
rect.updateMaps()
track = new Track(obj);
track.start = new Date();
track.timeLen = 2000;
track.onEnd = loadImg
track.keyMap = new Map([
[
"ratio",
[
[0, 0],
[1000, 1]
],
],
]);
}

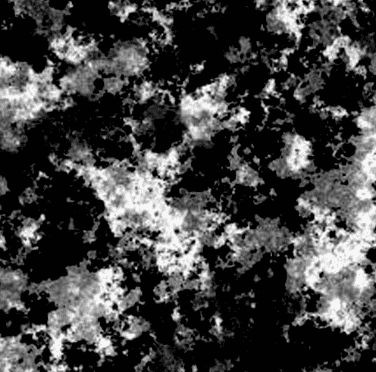
gradient 便是蒙版图像,效果如下:
图示

2.在片元着色器里,使用蒙版合成图像。

1
2
3
4
5
6
7
8
9
10
11
12
13
14
15
<script id="fragmentShader" type="x-shader/x-fragment">
precision mediump float;
uniform sampler2D u_Sampler;
uniform sampler2D u_Pattern;
uniform sampler2D u_Gradient;
uniform float u_Ratio;
varying vec2 v_Pin;
void main(){
vec4 o=texture2D(u_Sampler,v_Pin);
vec4 p=texture2D(u_Pattern,v_Pin);
vec4 g=texture2D(u_Gradient,v_Pin);
float f=clamp((g.r + u_Ratio), 0.0, 1.0);
gl_FragColor=mix(o,p,f);
}
</script>

我们重点看上面的浮点数 f。

g.r + u_Ratio 是让蒙版的亮度加上混合比值。

在灰度图像里,片元的r,g,b 数据都可以表示亮度。

clamp(n,min,max) 方法是用于限定数据极值的:

当n 小于min的时候返回min
当n 大于max的时候返回max
否则,返回n
clamp(-1,0,1) =0

clamp(2,0,1) =1

clamp(0.5,0,1) =0.5

利用蒙版实现换装达人效果

我们先说一下换装达人的实现原理。

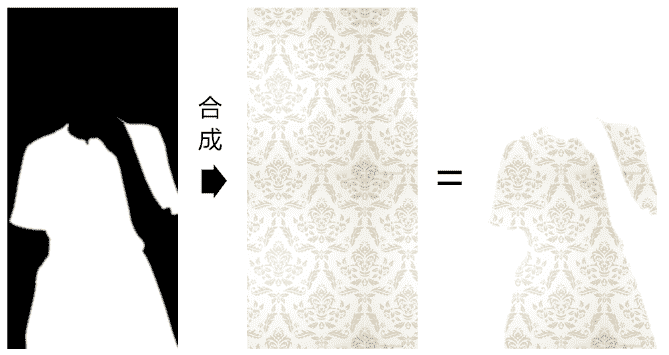
1.用一张黑白遮罩图对两个纹理图案进行裁剪,裁出裙子的区域。
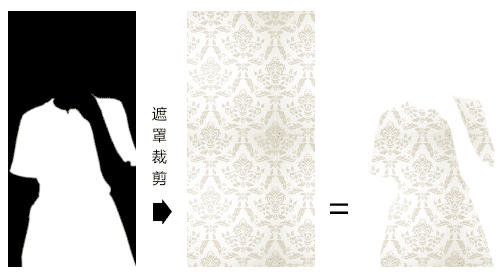
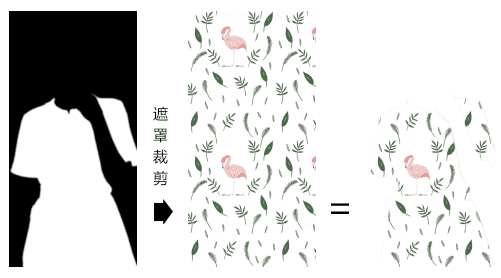
图示
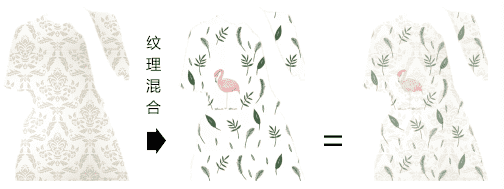
图示
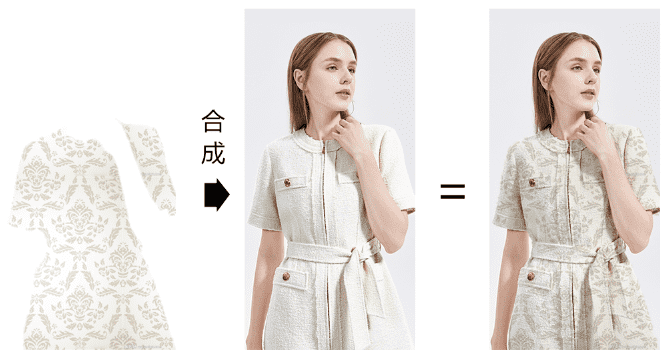
2.对裙子区域的图案进行纹理混合
图示
3.将纹理混合后的图案与原始图像进行正片叠底
图示

接下来咱们再看一下代码实现。

1.建立矩形面

1
2
3
4
5
6
7
8
9
10
11
12
13
14
15
16
17
18
19
20
21
const rect = new Poly({
gl,
source,
type: 'TRIANGLE_STRIP',
uniforms: {
u_Ratio: {
type: 'uniform1f',
value: obj.ratio
}
},
attributes: {
a_Position: {
size: 2,
index: 0
},
a_Pin: {
size: 2,
index: 2
},
}
})

2.建立原始图像和遮罩图像,在它们载成功后,将其写入到矩形面的贴图集合中,并再加载两个纹理图像。

1
2
3
4
5
6
7
8
9
10
11
12
13
14
15
16
const originImg = new Image()
originImg.src = `./https://blog-st.oss-cn-beijing.aliyuncs.com/16276521220864486294203747374.jpg`

const mask = new Image()
mask.src = './images/mask-dress.jpg'

Promise.all([
imgPromise(originImg),
imgPromise(mask),
]).then(() => {
rect.maps = {
u_Sampler: { image: originImg },
u_Mask: { image: mask },
}
loadImg()
})

3.加载纹理图案

1
2
3
4
5
6
7
8
9
10
11
12
13
14
15
16
17
18
19
function loadImg() {
n++;
const i1 = n % len
const i2 = (n + 1) % len

const pattern1 = new Image()
pattern1.src = `./images/pattern${i1}.jpg`

const pattern2 = new Image()
pattern2.src = `./images/pattern${i2}.jpg`

Promise.all([
imgPromise(pattern1),
imgPromise(pattern2),
]).then(() => {
changeImg(pattern1, pattern2)
ani()
})
}

4.将纹理图案写入到矩形面的贴图集合中,并建立轨道对象。

1
2
3
4
5
6
7
8
9
10
11
12
13
14
15
16
17
18
19
function changeImg(...imgs) {
obj.ratio = 0
rect.maps.u_Pattern1 = { image: imgs[0] }
rect.maps.u_Pattern2 = { image: imgs[1] }
rect.updateMaps()
track = new Track(obj);
track.start = new Date();
track.timeLen = 1500;
track.onEnd = loadImg
track.keyMap = new Map([
[
"ratio",
[
[0, 0],
[700, 1]
],
],
]);
}

5.连续渲染

1
2
3
4
5
6
7
8
/* 动画 */
function ani() {
track.update(new Date())
rect.uniforms.u_Ratio.value = obj.ratio;
rect.updateUniform()
render()
requestAnimationFrame(ani)
}

6.在片元着色器里进行纹理合成,

1
2
3
4
5
6
7
8
9
10
11
12
13
14
15
16
17
18
19
20
<script id="fragmentShader" type="x-shader/x-fragment">
precision mediump float;
uniform sampler2D u_Sampler;
uniform sampler2D u_Pattern1;
uniform sampler2D u_Pattern2;
uniform sampler2D u_Mask;
uniform float u_Ratio;
varying vec2 v_Pin;
void main(){
vec4 o=texture2D(u_Sampler,v_Pin);
vec4 p1=texture2D(u_Pattern1,v_Pin);
vec4 p2=texture2D(u_Pattern2,v_Pin);
vec4 m=texture2D(u_Mask,v_Pin);
vec4 p3=vec4(1,1,1,1);
if(m.x>0.5){
p3=mix(p1,p2,u_Ratio);
}
gl_FragColor=p3*o;
}
</script>

o 原始图像
p1 第1张纹理图案
p2 第二张纹理图案
m 蒙版图像
我通过m.x 来判断蒙版的黑白区域,m.y、m.z,或者m.r、m.g、m.b也可以。

p3片元默认为白色vec4(1,1,1,1)。

当m.x>0.5 时,p3为p1,p2的混合片元;

最终的gl_FragColor颜色便是p3和原始片元o的正片叠底。

视频纹理贴图

顾名思义,就是把原来图片换成视频就行了

  1. 正常建立纹理对象,并设置其相关属性。
    1
    2
    3
    4
    5
    6
    7
    8
    9
    10
    11
    12
    13
    14
    15
    16
    17
    18
    gl.activeTexture(gl.TEXTURE0)
    const texture = gl.createTexture()
    gl.bindTexture(gl.TEXTURE_2D, texture)
    gl.texParameteri(
    gl.TEXTURE_2D,
    gl.TEXTURE_MIN_FILTER,
    gl.LINEAR
    )
    gl.texParameteri(
    gl.TEXTURE_2D,
    gl.TEXTURE_WRAP_S,
    gl.CLAMP_TO_EDGE
    )
    gl.texParameteri(
    gl.TEXTURE_2D,
    gl.TEXTURE_WRAP_T,
    gl.CLAMP_TO_EDGE
    )
  2. 获取采样器对应的uniform 变量,并将纹理单元号赋给它。
    1
    2
    const u_Sampler = gl.getUniformLocation(gl.program, 'u_Sampler')
    gl.uniform1i(u_Sampler, 0)
  3. 建立video 对象,并播放
    1
    2
    3
    4
    5
    6
    7
    8
    9
    10
    const video = document.createElement('video');
    video.src = 'http://img.yxyy.name/ripples.mp4';
    video.autoplay = true;
    video.muted = true;
    video.loop = true;
    video.setAttribute("crossOrigin", 'Anonymous');
    video.play()
    video.addEventListener('playing', () => {
    ani()
    })
  4. 在video 对象播放时,向纹理对象连续写入video
    1
    2
    3
    4
    5
    6
    7
    8
    9
    10
    11
    12
    13
    function render() {
    gl.texImage2D(
    gl.TEXTURE_2D,
    0,
    gl.RGB,
    gl.RGB,
    gl.UNSIGNED_BYTE,
    video
    )
    gl.clear(gl.COLOR_BUFFER_BIT);
    gl.drawArrays(gl.TRIANGLE_STRIP, 0, sourceSize);
    requestAnimationFrame(render)
    }

结语

本篇文章就先到这里了,更多内容敬请期待,债见~

上一篇:
【可视化学习】70-图片转3D模型
下一篇:
【可视化学习】68-从入门到放弃WebGL(六)