前言
本篇,继续来学习 webgl
极坐标
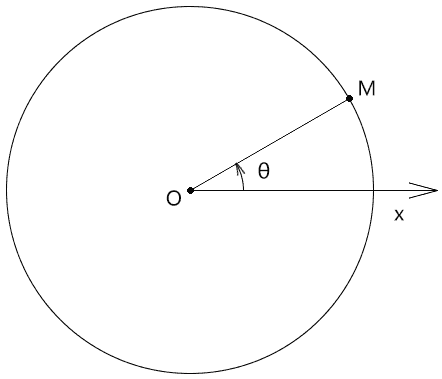
- 极点:极坐标的坐标原点,即点 O
- 极轴:极坐标的起始轴,其对应的弧度为 0,即 Ox
- 正方向:极坐标中,点位按此方向的旋转量越大,其相对于极轴的弧度越大,此方向通常为逆时针方向
- 极径:极坐标系中一点到极点的距离,如|OM|
- 极角:极坐标系中一点相对于极轴的角度,如 θ
- 极坐标:由极坐标系中一点的极径和极角构成的有序数对,如(|OM|,θ)
- 极坐标系:按照以上原理确定某点的坐标位的坐标系
直角坐标系
gl_FragCoord 所对应的二维直角坐标系中,y 轴是朝上的,以像素为单位。

一个点的位置既可以用直角坐标来表示,也可以用极坐标来表示。
接下来我们说一下二维直角坐标系与极坐标系的转换方法。
极角与 x 轴的映射
我们可以通过极角与 x 轴的映射实现放射效果。
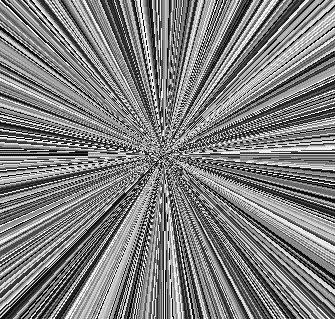
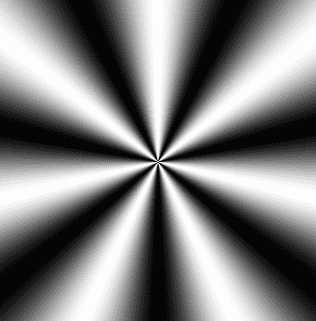
放射渐变
在片元着色器里基于画布尺寸计算画布中心位,声明 360° 所对应的弧度,以备后用。
1
2
3
| uniform vec2 u_CanvasSize;
vec2 center=u_CanvasSize/2.0;
float pi2=radians(360.0);
|
以画布中心点为极点,计算当前片元的极角 ang。
1
2
3
4
5
| void main(){
vec2 p=gl_FragCoord.xy-center;
float ang=atan(p.y,p.x);
……
}
|
以极角为变量,计算与计算一个 x 值
将 x 值拼上一个随意的 y 值,构成向量 v
基于向量 v,通过 rand() 方法生成一个颜色
1
2
3
| vec2 v=vec2(int(x),0);
float f = rand(v);
gl_FragColor = vec4(f, f, f, 1);
|
完整代码
1
2
3
4
5
6
7
8
9
10
11
12
13
14
15
16
17
18
19
20
21
22
23
24
25
26
27
28
29
30
31
32
33
34
35
36
37
38
39
40
41
42
43
44
45
46
47
48
49
50
51
52
53
54
55
56
57
58
59
60
61
62
63
64
65
66
67
68
69
70
71
72
73
74
75
76
77
|
<script id="vertexShader" type="x-shader/x-vertex">
attribute vec4 a_Position;
void main(){
gl_Position=a_Position;
}
</script>
<script id="fragmentShader" type="x-shader/x-fragment">
precision mediump float;
uniform vec2 u_CanvasSize;
vec2 center=u_CanvasSize/2.0;
float pi2=radians(360.0);
float rand(vec2 fragCoord){
vec2 a= vec2(0.1234,0.5678);
float n= dot(fragCoord,a);
return fract(sin(n)*10000.0);
}
void main(){
vec2 p=gl_FragCoord.xy-center;
float ang=atan(p.y,p.x);
float x=ang*8.0;
vec2 v=vec2(int(x),0);
float f = rand(v);
gl_FragColor = vec4(f, f, f, 1);
}
</script>
<script type="module">
import { initShaders, parseColorStops } from "../jsm/Utils.js";
import Poly from "./jsm/Poly.js";
const canvas = document.querySelector("#canvas");
canvas.width = window.innerWidth;
canvas.height = window.innerHeight;
const vsSource = document.querySelector("#vertexShader").innerText;
const fsSource = document.querySelector("#fragmentShader").innerText;
const gl = canvas.getContext("webgl");
initShaders(gl, vsSource, fsSource);
gl.clearColor(0, 0, 0, 1);
const source = new Float32Array([-1, 1, -1, -1, 1, 1, 1, -1]);
const rect = new Poly({
gl,
source,
type: "TRIANGLE_STRIP",
attributes: {
a_Position: {
size: 2,
index: 0,
},
},
uniforms: {
u_CanvasSize: {
type: "uniform2fv",
value: [canvas.width, canvas.height],
},
},
});
gl.clear(gl.COLOR_BUFFER_BIT);
rect.draw();
</script>
|
有了渐变的效果后,我们还可以让其旋转起来。
放射渐变旋转
通过 requestAnimationFrame() 方法向着色器传递一个时间戳 u_Stamp
1
2
3
4
5
6
7
8
9
10
11
12
13
14
15
16
17
18
19
20
21
22
23
24
25
26
27
28
29
| const rect = new Poly({
gl,
source,
type: "TRIANGLE_STRIP",
attributes: {
a_Position: {
size: 2,
index: 0,
},
},
uniforms: {
u_CanvasSize: {
type: "uniform2fv",
value: [canvas.width, canvas.height],
},
u_Stamp: {
type: "uniform1f",
value: 0,
},
},
});
!(function ani(stamp) {
rect.uniforms.u_Stamp.value = stamp;
rect.updateUniform();
gl.clear(gl.COLOR_BUFFER_BIT);
rect.draw();
requestAnimationFrame(ani);
})();
|
1
2
3
4
5
6
7
8
9
10
11
12
13
| uniform vec2 u_CanvasSize;
uniform float u_Stamp;
vec2 center=u_CanvasSize/2.0;
float pi2=radians(360.0);
float angOffset=u_Stamp*0.001;
float cosAng=cos(angOffset);
float sinAng=sin(angOffset);
mat2 modelMatrix=mat2(
cosAng,sinAng,
-sinAng,cosAng
);
|
在 main() 方法中使用 modelMatrix 旋转点 p
1
2
3
4
5
6
7
8
9
10
| void main(){
vec2 p=gl_FragCoord.xy-center;
p=modelMatrix*p;
float ang=atan(p.y,p.x);
float x=ang*16.0;
vec2 v=vec2(int(x),0);
float f = rand(v);
gl_FragColor = vec4(f, f, f, 1);
}
|
完整代码
1
2
3
4
5
6
7
8
9
10
11
12
13
14
15
16
17
18
19
20
21
22
23
24
25
26
27
28
29
30
31
32
33
34
35
36
37
38
39
40
41
42
43
44
45
46
47
48
49
50
51
52
53
54
55
56
57
58
59
60
61
62
63
64
65
66
67
68
69
70
71
72
73
74
75
76
77
78
79
80
81
82
83
84
85
86
87
88
89
90
91
92
93
94
95
96
97
98
99
|
<script id="vertexShader" type="x-shader/x-vertex">
attribute vec4 a_Position;
void main(){
gl_Position=a_Position;
}
</script>
<script id="fragmentShader" type="x-shader/x-fragment">
precision mediump float;
uniform vec2 u_CanvasSize;
uniform float u_Stamp;
vec2 center=u_CanvasSize/2.0;
float pi2=radians(360.0);
float angOffset=u_Stamp*0.002;
float cosAng=cos(angOffset);
float sinAng=sin(angOffset);
mat2 modelMatrix=mat2(
cosAng,sinAng,
-sinAng,cosAng
);
float rand(vec2 fragCoord){
vec2 a= vec2(0.1234,0.5678);
float n= dot(fragCoord,a);
return fract(sin(n)*10000.0);
}
void main(){
vec2 p=gl_FragCoord.xy-center;
p=modelMatrix*p;
float ang=atan(p.y,p.x);
float x=ang*16.0;
vec2 v=vec2(int(x),0);
float f = rand(v);
gl_FragColor = vec4(f, f, f, 1);
}
</script>
<script type="module">
import { initShaders, parseColorStops } from "../jsm/Utils.js";
import Poly from "./jsm/Poly.js";
const canvas = document.querySelector("#canvas");
canvas.width = window.innerWidth;
canvas.height = window.innerHeight;
const vsSource = document.querySelector("#vertexShader").innerText;
const fsSource = document.querySelector("#fragmentShader").innerText;
const gl = canvas.getContext("webgl");
initShaders(gl, vsSource, fsSource);
gl.clearColor(0, 0, 0, 1);
const source = new Float32Array([-1, 1, -1, -1, 1, 1, 1, -1]);
const rect = new Poly({
gl,
source,
type: "TRIANGLE_STRIP",
attributes: {
a_Position: {
size: 2,
index: 0,
},
},
uniforms: {
u_CanvasSize: {
type: "uniform2fv",
value: [canvas.width, canvas.height],
},
u_Stamp: {
type: "uniform1f",
value: 0,
},
},
});
gl.clear(gl.COLOR_BUFFER_BIT);
rect.draw();
!(function ani(stamp) {
rect.uniforms.u_Stamp.value = stamp;
rect.updateUniform();
gl.clear(gl.COLOR_BUFFER_BIT);
rect.draw();
requestAnimationFrame(ani);
})();
</script>
|
放射渐变闪烁
修改一下 main 方法
1
2
3
4
5
6
7
8
9
10
| void main(){
vec2 p=gl_FragCoord.xy-center;
float ang=atan(p.y,p.x);
float x=ang*16.0;
vec2 v=vec2(int(x),int(u_Stamp));
float f = rand(v);
gl_FragColor = vec4(f, f, f, 1);
}
|
控制一下闪烁速度
1
2
3
4
5
6
7
8
9
10
11
12
| let lastTime = 0
const timeLen = 100
!(function ani(stamp) {
if (stamp % timeLen < lastTime % timeLen) {
rect.uniforms.u_Stamp.value = stamp
rect.updateUniform()
gl.clear(gl.COLOR_BUFFER_BIT)
rect.draw()
}
lastTime = stamp
requestAnimationFrame(ani)
})()
|
完整代码
1
2
3
4
5
6
7
8
9
10
11
12
13
14
15
16
17
18
19
20
21
22
23
24
25
26
27
28
29
30
31
32
33
34
35
36
37
38
39
40
41
42
43
44
45
46
47
48
49
50
51
52
53
54
55
56
57
58
59
60
61
62
63
64
65
66
67
68
69
70
71
72
73
74
75
76
77
78
79
80
81
82
83
84
85
86
87
88
89
90
91
92
93
94
95
96
97
98
99
|
<script id="vertexShader" type="x-shader/x-vertex">
attribute vec4 a_Position;
void main(){
gl_Position=a_Position;
}
</script>
<script id="fragmentShader" type="x-shader/x-fragment">
precision mediump float;
uniform vec2 u_CanvasSize;
uniform float u_Stamp;
vec2 center=u_CanvasSize/2.0;
float pi2=radians(360.0);
float rand(vec2 fragCoord){
vec2 a= vec2(0.1234,0.5678);
float n= dot(fragCoord,a);
return fract(sin(n)*10000.0);
}
void main(){
vec2 p=gl_FragCoord.xy-center;
float ang=atan(p.y,p.x);
float x=ang*16.0;
vec2 v=vec2(int(x),int(u_Stamp));
float f = rand(v);
gl_FragColor = vec4(f, f, f, 1);
}
</script>
<script type="module">
import { initShaders, parseColorStops } from "../jsm/Utils.js";
import Poly from "./jsm/Poly.js";
const canvas = document.querySelector("#canvas");
canvas.width = window.innerWidth;
canvas.height = window.innerHeight;
const vsSource = document.querySelector("#vertexShader").innerText;
const fsSource = document.querySelector("#fragmentShader").innerText;
const gl = canvas.getContext("webgl");
initShaders(gl, vsSource, fsSource);
gl.clearColor(0, 0, 0, 1);
const source = new Float32Array([-1, 1, -1, -1, 1, 1, 1, -1]);
const rect = new Poly({
gl,
source,
type: "TRIANGLE_STRIP",
attributes: {
a_Position: {
size: 2,
index: 0,
},
},
uniforms: {
u_CanvasSize: {
type: "uniform2fv",
value: [canvas.width, canvas.height],
},
u_Stamp: {
type: "uniform1f",
value: 0,
},
},
});
gl.clear(gl.COLOR_BUFFER_BIT);
rect.draw();
let lastTime = 0;
const timeLen = 100;
!(function ani(stamp) {
if (stamp % timeLen < lastTime % timeLen) {
rect.uniforms.u_Stamp.value = stamp;
rect.updateUniform();
gl.clear(gl.COLOR_BUFFER_BIT);
rect.draw();
}
lastTime = stamp;
requestAnimationFrame(ani);
})();
</script>
|
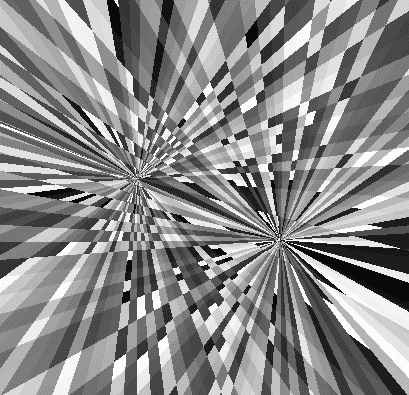
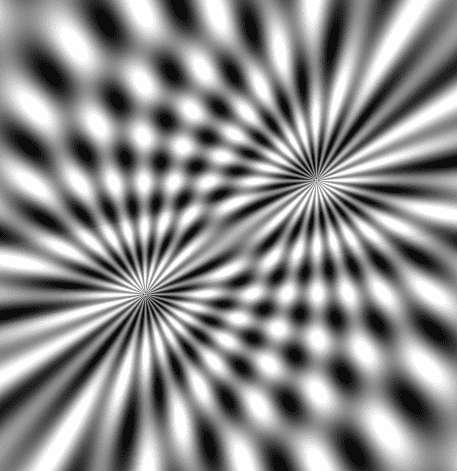
来自深渊的凝视
建立两个模型矩阵
1
2
3
4
5
6
7
8
9
10
11
12
13
14
15
| float angOffset1=u_Stamp*0.0002;
float cosAng1=cos(angOffset1);
float sinAng1=sin(angOffset1);
mat2 modelMatrix1=mat2(
cosAng1,sinAng1,
-sinAng1,cosAng1
);
float angOffset2=u_Stamp*0.0008;
float cosAng2=cos(angOffset2);
float sinAng2=sin(angOffset2);
mat2 modelMatrix2=mat2(
cosAng2,sinAng1,
-sinAng2,cosAng2
);
|
modelMatrix1 是用于旋转片元位的
modelMatrix2 是用于旋转极点的。
注:modelMatrix2 中的第二个元素是sinAng1,不是sinAng2,我这么做是为打破一下其中规中矩的旋转方式。
将通过极坐标获取亮度的方法封装一下。
1
2
3
4
5
6
7
8
9
| float getBright(vec2 pole){
pole=center+modelMatrix2*(pole-center);
vec2 p=gl_FragCoord.xy-pole;
p=modelMatrix1*p;
float ang=atan(p.y,p.x);
float x=ang*16.0;
vec2 v=vec2(int(x),0);
return rand(v);
}
|
在mian 中基于两个极点,获取两个亮度值。
1
2
3
4
5
6
7
| void main(){
vec2 min=u_CanvasSize*0.35;
vec2 max=u_CanvasSize*0.65;
float bright1 = getBright(min);
float bright2 = getBright(max);
……
}
|
对两个亮度值进行合成。
其合成思路是若两个亮度值都比较暗,那我就让当前片元变亮;若都比较亮,那我就让其变暗。
1
2
3
4
5
6
7
8
9
10
11
12
13
14
15
| void main(){
vec2 min=u_CanvasSize*0.35;
vec2 max=u_CanvasSize*0.65;
float bright1 = getBright(min);
float bright2 = getBright(max);
float f=0.0;
float sum=bright1+bright2;
if(sum>1.0){
f=bright1*bright2;
}else{
f=sum;
}
gl_FragColor = vec4(f, f, f, 1);
}
|
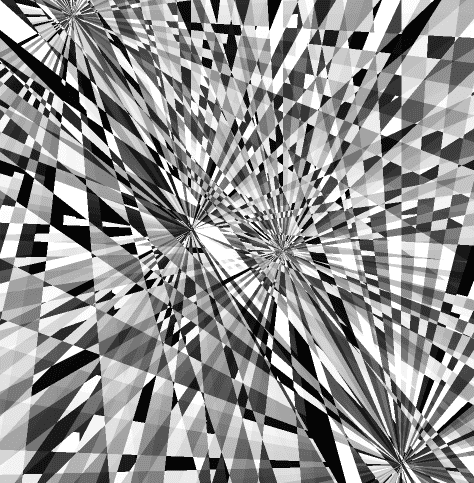
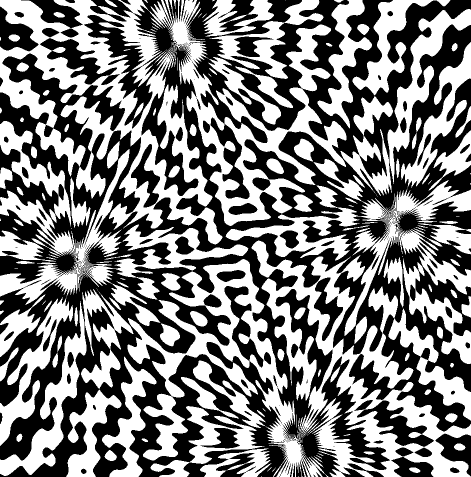
数字山谷
修改矩阵变换的参数
1
2
3
4
5
6
7
8
9
10
11
12
13
14
15
| float angOffset1=u_Stamp*0.00015;
float cosAng1=cos(angOffset1);
float sinAng1=sin(angOffset1);
mat2 modelMatrix1=mat2(
cosAng1,sinAng1,
-sinAng1,cosAng1
);
float angOffset2=u_Stamp*0.0004;
float cosAng2=cos(angOffset2);
float sinAng2=sin(angOffset2);
mat2 modelMatrix2=mat2(
cosAng2,sinAng1,
-sinAng2,cosAng2
);
|
通过4个极点获取亮度值,然后对其合成
1
2
3
4
5
6
7
8
9
10
11
12
13
14
15
16
| void main(){
vec2 min=u_CanvasSize*0.25;
vec2 max=u_CanvasSize*0.75;
float bright1 = getBright(min);
float bright2 = getBright(max);
float bright3 = getBright(vec2(min.x,max.y));
float bright4 = getBright(vec2(max.x,min.y));
float f=0.0;
float sum=bright1+bright2+bright3+bright4;
if(sum>2.0){
f=bright1*bright2*bright3*bright4*4.0;
}else{
f=sum/2.0;
}
gl_FragColor = vec4(f, f, f, 1);
}
|
正弦型放射
先回顾一下正弦型函数:
y=Asin(ωx+φ)
A 影响的是正弦曲线的波动幅度
φ 影响的是正弦曲线的平移
ω 影响的是正弦曲线的周期,ω 越大,周期越小
接下来咱们说一下代码实现。
声明omega和a变量
1
2
| float omega=7.0;
float a=0.5;
|
omega 对应的是正弦函数式里的ω,在放射效果中此值会影响射线的数量
a 对应的是正弦函数式里的A,在放射效果中此值会影响亮度
在main方法中,以画布中心为极点,计算当前片元的极角
1
2
3
4
5
| void main(){
vec2 p=gl_FragCoord.xy-center;
float ang=atan(p.y,p.x);
……
}
|
以极角为变量计算正弦函数值
1
2
| float f = a*sin(omega*ang)+0.5;
gl_FragColor = vec4(f, f, f, 1);
|
上面求f时加的0.5 是为了在[0,1]之间去亮度值:
asin(omegax)∈[-0.5,0.5]
asin(omegax)+0.5∈[0,1]
光影沉浮
1
2
3
4
5
6
7
8
9
10
11
12
13
14
15
16
17
18
19
20
21
22
23
24
25
26
27
28
29
30
31
32
33
34
35
36
37
38
39
40
41
42
43
44
| <script id="fragmentShader" type="x-shader/x-fragment">
precision mediump float;
uniform vec2 u_CanvasSize;
uniform float u_Stamp;
vec2 center=u_CanvasSize/2.0;
float pi2=radians(360.0);
float omega=24.0;
float a=0.5;
float angOffset1=u_Stamp*0.001;
float cosAng1=cos(angOffset1);
float sinAng1=sin(angOffset1);
mat2 modelMatrix1=mat2(
cosAng1,sinAng1,
-sinAng1,cosAng1
);
float angOffset2=u_Stamp*0.001;
float cosAng2=cos(angOffset2);
float sinAng2=sin(angOffset2);
mat2 modelMatrix2=mat2(
cosAng2,sinAng2,
-sinAng2,cosAng2
);
float getBright(vec2 pole){
pole=center+modelMatrix2*(pole-center);
vec2 p=gl_FragCoord.xy-pole;
p=modelMatrix1*p;
float ang=atan(p.y,p.x);
return a*sin(omega*ang)+0.5;
}
void main(){
vec2 min=u_CanvasSize*0.35;
vec2 max=u_CanvasSize*0.65;
float bright1 = getBright(min);
float bright2 = getBright(max);
float f=(bright1+bright2)*0.55;
gl_FragColor = vec4(f, f, f, 1);
}
</script>
|
湍流
1
2
3
4
5
6
7
8
9
10
11
12
13
14
15
16
17
18
19
20
21
22
23
24
25
26
27
28
29
30
31
32
33
34
35
36
37
38
39
40
41
42
43
44
| <script id="fragmentShader" type="x-shader/x-fragment">
precision mediump float;
uniform vec2 u_CanvasSize;
uniform float u_Stamp;
vec2 center=u_CanvasSize/2.0;
float pi2=radians(360.0);
float omega=64.0;
float a=0.5;
float angOffset1=u_Stamp*0.0004;
float sinAng1=sin(angOffset1);
float angOffset2=u_Stamp*0.0002;
float cosAng2=cos(angOffset2);
float sinAng2=sin(angOffset2);
mat2 modelMatrix2=mat2(
cosAng2,sinAng1,
-sinAng2,cosAng2
);
float getBright(vec2 pole){
pole=center+modelMatrix2*(pole-center);
vec2 p=gl_FragCoord.xy-pole;
float ang=atan(p.y,p.x);
return a*sin(omega*ang)+0.5;
}
void main(){
vec2 min=u_CanvasSize*0.25;
vec2 max=u_CanvasSize*0.75;
float bright1 = getBright(min);
float bright2 = getBright(max);
float bright3 = getBright(vec2(min.x,max.y));
float bright4 = getBright(vec2(max.x,min.y));
float f=0.0;
float sum=bright1+bright2+bright3+bright4;
if(sum<2.0){
f=1.0;
}
gl_FragColor = vec4(f, f, f, 1);
}
</script>
|
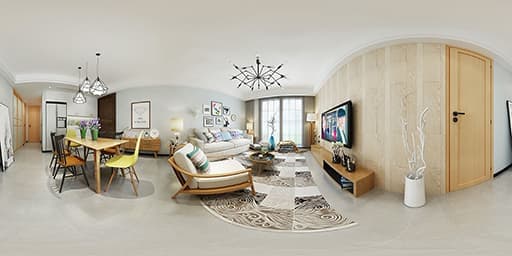
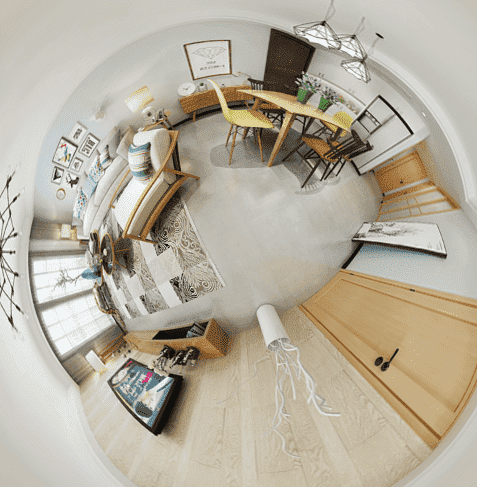
全景图的极坐标扭曲
准备全景图
建立带贴图的rect对象
1
2
3
4
5
6
7
8
9
10
11
12
13
14
15
16
17
18
19
20
21
22
23
24
25
26
27
28
29
30
31
32
33
34
35
36
37
38
39
40
41
42
43
44
| const source = new Float32Array([
-1, 1, 0, 1,
-1, -1, 0, 0,
1, 1, 1, 1,
1, -1, 1, 0
]);
const rect = new Poly({
gl,
source,
type: 'TRIANGLE_STRIP',
attributes: {
a_Position: {
size: 2,
index: 0
},
a_Pin: {
size: 2,
index: 2
},
},
uniforms: {
u_CanvasSize: {
type: 'uniform2fv',
value: [canvas.width, canvas.height]
}
}
})
const image = new Image()
image.src = './images/room.jpg'
image.onload = function () {
rect.maps = {
u_Sampler: { image },
}
rect.updateMaps()
render()
}
//渲染
function render() {
gl.clear(gl.COLOR_BUFFER_BIT);
rect.draw()
}
|
顶点着色器
1
2
3
4
5
6
7
8
9
| <script id="vertexShader" type="x-shader/x-vertex">
attribute vec4 a_Position;
attribute vec2 a_Pin;
varying vec2 v_Pin;
void main(){
gl_Position=a_Position;
v_Pin=a_Pin;
}
</script>
|
片元着色器
1
2
3
4
5
6
7
8
9
10
11
12
13
14
15
16
17
18
19
20
21
22
23
24
25
26
27
28
29
30
| <script id="fragmentShader" type="x-shader/x-fragment">
precision mediump float;
uniform vec2 u_CanvasSize;
uniform sampler2D u_Sampler;
varying vec2 v_Pin;
vec2 center=u_CanvasSize/2.0;
float diagLen=length(center);
float pi2=radians(360.0);
float getAngle(vec2 v){
float ang=atan(v.y,v.x);
if(ang<0.0){
ang+=pi2;
}
return ang;
}
void main(){
vec2 p=gl_FragCoord.xy-center;
float ang=getAngle(p);
float x=ang/pi2;
float len=length(p);
float y=len/diagLen;
vec4 color=texture2D(u_Sampler,vec2(x,y));
if(p.x>0.0&&abs(p.y)<1.0){
color=texture2D(u_Sampler,vec2(0,y));
}
gl_FragColor=color;
}
</script>
|
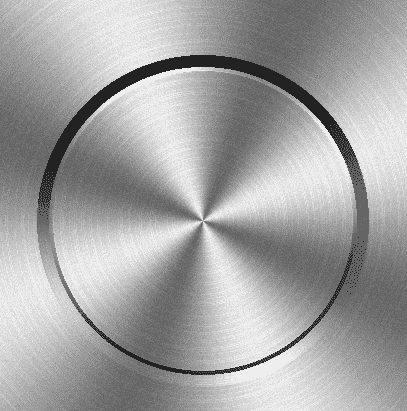
综合案例-磨砂金属按钮
接下来我们将之前说过的渐变、杂色、极坐标扭曲、拉丝融为一体,做一个磨砂金属按钮。
磨砂材质
1
2
3
4
5
6
7
8
9
10
11
12
13
14
15
16
17
18
19
20
21
22
23
24
25
26
27
28
29
30
31
32
33
34
35
36
37
38
39
40
41
42
43
44
45
46
47
48
49
50
51
52
53
54
55
56
57
58
59
60
61
62
63
64
65
66
| <script id="fragmentShader" type="x-shader/x-fragment">
precision mediump float;
uniform vec2 u_CanvasSize;
vec2 center=u_CanvasSize/2.0;
float diagLen=length(center);
float pi2=radians(360.0);
float omega=4.0;
float a=0.5;
//渐变
float gradient(float ang){
return a*sin(omega*ang)+0.5; ;
}
//水平拉丝
float wire(vec2 v){
vec2 a= vec2(0.0,1.0);
float n= dot(v,a);
return fract(tan(n)*10000.0);
}
//杂色
float noise(vec2 v){
vec2 a= vec2(0.1234,0.5678);
float n= dot(v,a);
return fract(tan(n)*10000.0);
}
//获取弧度
float getAngle(vec2 v){
float ang=atan(v.y,v.x);
if(ang<0.0){
ang+=pi2;
}
return ang;
}
void main(){
vec2 p=gl_FragCoord.xy-center;
//极径
float len=length(p);
//极角
float ang=getAngle(p);
float x=u_CanvasSize.x*ang/pi2;
float y=(len/diagLen)*u_CanvasSize.y;
//渐变
float f1 = gradient(ang);
f1=0.65*f1+0.5;
//拉丝
float f2 = wire(vec2(int(x),int(y)));
f2=clamp(f2,0.75,0.8);
//杂色
float f3 = noise(gl_FragCoord.xy);
f3*=0.07;
//复合亮度
float f=f1*f2+f3;
gl_FragColor = vec4(vec3(f), 1);
}
</script>
|
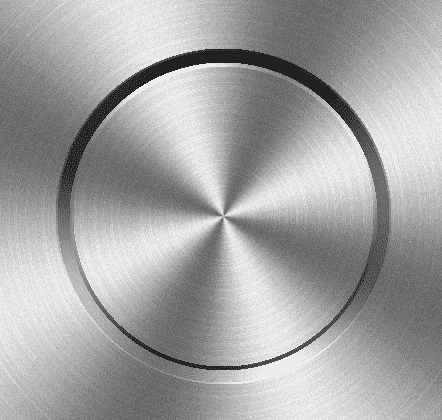
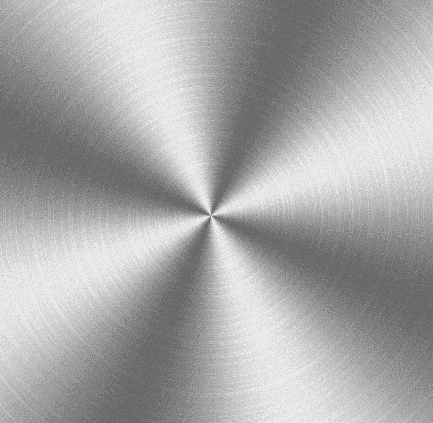
此时效果如下
绘制凸出效果,对复合亮度做一下加工。
1
2
3
4
5
6
| float ratio1=smoothstep(-1.0,1.0,sin(ang));
float r=150.0;
float expand1=r+4.0;
if(len>r&&len<expand1){
f*=ratio1+0.3;
}
|
smoothstep(edge0,edge1,x) 求x在edge0和edge1间的插值[0,1]
若x<edge0 返回0
若x>edge1 返回1
否则返回x 在edge0和edge1间的插值
例子:
smoothstep(3,7,1)=0
smoothstep(3,7,8)=1
smoothstep(3,7,5)=(5-3)/(7-3)=2/4=0.5
sin(ang)的单调性:
ang∈[-π/2,π/2] 时,ang越大,sin(ang)越大
ang∈[π/2,π/2+π] 时,ang越大,sin(ang)越小
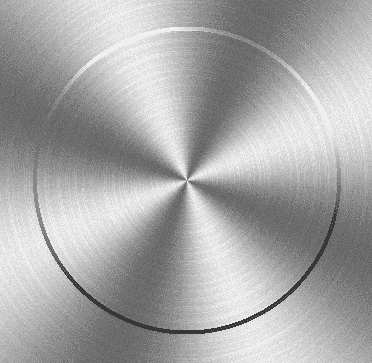
以此原理,我们还可以再做一圈凹陷效果。
1
2
3
4
5
6
7
8
9
10
| float ratio1=smoothstep(-1.0,1.0,sin(ang));
float ratio2=1.0-ratio1;
float r=150.0;
float expand1=r+4.0;
float expand2=expand1+12.0;
if(len>r&&len<expand1){
f*=ratio1+0.3;
}else if(len>expand1&&len<expand2){
f*=ratio2+0.1;
}
|
上面的ratio2 是实现了一个自上到下,由暗到亮的效果。
我也可以对代码做一点优化,把亮度和半径各自装进一个集合里。
1
2
3
4
5
6
7
8
9
10
11
12
13
14
15
16
17
18
19
20
21
22
23
24
|
float ratio1=(sin(ang)+1.0)/2.0;
float ratio2=1.0-ratio1;
float ls[3];
ls[0]=f*(ratio1+0.3);
ls[1]=f*(ratio2+0.1);
ls[2]=f*(ratio2+0.3);
float r=150.0;
float rs[3];
rs[0]=r+4.0;
rs[1]=rs[0]+12.0;
rs[2]=rs[1]+2.0;
for(int i=0;i<3;i++){
if(len>=r&&len<rs[i]){
f=ls[i];
break;
}
r=rs[i];
}
|
使用Element3+WebGL
添加安装依赖
使用vite初始化安装依赖之后,添加依赖
1
| rollup-plugin-element3-webgl
|
vite.config.js
1
2
3
4
5
6
7
8
9
| import { defineConfig } from "vite";
import vue from "@vitejs/plugin-vue";
import element3Webgl from "rollup-plugin-element3-webgl";
// https://vitejs.dev/config/
export default defineConfig({
base: "/",
plugins: [vue(), element3Webgl()],
});
|
使用
1
2
3
4
5
6
7
8
9
10
11
12
13
14
15
16
17
18
19
20
21
22
23
24
25
26
27
28
29
| <template>
<div>
<DrawBlock
:u_Width="600"
:u_Height="600"
:u_Radius="200"
width=600
height=600
></DrawBlock>
</div>
</template>
<script lang="ts">
import { defineComponent } from "vue";
import DrawBlock from "./pure.frag";
export default defineComponent({
name: "App",
components: {
DrawBlock
},
setup(){
return {
}
}
});
</script>
|
1
2
3
4
5
6
7
8
9
10
11
12
13
14
15
16
| precision mediump float;
uniform float u_Width;
uniform float u_Height;
uniform float u_Radius;
void main() {
vec2 center=vec2(u_Width,u_Height)/2.0;
vec2 p=gl_FragCoord.xy-center;
float l = length(p);
if(l<u_Radius){
gl_FragColor=vec4(1,1,0,1);
}else{
gl_FragColor = vec4(0, 0, 0, 1);
}
}
|
最终效果就是一个红色的圆圈。
接下来我们把之前写过的磨砂金属作为Element3 组件的皮肤。
金属Switch
1
2
3
4
5
6
7
8
9
10
11
12
13
14
15
16
17
18
19
20
21
22
23
24
25
26
27
28
29
30
31
32
33
34
35
36
37
38
39
40
41
42
43
44
45
46
47
48
49
50
51
52
53
54
55
56
57
58
59
60
61
62
63
64
65
66
67
68
69
70
71
72
73
| <template>
<E3Switch
v-model="enabled"
class="
relative
focus:outline-none
"
>
<draw
width="100"
height="100"
:iTime="0"
:iWidth="buttonWidth"
:iHeight="buttonHeight"
:style="enabled?buttonEnterStyle:buttonStyle"
></draw>
<div :style="backgroundStyle"></div>
</E3Switch>
</template>
<script>
import { ref } from "vue";
import { E3Switch } from "element3-core";
import draw from "./metal.frag";
export default {
components: {
E3Switch,
draw,
},
setup() {
const enabled = ref(false);
const buttonStyle = {
width:"40px",
height:"40px",
transform:"translate(0px,0px)",
borderRadius:"50%",
position:"absolute",
left:"17px",
top:"14px",
boxShadow:"0px 3px 4px #000",
transition:"all .2s ease-in"
}
const buttonEnterStyle = {
width:"40px",
height:"40px",
transform:"translate(32px,0px)",
borderRadius:"50%",
position:"absolute",
left:"17px",
top:"14px",
boxShadow:"0px 3px 4px #000",
transition:"all .2s ease-in"
}
const buttonWidth = ref(100);
const buttonHeight = ref(100);
const backgroundStyle = {
background: "linear-gradient(#333, #666)",
width: "70px",
height:"44px",
borderRadius:"25px",
border:"2px solid #333",
}
return { buttonWidth,buttonHeight,backgroundStyle,enabled,buttonStyle,buttonEnterStyle};
},
};
</script>
<style></style>
|
金属材质
1
2
3
4
5
6
7
8
9
10
11
12
13
14
15
16
17
18
19
20
21
22
23
24
25
26
27
28
29
30
31
32
33
34
35
36
37
38
39
40
41
42
43
44
45
46
47
48
49
50
51
52
53
54
55
56
57
58
59
60
61
62
63
64
65
66
67
68
69
70
71
72
73
74
75
76
77
78
79
80
81
82
83
84
85
86
| precision mediump float;
uniform float iWidth;
uniform float iHeight;
vec2 u_CanvasSize = vec2(iWidth, iHeight);
vec2 center = u_CanvasSize / 2.0;
float diagLen = length(center);
float pi2 = radians(360.0);
float omega=4.0;
float a=0.5;
float gradient(float ang){
return a*sin(omega*ang)+0.5; ;
}
float wire(vec2 v){
vec2 a= vec2(0.0,1.0);
float n= dot(v,a);
return fract(tan(n)*10000.0);
}
float noise(vec2 v){
vec2 a= vec2(0.1234,0.5678);
float n= dot(v,a);
return fract(tan(n)*10000.0);
}
float getAngle(vec2 v){
float ang=atan(v.y,v.x);
if(ang<0.0){
ang+=pi2;
}
return ang;
}
void main(){
vec2 p=gl_FragCoord.xy-center;
float len=length(p);
float ang=getAngle(p);
float x=u_CanvasSize.x*ang/pi2;
float y=(len/diagLen)*u_CanvasSize.y;
float f1 = gradient(ang);
f1=0.65*f1+0.5;
float f2 = wire(vec2(int(x),int(y)));
f2=clamp(f2,0.75,0.8);
float f3 = noise(gl_FragCoord.xy);
f3*=0.07;
float f=f1*f2+f3;
float ratio1=smoothstep(-1.0,1.0,sin(ang));
float ratio2=1.0-ratio1;
float ls[3];
ls[0]=f*(ratio1+0.3);
ls[1]=f*(ratio2+0.1);
ls[2]=f*(ratio2+0.3);
float r=150.0;
float rs[3];
rs[0]=r+4.0;
rs[1]=rs[0]+12.0;
rs[2]=rs[1]+2.0;
for(int i=0;i<3;i++){
if(len>=r&&len<rs[i]){
f=ls[i];
break;
}
r=rs[i];
}
gl_FragColor = vec4(vec3(f), 1);
}
|

结语
本篇文章就到这里了,更多内容敬请期待,债见~