【可视化学习】84-从入门到放弃WebGL(十六)
发表于:2024-09-03 |

前言

本篇继续跟着李伟老师学习 webgl,主要讲解正交相机轨道控制器

正交相机轨道控制器

相机轨道控制器可以让我们更好的变换相机,从而灵活观察物体。

three.js相机轨道控制器如何变换相机

three.js 中的相机轨道控制器是通过以下事件变换相机的:

旋转

鼠标左键拖拽
单手指移动

缩放

鼠标滚轮滚动
两个手指展开或挤压

平移

鼠标右键拖拽
鼠标左键+ctrl/meta/shiftKey 拖拽
箭头键
两个手指移动

在实际项目开发中,我们不能对 three.js 里的相机轨道控制器太过依赖。
因为其不能满足我们图形项目里的所有需求。
面对这样的情况,我们若不能充分理解相机轨道控制器的实现原理,整个项目都会被卡住。
所以,我们接下来要从最底层实现相机轨道控制器。
我们先使用相机轨道控制器变换正交相机。

正交相机的位移轨道

首先来说正交相机的位移轨道。

搭建场景

准备 4 个三角形+1 个相机

着色器
1
2
3
4
5
6
7
8
9
10
11
12
13
14
15
<script id="vertexShader" type="x-shader/x-vertex">
attribute vec4 a_Position;
uniform mat4 u_PvMatrix;
uniform mat4 u_ModelMatrix;
void main(){
gl_Position = u_PvMatrix*u_ModelMatrix*a_Position;
}
</script>
<script id="fragmentShader" type="x-shader/x-fragment">
precision mediump float;
uniform vec4 u_Color;
void main(){
gl_FragColor=u_Color;
}
</script>
初始化着色器
1
2
3
4
5
6
7
8
9
10
11
12
13
14
15
16
17
18
19
20
21
22
import { initShaders } from "../jsm/Utils.js";
import {
Matrix4,
PerspectiveCamera,
Vector2,
Vector3,
Quaternion,
Object3D,
OrthographicCamera,
} from "https://unpkg.com/three/build/three.module.js";
import Poly from "./jsm/Poly.js";

const canvas = document.getElementById("canvas");
const [viewW, viewH] = [window.innerWidth, window.innerHeight];
canvas.width = viewW;
canvas.height = viewH;
const gl = canvas.getContext("webgl");

const vsSource = document.getElementById("vertexShader").innerText;
const fsSource = document.getElementById("fragmentShader").innerText;
initShaders(gl, vsSource, fsSource);
gl.clearColor(0.0, 0.0, 0.0, 1.0);
正交相机
1
2
3
4
5
6
7
8
9
10
11
12
13
14
15
16
17
18
19
20
21
const halfH = 2;
const ratio = canvas.width / canvas.height;
const halfW = halfH * ratio;
const [left, right, top, bottom, near, far] = [
-halfW,
halfW,
halfH,
-halfH,
1,
8,
];
const eye = new Vector3(1, 1, 2);
const target = new Vector3(0, 0, -3);
const up = new Vector3(0, 1, 0);

const camera = new OrthographicCamera(left, right, top, bottom, near, far);
camera.position.copy(eye);
camera.lookAt(target);
camera.updateMatrixWorld();
const pvMatrix = new Matrix4();
pvMatrix.multiplyMatrices(camera.projectionMatrix, camera.matrixWorldInverse);
4 个三角形
1
2
3
4
5
6
7
8
9
10
11
12
13
14
15
16
17
18
19
20
21
22
23
24
25
26
27
28
29
30
31
32
33
34
35
36
37
38
39
40
41
42
43
44
45
46
47
48
49
50
51
52
53
54
55
56
57
58
59
60
61
const triangle1 = crtTriangle(
[1, 0, 0, 1],
new Matrix4().setPosition(-0.5, 0, -4).elements
);
const triangle2 = crtTriangle(
[1, 0, 0, 1],
new Matrix4().setPosition(0.5, 0, -4).elements
);
const triangle3 = crtTriangle(
[1, 1, 0, 1],
new Matrix4().setPosition(-0.8, 0, -2).elements
);
const triangle4 = crtTriangle(
[1, 1, 0, 1],
new Matrix4().setPosition(0.5, 0, -2).elements
);

render();
function render() {
gl.clear(gl.COLOR_BUFFER_BIT);

triangle1.init();
triangle1.draw();

triangle2.init();
triangle2.draw();

triangle3.init();
triangle3.draw();

triangle4.init();
triangle4.draw();
}

function crtTriangle(color, modelMatrix) {
return new Poly({
gl,
source: [0, 0.3, 0, -0.3, -0.3, 0, 0.3, -0.3, 0],
type: "TRIANGLES",
attributes: {
a_Position: {
size: 3,
index: 0,
},
},
uniforms: {
u_Color: {
type: "uniform4fv",
value: color,
},
u_PvMatrix: {
type: "uniformMatrix4fv",
value: pvMatrix.elements,
},
u_ModelMatrix: {
type: "uniformMatrix4fv",
value: modelMatrix,
},
},
});
}

效果图

声明基础数据

鼠标事件集合
1
const mouseButtons = new Map([[2, "pan"]]);

2 鼠标右键按下时的 event.button 值
​pan:平移

轨道控制器状态,表示控制器正在对相机进行哪种变换。比如 state 等于 pan 时,代表位移
1
let state = "none";
鼠标在屏幕上拖拽时的起始位和结束位,以像素为单位
1
2
const dragStart = new Vector2();
const dragEnd = new Vector2();
鼠标每次移动时的位移量,webgl 坐标量
1
const panOffset = new Vector3();
鼠标在屏幕上垂直拖拽时,是基于相机本地坐标系的 y 方向还是 z 方向移动相机

true:y 向移动
false:z 向移动

1
const screenSpacePanning = true;

在 canvas 上绑定鼠标事件

取消右击菜单的显示
1
2
3
canvas.addEventListener("contextmenu", (event) => {
event.preventDefault();
});
指针按下时,设置拖拽起始位,获取轨道控制器状态。
1
2
3
4
canvas.addEventListener("pointerdown", ({ clientX, clientY, button }) => {
dragStart.set(clientX, clientY);
state = mouseButtons.get(button);
});

注:指针事件支持多种方式的指针顶点输入,如鼠标、触控笔、触摸屏等。

指针移动时,若控制器处于平移状态,平移相机。
1
2
3
4
5
6
canvas.addEventListener("pointermove", (event) => {
switch (state) {
case "pan":
handleMouseMovePan(event);
}
});
指针抬起时,清除控制器状态。
1
2
3
canvas.addEventListener("pointerup", (event) => {
state = "none";
});

接下来我们重点看一下相机平移方法 handleMouseMovePan()。

相机平移方法

相机平移方法
1
2
3
4
5
6
7
8
function handleMouseMovePan({ clientX, clientY, button }) {
//指针拖拽的结束位(像素单位)
dragEnd.set(clientX, clientY);
//基于拖拽距离(像素单位)移动相机
pan(dragEnd.clone().sub(dragStart));
//重置拖拽起始位
dragStart.copy(dragEnd);
}
基于拖拽距离(像素单位)移动相机

效果图

1
2
3
4
5
6
7
8
9
10
11
12
13
14
15
16
17
18
19
20
21
22
23
24
25
26
27
28
29
30
function pan(delta) {
//相机近裁剪面尺寸
const cameraW = camera.right - camera.left;
const cameraH = camera.top - camera.bottom;
//指针拖拽量在画布中的比值
const ratioX = delta.x / canvas.clientWidth;
const ratioY = delta.y / canvas.clientHeight;
//将像素单位的位移量转换为相机近裁剪面上的位移量
const distanceLeft = ratioX * cameraW;
const distanceUp = ratioY * cameraH;
//相机本地坐标系里的x轴
const mx = new Vector3().setFromMatrixColumn(camera.matrix, 0);
//相机x轴平移量
const vx = mx.clone().multiplyScalar(-distanceLeft);
//相机z|y轴平移量
const vy = new Vector3();
if (screenSpacePanning) {
//y向
vy.setFromMatrixColumn(camera.matrix, 1);
} else {
//-z向
vy.crossVectors(camera.up, mx);
}
//相机y向或-z向的平移量
vy.multiplyScalar(distanceUp);
//整合平移量
panOffset.copy(vx.add(vy));
//更新
update();
}
基于平移量,位移相机,更新投影视图矩阵
1
2
3
4
5
6
7
8
function update() {
target.add(panOffset);
camera.position.add(panOffset);
camera.lookAt(target);
camera.updateWorldMatrix(true);
pvMatrix.multiplyMatrices(camera.projectionMatrix, camera.matrixWorldInverse);
render();
}

ok,接下来,我们来解释一下pan方法(相机平移方法),另外的俩个步骤相信大家都可以很好理解

一、变量初始化与计算

首先计算相机近裁剪面的尺寸,通过相机的右边界值减去左边界值得到相机宽度(cameraW),相机上边界值减去下边界值得到相机高度(cameraH)。
接着计算指针拖拽量在画布中的比值。分别将指针在水平方向上的拖拽量(delta.x)除以画布的宽度(canvas.clientWidth)得到水平方向比值(ratioX);将指针在垂直方向上的拖拽量(delta.y)除以画布的高度(canvas.clientHeight)得到垂直方向比值(ratioY)。
然后将像素单位的位移量转换为相机近裁剪面上的位移量。水平方向上,通过比值乘以相机宽度得到相机左边界的位移量(distanceLeft);垂直方向上,通过比值乘以相机高度得到相机上边界的位移量(distanceUp)。

二、相机平移向量计算

取相机本地坐标系里的 x 轴向量(mx),通过从相机矩阵中提取第 0 列得到。
计算相机 x 轴平移量(vx),克隆 mx 向量并乘以负的水平位移量(distanceLeft)。这是因为相机的移动方向与坐标系的正方向相反。
计算相机 y 轴或 - z 轴平移量(vy)。如果 screenSpacePanning 为真,则取相机矩阵的第 1 列作为 y 向向量;如果为假,则通过相机的上方向向量(camera.up)与 x 轴向量(mx)叉乘得到 - z 向向量(右手法则)。然后将该向量乘以垂直位移量(distanceUp)。

三、整合平移量与更新

整合平移量(panOffset),将 x 轴平移量(vx)与 y 轴或 - z 轴平移量(vy)相加,得到最终的相机平移向量。
调用 update()函数进行更新操作。

正交相机的缩放轨道

正交相机的缩放原理

相机的缩放就是让我们在裁剪空间中看到的同一深度上的东西更多或者更少。
通常大家很容易结合实际生活来考虑,比如我们正对着一面墙壁,墙壁上铺满瓷砖。
当我们把镜头拉近时,看到的瓷砖数量就变少了,每块瓷砖的尺寸也变大了;
反之,当我们把镜头拉远时,看到的瓷砖数量就变多了,每块瓷砖的尺寸也变小了。
然而这种方式只适用于透视相机,并不适用于正交相机,因为正交相机不具备近大远小规则。
正交相机的缩放,是直接缩放的投影面,这个投影面在 three.js 里就是近裁剪面。
当投影面变大了,那么能投影的顶点数量也就变多了;
反之,当投影面变小了,那么能投影的顶点数量也就变少了。
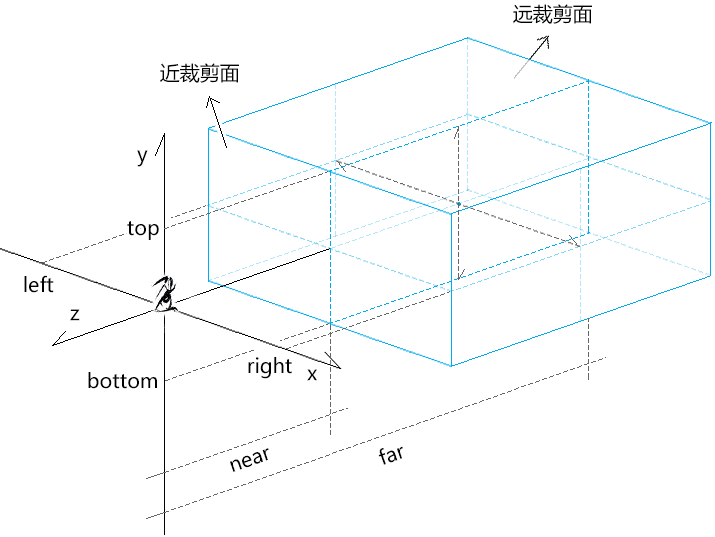
效果图

正交相机缩放方法

在 three.js 里的正交相机对象 OrthographicCamera 的 updateProjectionMatrix() 方法里可以找到正交相机的缩放方法。

1
2
3
4
5
6
7
8
9
10
11
12
updateProjectionMatrix: function () {
const dx = ( this.right - this.left ) / ( 2 * this.zoom );
const dy = ( this.top - this.bottom ) / ( 2 * this.zoom );
const cx = ( this.right + this.left ) / 2;
const cy = ( this.top + this.bottom ) / 2;

let left = cx - dx;
let right = cx + dx;
let top = cy + dy;
let bottom = cy - dy;
……
}

我们可以将上面的 dx、dy 分解一下:

近裁剪面宽度的一半 width:( this.right - this.left ) / 2
近裁剪面高度的一半 height:( this.top - this.bottom ) / 2
dx=width/zoom
dy=height/zoom
在 three.js 里,zoom 的默认值是 1,即不做缩放。

由上我们可以得到正交相机缩放的性质:

  1. zoom 值和近裁剪面的尺寸成反比
  2. 近裁剪面的尺寸和我们在同一深度所看物体的数量成正比
  3. 近裁剪面的尺寸和我们所看的同一物体的尺寸成反比

正交相机缩放轨道的实现

基于之前的相机位移轨道继续写代码。

1.定义滚轮在每次滚动时的缩放系数
1
const zoomScale = 0.95;
2.为 canvas 添加滚轮事件
1
2
3
4
5
6
7
8
9
10
canvas.addEventListener("wheel", handleMouseWheel);

function handleMouseWheel({ deltaY }) {
if (deltaY < 0) {
dolly(1 / zoomScale);
} else if (deltaY > 0) {
dolly(zoomScale);
}
update();
}
  1. 当 deltaY<0 时,是向上滑动滚轮,会缩小裁剪面;

  2. 当 deltaY>0 时,是向下滑动滚轮,会放大裁剪面。

3.通过 dolly()方法缩放相机
1
2
3
4
function dolly(dollyScale) {
camera.zoom *= dollyScale;
camera.updateProjectionMatrix();
}

正交相机的旋转轨道

正交相机的旋转轨道的概念

相机的旋转轨道的实现原理就是让相机绕物体旋转。
相机旋转轨迹的集合是一个球体。
相机旋转轨道的实现方式是有许多种的,至于具体用哪种,还要看我们具体的项目需求。
我们这里就先说一种基于球坐标系旋转的相机旋转轨道
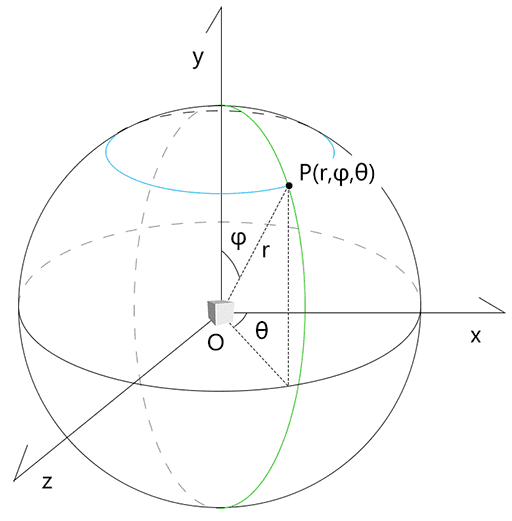
效果图
已知:

三维坐标系[O;x,y,z]
正交相机
视点位:点P
目标位:点O
正交相机旋转轨的旋转轴是 y 轴

则:
正交相机在球坐标系中的旋转轨道有两种:

  1. 点 P 绕旋转轴 y 轴的旋转轨道,即上图的蓝色轨道。
  2. 点 P 在平面 OPy 中的旋转轨道,即上图的绿色轨迹。

如何计算正交相机旋转后的视点位。

接下来,结合正交相机的实际情况,说一下如何计算正交相机旋转后的视点位。

解题思路

已知:
三维坐标系[O;x,y,z]
正交相机
视点位:三维坐标点 P(x,y,z)
目标位:点 O
正交相机旋转轨的旋转轴是 y 轴
求:相机在平面 OPy 中旋转 a 度,绕 y 轴旋转 b 度后,相机视点的三维空间位 P’(x’,y’,z’)
解:

  1. 将点 P(x,y,z)的三维坐标位换算为球坐标位,即 P(r,φ,θ)

  2. 计算点 P 在平面 OPy 中旋转 a 度,绕 y 轴旋转 b 度后的球坐标位,即 P(r,φ+a,θ+b)

  3. 将点 P 的球坐标位转换为三维坐标位

求解的思路就这么简单,我们首先来说一下球坐标系。

球坐标系

球坐标系的概念

球坐标系(spherical coordinate system)是用球坐标表示空间点位的坐标系。

球坐标由以下分量构成:

  1. 半径(radial distance) r:OP 长度( 0 ≤ r ) 。
  2. 极角(polar angle) φ:OP 与 y 轴的夹角(0 ≤ φ ≤ π)
  3. 方位角(azimuth angle) θ:OP 在平面 Oxz 上的投影与正 x 轴的夹角( 0 ≤ θ < 2π )。

注:
球坐标系可视极坐标系的三维推广。
当 r=0 时,φ 和 θ 无意义。
当 φ =0 或 φ =π 时,θ 无意义。
接下来咱们说一下球坐标与三维坐标的转换。

三维坐标转球坐标

效果图

已知:点 P 的三维坐标位(x,y,z)

求:点 P 的球坐标位(r,φ,θ)

解:

求半径 r:

1
r=sqrt(x²+y²+z²)

求极角 φ 的方法有三种:

1
2
3
φ=acos(y/r)
φ=asin(sqrt(x²+z²)/r)
φ=atan(sqrt(x²+z²)/y)

求方位角 θ 的方法有三种:

1
2
3
θ = acos(x / (r * sinφ));
θ = asin(z / (r * sinφ));
θ = atan(z / x);

注:
在用反正切求角度时,需要注意点问题。
atan()返回的值域是[-PI/2,PI/2],这是个半圆,这会导致其返回的弧度失真。
如:

1
2
atan(z / x) == atan(-z / -x);
atan(-z / x) == atan(z / -x);

所以,我们在 js 里用反正切计算弧度时,要使用 atan2() 方法,即:

1
2
φ=Math.atan2(sqrt(x²+z²),y)
θ=Math.atan2(z,x)

atan2()返回的值域是[-PI,PI],这是一个整圆。
atan2()方法是将 z,x 分开写入的,其保留了其最原始的正负符号,所以其返回的弧度不会失真。

球坐标转三维坐标

已知:点 P 的球坐标位(r,φ,θ)
求:点 P 的三维坐标位(x,y,z)
解:

1
2
3
x = r * sinφ * cosθ;
y = r * cosφ;
z = r * sinφ * sinθ;

关于球坐标系我们就说到这,接下来我们就可以说一下正交相机旋转轨道的具体代码实现啦。

正交相机的旋转轨道实现

申明事件
1
2
3
4
5
6
//鼠标事件集合
const mouseButtons = new Map([[0, "rotate"]]);
//轨道状态
let state = "none";
//2PI
const pi2 = Math.PI * 2;
旋转轨道
1
2
3
4
//相机视点相对于目标的球坐标
const spherical = new Spherical().setFromVector3(
camera.position.clone().sub(target)
);
指针移动事件
1
2
3
4
5
6
7
8
9
canvas.addEventListener("pointermove", ({ clientX, clientY }) => {
dragEnd.set(clientX, clientY);
switch (state) {
case "rotate":
rotate(dragEnd.clone().sub(dragStart));
break;
}
dragStart.copy(dragEnd);
});
旋转方法
1
2
3
4
5
6
function rotate({ x, y }) {
const { clientHeight } = canvas;
spherical.theta -= (pi2 * x) / clientHeight; // yes, height
spherical.phi -= (pi2 * y) / clientHeight;
update();
}
update 方法
1
2
3
4
5
6
7
8
9
10
11
12
13
14
15
16
function update() {
//基于旋转量旋转相机
const rotateOffset = new Vector3().setFromSpherical(spherical);
camera.position.copy(target.clone().add(rotateOffset));

//更新投影视图矩阵
camera.lookAt(target);
camera.updateMatrixWorld(true);
pvMatrix.multiplyMatrices(camera.projectionMatrix, camera.matrixWorldInverse);

//重置旋转量
spherical.setFromVector3(camera.position.clone().sub(target));

// 渲染
render();
}

整理平移,旋转,缩放正交相机轨道代码

整理代码

着色器
1
2
3
4
5
6
7
8
9
10
11
12
13
14
15
<script id="vertexShader" type="x-shader/x-vertex">
attribute vec4 a_Position;
uniform mat4 u_PvMatrix;
uniform mat4 u_ModelMatrix;
void main(){
gl_Position = u_PvMatrix*u_ModelMatrix*a_Position;
}
</script>
<script id="fragmentShader" type="x-shader/x-fragment">
precision mediump float;
uniform vec4 u_Color;
void main(){
gl_FragColor=u_Color;
}
</script>
初始化着色器与绘制三角形
1
2
3
4
5
6
7
8
9
10
11
12
13
14
15
16
17
18
19
20
21
22
23
24
25
26
27
28
29
30
31
32
33
34
35
36
37
38
39
40
41
42
43
44
45
46
47
48
49
50
51
52
53
54
55
56
57
58
59
60
61
62
63
64
65
66
67
68
69
70
71
72
73
74
75
76
77
78
79
80
81
82
83
84
85
86
87
88
89
90
91
92
93
const canvas = document.getElementById("canvas");
const [viewW, viewH] = [window.innerWidth, window.innerHeight];
canvas.width = viewW;
canvas.height = viewH;
const gl = canvas.getContext("webgl");

const vsSource = document.getElementById("vertexShader").innerText;
const fsSource = document.getElementById("fragmentShader").innerText;
initShaders(gl, vsSource, fsSource);
gl.clearColor(0.0, 0.0, 0.0, 1.0);

const halfH = 2;
const ratio = canvas.width / canvas.height;
const halfW = halfH * ratio;
const [left, right, top, bottom, near, far] = [
-halfW,
halfW,
halfH,
-halfH,
1,
8,
];
const eye = new Vector3(1, 1, 2);
const target = new Vector3(0, 0, -3);
const up = new Vector3(0, 1, 0);

const camera = new OrthographicCamera(left, right, top, bottom, near, far);
camera.position.copy(eye);
camera.lookAt(target);
camera.updateMatrixWorld();
const pvMatrix = new Matrix4();
pvMatrix.multiplyMatrices(camera.projectionMatrix, camera.matrixWorldInverse);

const triangle1 = crtTriangle(
[1, 0, 0, 1],
[1, 0, 0, 0, 0, 1, 0, 0, 0, 0, 1, 0, -0.5, 0, -3, 1]
);
const triangle2 = crtTriangle(
[1, 0, 0, 1],
new Matrix4().setPosition(0.5, 0, -3).elements
);

const triangle3 = crtTriangle(
[1, 1, 0, 1],
new Matrix4().setPosition(-0.5, 0, -2).elements
);

const triangle4 = crtTriangle(
[1, 1, 0, 1],
new Matrix4().setPosition(0.5, 0, -2).elements
);

render();

function render() {
gl.clear(gl.COLOR_BUFFER_BIT);
triangle1.init();
triangle1.draw();
triangle2.init();
triangle2.draw();
triangle3.init();
triangle3.draw();
triangle4.init();
triangle4.draw();
}

function crtTriangle(color, modelMatrix) {
return new Poly({
gl,
source: [0, 0.3, 0, -0.3, -0.3, 0, 0.3, -0.3, 0],
type: "TRIANGLES",
attributes: {
a_Position: {
size: 3,
index: 0,
},
},
uniforms: {
u_Color: {
type: "uniform4fv",
value: color,
},
u_PvMatrix: {
type: "uniformMatrix4fv",
value: pvMatrix.elements,
},
u_ModelMatrix: {
type: "uniformMatrix4fv",
value: modelMatrix,
},
},
});
}
平移,旋转,缩放,更新
1
2
3
4
5
6
7
8
9
10
11
12
13
14
15
16
17
18
19
20
21
22
23
24
25
26
27
28
29
30
31
32
33
34
35
36
37
38
39
40
41
42
43
44
45
46
47
48
49
50
51
52
53
54
55
56
57
58
59
60
61
62
63
64
65
66
67
68
69
70
71
72
73
74
75
76
77
78
79
80
81
82
83
84
85
86
87
88
89
90
91
92
93
94
95
96
97
98
99
100
101
102
103
104
105
106
107
108
109
110
111
112
113
114
115
116
117
118
119
120
121
122
123
124
125
126
127
128
129
130
131
132
133
134
135
136
137
138
139
140
141
142
143
144
145
146
147
148
149
150
151
152
153
154
155
156
157
158
159
160
161
162
163
164
165
166
/* 声明基础数据 */
//鼠标事件集合
const mouseButtons = new Map([
[0, "rotate"],
[2, "pan"],
]);
//轨道状态
let state = "none";
//2PI
const pi2 = Math.PI * 2;
//鼠标拖拽的起始位和结束位,无论是左键按下还是右键按下
const [dragStart, dragEnd] = [new Vector2(), new Vector2()];

/* 平移轨道 */
//平移量
const panOffset = new Vector3();
//是否沿相机y轴平移相机
const screenSpacePanning = true;

/* 缩放轨道 */
//滚轮在每次滚动时的缩放系数
const zoomScale = 0.95;

/* 旋转轨道 */
const spherical = new Spherical().setFromVector3(
camera.position.clone().sub(target)
);

/* 取消右击菜单的显示 */
canvas.addEventListener("contextmenu", (event) => {
event.preventDefault();
});

/* 指针按下时,设置拖拽起始位,获取轨道控制器状态。 */
canvas.addEventListener("pointerdown", ({ clientX, clientY, button }) => {
dragStart.set(clientX, clientY);
state = mouseButtons.get(button);
});

/* 指针移动时,若控制器处于平移状态,平移相机;若控制器处于旋转状态,旋转相机。 */
canvas.addEventListener("pointermove", ({ clientX, clientY }) => {
dragEnd.set(clientX, clientY);
switch (state) {
case "pan":
pan(dragEnd.clone().sub(dragStart));
break;
case "rotate":
rotate(dragEnd.clone().sub(dragStart));
break;
}
dragStart.copy(dragEnd);
});
canvas.addEventListener("pointerup", (event) => {
state = "none";
});

//滚轮事件
canvas.addEventListener("wheel", handleMouseWheel);
function handleMouseWheel({ deltaY }) {
console.log("deltaY", deltaY);
if (deltaY < 0) {
dolly(1 / zoomScale);
} else {
dolly(zoomScale);
}
update();
}

function dolly(dollyScale) {
camera.zoom *= dollyScale;
camera.updateProjectionMatrix();
}

//平移方法
function pan({ x, y }) {
const { right, left, top, bottom, matrix, position, up } = camera;
const { clientWidth, clientHeight } = canvas;
const cameraW = right - left;
const cameraH = top - bottom;
const ratioX = x / clientWidth;
const ratioY = y / clientHeight;
const distanceLeft = ratioX * cameraW;
const distanceUp = ratioY * cameraH;
const mx = new Vector3().setFromMatrixColumn(matrix, 0);
const vx = mx.clone().multiplyScalar(-distanceLeft);
const vy = new Vector3();
if (screenSpacePanning) {
vy.setFromMatrixColumn(matrix, 1);
} else {
vy.crossVectors(up, mx);
}
vy.multiplyScalar(distanceUp);
panOffset.copy(vx.add(vy));
update();
}

// 旋转方法
function rotate({ x, y }) {
const { clientHeight } = canvas;
spherical.theta -= (pi2 * x) / clientHeight;
spherical.phi -= (pi2 * y) / clientHeight;
update();
}
function update() {
//基于平移量平移相机
target.add(panOffset);
camera.position.add(panOffset);

//基于旋转量旋转相机
const rotateOffset = new Vector3().setFromSpherical(spherical);
camera.position.copy(target.clone().add(rotateOffset));

//更新投影视图矩阵
camera.lookAt(target);
camera.updateMatrixWorld(true);
pvMatrix.multiplyMatrices(camera.projectionMatrix, camera.matrixWorldInverse);

//重置旋转量和平移量
spherical.setFromVector3(camera.position.clone().sub(target));
panOffset.set(0, 0, 0);

// 渲染
render();
}

render();

function render() {
gl.clear(gl.COLOR_BUFFER_BIT);
triangle1.init();
triangle1.draw();
triangle2.init();
triangle2.draw();
triangle3.init();
triangle3.draw();
triangle4.init();
triangle4.draw();
}

function crtTriangle(color, modelMatrix) {
return new Poly({
gl,
source: [0, 0.3, 0, -0.3, -0.3, 0, 0.3, -0.3, 0],
type: "TRIANGLES",
attributes: {
a_Position: {
size: 3,
index: 0,
},
},
uniforms: {
u_Color: {
type: "uniform4fv",
value: color,
},
u_PvMatrix: {
type: "uniformMatrix4fv",
value: pvMatrix.elements,
},
u_ModelMatrix: {
type: "uniformMatrix4fv",
value: modelMatrix,
},
},
});
}

限制旋转轴

在three.js 的轨道控制器里,无法限制旋转轴,比如我只想横向旋转相机,或者竖向旋转相机。
现在,我们了解了它底层代码之后,就可以实现了

声明一个控制旋转方向的属性
1
const rotateDir = 'xy'

x:可以在x方向旋转相机
y:可以在y方向旋转相机
xy:可以在x,y方向旋转相机

旋转方法,基于rotateDir属性约束旋转方向
1
2
3
4
5
6
7
8
9
10
11
12
function rotate({ x, y }) {
const { clientHeight } = canvas
const deltaT = pi2 * x / clientHeight // yes, height
const deltaP = pi2 * y / clientHeight
if (rotateDir.includes('x')) {
spherical.theta -= deltaT
}
if (rotateDir.includes('y')) {
spherical.phi -= deltaP
}
update()
}

限制极角

之前我们说球坐标系的时候说过,其极角的定义域是[0,180°],所以我们在代码里也要对其做一下限制。

在rotate() 方法里做下调整即可。

1
2
3
4
5
6
7
8
9
10
11
12
//旋转
function rotate({ x, y }) {
……
if (rotateDir.includes('y')) {
const phi = spherical.phi - deltaP
spherical.phi = Math.min(
Math.PI,
Math.max(0, phi)
)
}
……
}

然而,因为当球坐标里的极角等于0或180度的时候,方位角会失去意义,所以我们还不能在代码真的给极角0或180度,不然方位角会默认归零。

所以,我们需要分别给极角里的0和180度一个近似值。

1
2
3
4
spherical.phi = Math.min(
Math.PI * 0.99999999,
Math.max(0.00000001, phi)
)

轨迹球旋转

轨迹球这个名字,来自three.js 的TrackballControls 对象,其具体的代码实现便可以在这里找到。

轨迹球不像基于球坐标系的旋转轨道那样具有恒定的上方向。

轨迹球的上方向是一个垂直于鼠标拖拽方向和视线的轴,相机视点会基于此轴旋转。

轨迹球的上方向会随鼠标拖拽方向的改变而改变。
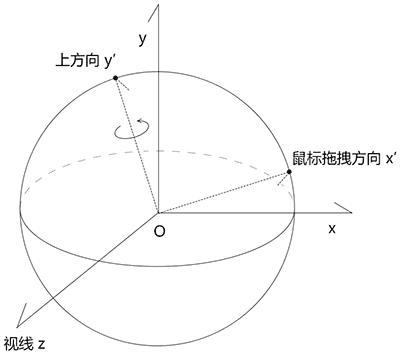
效果图

实现轨迹球旋转逻辑

1.定义用于沿某个轴旋转相机视点的四元数

1
const quaternion = new Quaternion()

2.把之前的rotate()旋转方法改一下

1
2
3
4
5
6
7
8
9
10
11
12
13
14
15
16
17
18
19
20
21
22
23
24
25
26
27
28
29
30
31
32
33
34
35
36
37
38
39
40
41
42
43
44
45
function rotate({ x, y }) {
const {right,left,top,bottom,matrix,position}=camera
const {clientWidth,clientHeight}=canvas

// 相机宽高
const cameraW = right - left
const cameraH = top - bottom

// 鼠标位移距离在画布中的占比
const ratioX = x / clientWidth
const ratioY = -y / clientHeight

//基于高度的x位置比-用于旋转量的计算
const ratioXBaseHeight = x / clientHeight
//位移量
const ratioLen=new Vector2(ratioXBaseHeight, ratioY).length()
//旋转量
const angle = ratioLen* pi2

// 在相机世界中的位移距离
const distanceLeft = ratioX * cameraW
const distanceUp = ratioY * cameraH

// 相机本地坐标系的x,y轴
const mx = new Vector3().setFromMatrixColumn(camera.matrix, 0)
const my = new Vector3().setFromMatrixColumn(camera.matrix, 1)

// 将鼠标在相机世界的x,y轴向的位移量转换为世界坐标位
const vx = mx.clone().multiplyScalar(distanceLeft)
const vy = my.clone().multiplyScalar(distanceUp)

//鼠标在s'j'z中的位移方向-x轴
const moveDir=vx.clone().add(vy).normalize()

//目标点到视点的单位向量-z轴
const eyeDir = camera.position.clone().sub(target).normalize()

//基于位移方向和视线获取旋转轴-上方向y轴
const axis = moveDir.clone().cross(eyeDir)

//基于旋转轴和旋转量建立四元数
quaternion.setFromAxisAngle(axis, angle)

update()
}
一、关键变量和数据结构
  1. { x, y }:表示鼠标在画布上的坐标位置。
  2. camera:包含相机的各种属性,如 rightlefttopbottommatrixposition,用于描述相机的视锥体和位置信息。
  3. canvas:包含画布的 clientWidthclientHeight 属性,用于获取画布的宽度和高度。
  4. cameraWcameraH:分别表示相机的宽度和高度,通过相机的右边界和左边界之差以及上边界和下边界之差计算得到。
  5. ratioXratioYratioXBaseHeight:鼠标位移距离在画布中的占比,用于计算相机在不同方向上的位移量。
  6. ratioLen:基于鼠标位移距离计算得到的位移量长度,用于确定旋转量。
  7. angle:根据位移量长度计算得到的旋转角度。
  8. mxmy:相机本地坐标系的 x 轴和 y 轴向量,通过从相机矩阵中提取列向量得到。
  9. vxvy:将鼠标在相机世界的 x、y 轴向的位移量转换为世界坐标位移向量。
  10. moveDir:鼠标在相机世界中的位移方向向量,通过将 x 轴和 y 轴的位移向量相加并归一化得到。
  11. eyeDir:目标点到视点的单位向量,即相机的视线方向。
  12. axis:基于位移方向和视线方向计算得到的旋转轴向量。
  13. quaternion:四元数,用于表示相机的旋转,通过旋转轴和旋转角度创建。
二、代码执行过程
  1. 首先,根据相机的边界和画布的尺寸计算出相机的宽度和高度。
    const cameraW = right - left:计算相机的宽度。
    const cameraH = top - bottom:计算相机的高度。
  2. 然后,计算鼠标位移距离在画布中的占比以及基于高度的 x 位置比,用于后续计算旋转量和位移量。
    const ratioX = x / clientWidth:鼠标横坐标在画布宽度中的占比。
    const ratioY = -y / clientHeight:鼠标纵坐标在画布高度中的占比(注意这里取负是为了适应特定的坐标系方向)。
    const ratioXBaseHeight = x / clientHeight:基于高度的 x 位置比。
  3. 接着,计算位移量和旋转量。
    const ratioLen = new Vector2(ratioXBaseHeight, ratioY).length():计算鼠标位移量的长度。
    const angle = ratioLen * pi2:根据位移量长度计算旋转角度。
  4. 之后,计算相机本地坐标系的 x 轴和 y 轴向量,并将鼠标在相机世界的位移量转换为世界坐标位移向量。
    const mx = new Vector3().setFromMatrixColumn(camera.matrix, 0):提取相机矩阵的第一列作为相机本地坐标系的 x 轴向量。
    const my = new Vector3().setFromMatrixColumn(camera.matrix, 1):提取相机矩阵的第二列作为相机本地坐标系的 y 轴向量。
    const vx = mx.clone().multiplyScalar(distanceLeft):将 x 轴向量乘以鼠标在 x 方向上的位移量,得到 x 方向的世界坐标位移向量。
    const vy = my.clone().multiplyScalar(distanceUp):将 y 轴向量乘以鼠标在 y 方向上的位移量,得到 y 方向的世界坐标位移向量。
  5. 再计算鼠标在相机世界中的位移方向向量和目标点到视点的单位向量。
    const moveDir = vx.clone().add(vy).normalize():将 x 方向和 y 方向的位移向量相加并归一化,得到鼠标在相机世界中的位移方向向量。
    const eyeDir = camera.position.clone().sub(target).normalize():计算目标点到视点的单位向量,即相机的视线方向。
  6. 最后,根据位移方向向量和视线方向向量计算旋转轴,并创建四元数表示相机的旋转。
    const axis = moveDir.clone().cross(eyeDir):计算旋转轴向量,通过位移方向向量和视线方向向量的叉积得到。
    quaternion.setFromAxisAngle(axis, angle):根据旋转轴和旋转角度创建四元数,表示相机的旋转。
    调用 update() 函数更新相机的位置和姿态,实现相机的旋转效果。

3.在update()更新方法中,基于四元数设置相机视点位置,并更新相机上方向

1
2
3
4
5
6
7
8
9
10
11
12
13
14
15
16
17
18
19
20
21
22
23
24
25
/* 更新相机,并渲染 */
function update() {
……

//旋转视线
const rotateOffset = camera.position
.clone()
.sub(target)
.applyQuaternion(quaternion)

//基于最新视线设置相机位置
camera.position.copy(
target.clone().add(rotateOffset)
)
//旋转相机上方向
camera.up.applyQuaternion(quaternion)

……

//重置旋转量和平移量
panOffset.set(0, 0, 0)
quaternion.setFromRotationMatrix(new Matrix4())

……
}

修改完相机的视点位和上方后,要记得重置四元数,以避免在拖拽和缩放时,造成相机旋转。

结语

本篇文章就先到这里了,更多内容敬请期待,债见~

上一篇:
【可视化学习】85-3D后期效果(一)
下一篇:
【可视化学习】83-从入门到放弃WebGL(十五)