【可视化学习】89-从入门到放弃WebGL(十九)
发表于:2024-09-26 |

前言

本篇文章继续跟着李伟老师学习webgl,主要内容是回顾顶点索引并拓展和学习多着色器使用。

顶点索引

在之前的文章中,我们就提到过这个概念

JS绘制立方体布点

1
2
3
4
5
6
7
8
9
10
11
12
13
14
15
16
17
18
19
20
21
22
23
24
25
26
27
28
29
30
31
32
33
34
35
36
37
const verticeLib = [
1.0, 1.0, 1.0,
-1.0, 1.0, 1.0,
-1.0, -1.0, 1.0,
1.0, -1.0, 1.0,
1.0, -1.0, -1.0,
1.0, 1.0, -1.0,
-1.0, 1.0, -1.0,
-1.0, -1.0, -1.0,
];

const indices = [
0, 1,
1, 2,
2, 3,
3, 0,

0, 5,
1, 6,
2, 7,
3, 4,

4, 5,
5, 6,
6, 7,
7, 4
];

const arr = [];
indices.forEach(n => {
const i = n * 3
arr.push(
verticeLib[i] / 5,
verticeLib[i + 1] / 5,
verticeLib[i + 2] / 5,
)
})

至于为什么这么布置点位,大家可以这么理解一下

1
2
3
4
5
6
7
//    v6----- v5
// /| /|
// v1------v0|
// | | | |
// | |v7---|-|v4
// |/ |/
// v2------v3

我们以立方体的中心点作为原点,那么v0-v7可以依次用上面的点位表示,比如v0的x方向(右边为正)就是1,y方向(上面为正)也是1,z方向(指向我们的方向为正)也是1。剩下的点也都是这样得到位置的。

  1. 首先看前四组索引:
    0, 1:表示连接verticeLib数组中的第 0 个顶点和第 1 个顶点,构成一条边。
    1, 2:连接第 1 个顶点和第 2 个顶点,继续构成边。
    2, 3:连接第 2 个顶点和第 3 个顶点。
    3, 0:连接第 3 个顶点和第 0 个顶点。这四组索引共同构成了立方体的一个面(通常可以认为是顶面或底面)。
  2. 接着看中间四组索引:
    0, 5:连接第 0 个顶点和第 5 个顶点,构成另一条边。
    1, 6:连接第 1 个顶点和第 6 个顶点。
    2, 7:连接第 2 个顶点和第 7 个顶点。
    3, 4:连接第 3 个顶点和第 4 个顶点。这四组索引构成了立方体四个侧面中的其中四个边。
  3. 最后四组索引:
    4, 5:连接第 4 个顶点和第 5 个顶点。
    5, 6:连接第 5 个顶点和第 6 个顶点。
    6, 7:连接第 6 个顶点和第 7 个顶点。
    7, 4:连接第 7 个顶点和第 4 个顶点。这四组索引构成了立方体另一个面(与前面构成的面相对)以及四个侧面中的另外四个边。
    通过这样的索引组合,就可以明确地指定哪些顶点连接在一起,从而构建出一个完整的立方体形状。每个索引对应verticeLib数组中的特定位置,通过这些索引可以准确地提取出需要的顶点坐标,进而绘制出立方体的各个面和边。

WEBGL绘制立方体

上面是我们用JS进行绘制的立方体,其实我们可以直接用WEBGL来进行绘制,省去了我们自己使用arr来计算顶点的过程。

顶点数据verticeLib 和顶点索引数据indices 和之前一样
1
2
3
4
5
6
7
8
9
10
11
12
13
14
15
16
17
18
19
20
21
22
23
24
25
26
27
const verticeLib = new Float32Array([
1.0, 1.0, 1.0,
-1.0, 1.0, 1.0,
-1.0, -1.0, 1.0,
1.0, -1.0, 1.0,
1.0, -1.0, -1.0,
1.0, 1.0, -1.0,
-1.0, 1.0, -1.0,
-1.0, -1.0, -1.0,
])

const indices = new Uint8Array([
0, 1,
1, 2,
2, 3,
3, 0,

0, 5,
1, 6,
2, 7,
3, 4,

4, 5,
5, 6,
6, 7,
7, 4
])
顶点数据在webgl缓冲区写入和之前都是一样的
1
2
3
4
5
6
const vertexBuffer = gl.createBuffer();
gl.bindBuffer(gl.ARRAY_BUFFER, vertexBuffer);
gl.bufferData(gl.ARRAY_BUFFER, verticeLib, gl.STATIC_DRAW);
const a_Position = gl.getAttribLocation(gl.program, 'a_Position');
gl.vertexAttribPointer(a_Position, 3, gl.FLOAT, false, 0, 0);
gl.enableVertexAttribArray(a_Position);
视图矩阵和模型矩阵和设置和之前也是一样的
1
2
3
4
5
6
7
8
9
10
11
const u_ViewMatrix = gl.getUniformLocation(gl.program, 'u_ViewMatrix')
const u_ModelMatrix = gl.getUniformLocation(gl.program, 'u_ModelMatrix')
const viewMatrix = new Matrix4().lookAt(
new Vector3(0.2, 0.2, 1),
new Vector3(0, 0, 0),
new Vector3(0, 1, 0)
)
const modelMatrix = new Matrix4()
modelMatrix.makeScale(0.5, 0.5, 0.5)
gl.uniformMatrix4fv(u_ViewMatrix, false, viewMatrix.elements)
gl.uniformMatrix4fv(u_ModelMatrix, false, modelMatrix.elements)
把顶点索引写入webgl缓冲区
1
2
3
4
5
6
//建立缓冲对象
const indicesBuffer = gl.createBuffer();
//在ELEMENT_ARRAY_BUFFER上绑定缓冲对象
gl.bindBuffer(gl.ELEMENT_ARRAY_BUFFER, indicesBuffer);
//将顶点索引数据写入缓冲对象
gl.bufferData(gl.ELEMENT_ARRAY_BUFFER, indices, gl.STATIC_DRAW)

接下来咱们说不一样的地方。

绘图
1
2
3
4
5
6
7
8
gl.clear(gl.COLOR_BUFFER_BIT);
// gl.drawArrays(gl.LINES, 0, indices.length);
gl.drawElements(
gl.LINES,
indices.length,
gl.UNSIGNED_BYTE,
0
)

drawElements(mode, count, type, offset) 是使用顶点索引绘图的方法。

  • mode 绘图方式
  • count 元素数量
  • type 缓冲区数据的类型
  • offset 当前系列的字节索引位
    我们上面用顶点索引画了一个线框

效果图

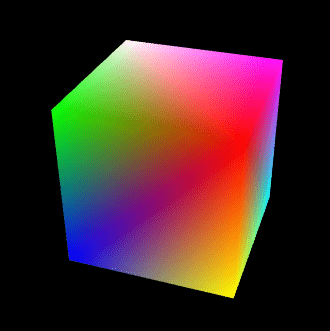
绘制彩色立方体

着色器
1
2
3
4
5
6
7
8
9
10
11
12
13
14
15
16
17
18
<script id="vertexShader" type="x-shader/x-vertex">
attribute vec4 a_Position;
attribute vec4 a_Color;
uniform mat4 u_PvMatrix;
uniform mat4 u_ModelMatrix;
varying vec4 v_Color;
void main(){
gl_Position = u_PvMatrix*u_ModelMatrix*a_Position;
v_Color=a_Color;
}
</script>
<script id="fragmentShader" type="x-shader/x-fragment">
precision mediump float;
varying vec4 v_Color;
void main(){
gl_FragColor=v_Color;
}
</script>

上面的a_Color 是和a_Position 一一对应的,一个顶点,一个颜色,用attribute 声明的a_Color。

如果整个立方体都是一个颜色,直接在片元着色器里用uniform 声明就好了。

初始化着色器,打开深度测试
1
2
3
4
5
6
7
8
9
10
11
12
13
14
import { initShaders } from '../jsm/Utils.js';
import { Matrix4, PerspectiveCamera, Vector3, Quaternion } from 'https://unpkg.com/three/build/three.module.js';
import OrbitControls from './jsm/OrbitControls.js'

const canvas = document.getElementById('canvas');
canvas.width = window.innerWidth;
canvas.height = window.innerHeight;
const gl = canvas.getContext('webgl');

const vsSource = document.getElementById('vertexShader').innerText;
const fsSource = document.getElementById('fragmentShader').innerText;
initShaders(gl, vsSource, fsSource);
gl.clearColor(0, 0, 0, 1);
gl.enable(gl.DEPTH_TEST);

深度测试可以解决物体的遮挡问题,不然后面的物体可能挡住前面的物体。

建立透视相机和轨道控制器
1
2
3
4
5
6
7
8
9
10
11
12
13
14
15
16
17
18
19
20
21
22
23
24
25
26
27
28
29
30
31
32
33
34
35
36
37
38
/* 透视相机 */
const eye = new Vector3(1, 2, 3)
const target = new Vector3(0, 0, 0)
const up = new Vector3(0, 1, 0)
const [fov, aspect, near, far] = [
45,
canvas.width / canvas.height,
1,
20
]
const camera = new PerspectiveCamera(fov, aspect, near, far)
camera.position.copy(eye)

/* 实例化轨道控制器 */
const orbit = new OrbitControls({
camera, target,
dom: canvas,
})
/* 取消右击菜单的显示 */
canvas.addEventListener('contextmenu', event => {
event.preventDefault()
})
/* 指针按下时,设置拖拽起始位,获取轨道控制器状态。 */
canvas.addEventListener('pointerdown', event => {
orbit.pointerdown(event)
})
/* 指针移动时,若控制器处于平移状态,平移相机;若控制器处于旋转状态,旋转相机。 */
canvas.addEventListener('pointermove', event => {
orbit.pointermove(event)
})
/* 指针抬起 */
canvas.addEventListener('pointerup', event => {
orbit.pointerup(event)
})
/* 滚轮事件 */
canvas.addEventListener('wheel', event => {
orbit.wheel(event)
})
声明顶点数据vertices 和顶点索引indexes
1
2
3
4
5
6
7
8
9
10
11
12
13
14
15
16
17
18
19
20
21
22
23
24
25
26
//    v6----- v5
// /| /|
// v1------v0|
// | | | |
// | |v7---|-|v4
// |/ |/
// v2------v3
const vertices = new Float32Array([
1, 1, 1, 1, 0, 0, // v0
-1, 1, 1, 0, 1, 0, // v1
-1, -1, 1, 0, 0, 1, // v2
1, -1, 1, 1, 1, 0, // v3
1, -1, -1, 0, 1, 1, // v4
1, 1, -1, 1, 0, 1, // v5
-1, 1, -1, 1, 1, 1, // v6
-1, -1, -1, 0, 0, 0 // v7
])
// 之前讲过的,逆时针绘制三角形,以三角形的第三条边作为第二个三角形的起始边,方向和第三条边绘制的方向相反。
const indexes = new Uint8Array([
0, 1, 2, 0, 2, 3, // front
0, 3, 4, 0, 4, 5, // right
0, 5, 6, 0, 6, 1, // up
1, 6, 7, 1, 7, 2, // left
7, 4, 3, 7, 3, 2, // down
4, 7, 6, 4, 6, 5 // back
])

vertices中每一行有俩个参数,前面三个是顶点索引,后面三个是颜色,代表了rgb。

将顶点数据写入缓冲区,并将其中的点位和颜色数据分别分配给a_Position 和a_Color
1
2
3
4
5
6
7
8
9
10
11
12
13
14
15
16
17
18
19
20
21
22
23
24
25
26
27
28
29
30
31
32
33
34
35
36
37
38
39
40
41
42
//元素字节数
const elementBytes = vertices.BYTES_PER_ELEMENT
const FSIZE = vertices.BYTES_PER_ELEMENT
//系列尺寸
const verticeSize = 3
const colorSize = 3
//类目尺寸
const categorySize = verticeSize + colorSize
//类目字节数
const categoryBytes = categorySize * elementBytes
//系列字节索引位置
const verticeByteIndex = 0
const colorByteIndex = verticeSize * elementBytes

/* 顶点缓冲区 */
const vertexBuffer = gl.createBuffer();
gl.bindBuffer(gl.ARRAY_BUFFER, vertexBuffer);
gl.bufferData(gl.ARRAY_BUFFER, vertices, gl.STATIC_DRAW);

// 将顶点缓冲区里的点位数据分配给a_Position
const a_Position = gl.getAttribLocation(gl.program, 'a_Position');
gl.vertexAttribPointer(
a_Position,
verticeSize,
gl.FLOAT,
false,
categoryBytes,
verticeByteIndex
);
gl.enableVertexAttribArray(a_Position);

// 将顶点缓冲区里的颜色数据分配给a_Color
const a_Color = gl.getAttribLocation(gl.program, 'a_Color');
gl.vertexAttribPointer(
a_Color,
colorSize,
gl.FLOAT,
false,
categoryBytes,
colorByteIndex
);
gl.enableVertexAttribArray(a_Color);
将顶点索引写入缓冲区
1
2
3
4
5
6
// 建立缓冲区对象
const indexesBuffer = gl.createBuffer()
//把缓冲区绑定到webgl 上下文对象上
gl.bindBuffer(gl.ELEMENT_ARRAY_BUFFER, indexesBuffer)
// 往缓冲区写数据
gl.bufferData(gl.ELEMENT_ARRAY_BUFFER, indexes, gl.STATIC_DRAW)
建立模型矩阵,并传递给片元着色器
1
2
3
4
const u_ModelMatrix = gl.getUniformLocation(gl.program, 'u_ModelMatrix')
const modelMatrix = new Matrix4()
modelMatrix.makeScale(0.5, 0.5, 0.5)
gl.uniformMatrix4fv(u_ModelMatrix, false, modelMatrix.elements)
建立投影视图矩阵,并传递给片元着色器
1
2
const u_PvMatrix = gl.getUniformLocation(gl.program, 'u_PvMatrix')
gl.uniformMatrix4fv(u_PvMatrix, false, orbit.getPvMatrix().elements)
用连续渲染的方法绘图
1
2
3
4
5
6
7
!(function ani() {
modelMatrix.multiply(new Matrix4().makeRotationY(0.05))
gl.uniformMatrix4fv(u_ModelMatrix, false, modelMatrix.elements)
gl.clear(gl.COLOR_BUFFER_BIT);
gl.drawElements(gl.TRIANGLES, indexes.length, gl.UNSIGNED_BYTE, 0)
requestAnimationFrame(ani)
})()

效果图

多着色器

到目前为止,我们都是用了一套着色器做的例子,这一套着色器包含了顶点着色器和片元着色器。

在实际开发中,我们是不可能只用一套着色器做项目的,就比如场景里有两个三角形,一个三角形需要着纯色,一个三角形需要着纹理。

效果图

接下来我们就拿两个三角形来说一下多着色器的实现方法。

多着色器绘图

准备两套着色器

两套着色器,一套着纯色,一套着纹理。

1
2
3
4
5
6
7
8
9
10
11
12
13
14
15
16
17
18
19
20
21
22
23
24
25
26
27
28
29
30
31
32
<!-- 着纯色 -->
<script id="solidVertexShader" type="x-shader/x-vertex">
attribute vec4 a_Position;
void main(){
gl_Position = a_Position;
}
</script>
<script id="solidFragmentShader" type="x-shader/x-fragment">
precision mediump float;
void main(){
gl_FragColor=vec4(0.9,0.7,0.4,1);
}
</script>

<!-- 着纹理 -->
<script id="textureVertexShader" type="x-shader/x-vertex">
attribute vec4 a_Position;
attribute vec2 a_Pin;
varying vec2 v_Pin;
void main(){
gl_Position = a_Position;
v_Pin=a_Pin;
}
</script>
<script id="textureFragmentShader" type="x-shader/x-fragment">
precision mediump float;
uniform sampler2D u_Sampler;
varying vec2 v_Pin;
void main(){
gl_FragColor=texture2D(u_Sampler,v_Pin);
}
</script>

绘制纯色三角形
  1. 建立程序对象,并应用
    1
    2
    3
    4
    const solidVsSource = document.getElementById('solidVertexShader').innerText
    const solidFsSource = document.getElementById('solidFragmentShader').innerText
    const solidProgram = createProgram(gl, solidVsSource, solidFsSource)
    gl.useProgram(solidProgram)

上面的createProgram() 方法是基于一套着色器建立程序对象的方法:

1
2
3
4
5
6
7
8
9
10
11
12
13
14
function createProgram(gl, vsSource, fsSource) {
//创建程序对象
const program = gl.createProgram();
//建立着色对象
const vertexShader = loadShader(gl, gl.VERTEX_SHADER, vsSource);
const fragmentShader = loadShader(gl, gl.FRAGMENT_SHADER, fsSource);
//把顶点着色对象装进程序对象中
gl.attachShader(program, vertexShader);
//把片元着色对象装进程序对象中
gl.attachShader(program, fragmentShader);
//连接webgl上下文对象和程序对象
gl.linkProgram(program);
return program;
}

关于程序对象的概念咱们之前在前面的文章里已经说过。

之前我们的初始化着色器方法initShaders() 只是比上面的方法多了一个应用程序对象的步骤:

1
gl.useProgram(program);

我们这里之所以把启用程序的步骤提取出来,是因为一套着色器对应着一个程序对象。

而一个webgl 上下文对象,是可以依次应用多个程序对象的。

通过不同程序对象,可以绘制不同材质的图形。

  1. 用当前的程序对象绘制图形
    1
    2
    3
    4
    5
    6
    7
    8
    9
    10
    11
    12
    13
    14
    const solidVertices = new Float32Array([
    -0.5, 0.5,
    -0.5, -0.5,
    0.5, -0.5,
    ])
    const solidVertexBuffer = gl.createBuffer()
    gl.bindBuffer(gl.ARRAY_BUFFER, solidVertexBuffer)
    gl.bufferData(gl.ARRAY_BUFFER, solidVertices, gl.STATIC_DRAW)
    const solidPosition = gl.getAttribLocation(solidProgram, 'a_Position')
    gl.vertexAttribPointer(solidPosition, 2, gl.FLOAT, false, 0, 0)
    gl.enableVertexAttribArray(solidPosition)

    gl.clear(gl.COLOR_BUFFER_BIT)
    gl.drawArrays(gl.TRIANGLES, 0, 3)

因为我们后面还需要绘制一个纹理图形,纹理图形是需要等纹理加载成功才能绘制的。

这会造成两个三角形的异步绘制,这并不是我们想要的,因为一异步,就会把之前三角形的缓冲数据给清理掉,这个原理,我们之前说过。

因此,我需要同步绘制两个三角形。

我先把上面的绘图方法封装到一个函数里,等纹理三角形的图片加载成功了,再执行。

1
2
3
4
5
6
7
8
9
10
11
12
13
14
15
16
17
18
19
20
21
function drawSolid() {
/* 1.建立程序对象,并应用 */
const solidVsSource = document.getElementById('solidVertexShader').innerText
const solidFsSource = document.getElementById('solidFragmentShader').innerText
const solidProgram = createProgram(gl, solidVsSource, solidFsSource)
gl.useProgram(solidProgram)
/* 2.用当前的程序对象绘制图形 */
const solidVertices = new Float32Array([
-0.5, 0.5,
-0.5, -0.5,
0.5, -0.5,
])
const solidVertexBuffer = gl.createBuffer()
gl.bindBuffer(gl.ARRAY_BUFFER, solidVertexBuffer)
gl.bufferData(gl.ARRAY_BUFFER, solidVertices, gl.STATIC_DRAW)
const solidPosition = gl.getAttribLocation(solidProgram, 'a_Position')
gl.vertexAttribPointer(solidPosition, 2, gl.FLOAT, false, 0, 0)
gl.enableVertexAttribArray(solidPosition)
gl.clear(gl.COLOR_BUFFER_BIT)
gl.drawArrays(gl.TRIANGLES, 0, 3)
}
绘制纹理三角形

纹理三角形的绘制原理和纯色三角形一样,要用一套新的着色器建立一个新的程序对象,然后用这个新的程序对象进行绘图。

1
2
3
4
5
6
7
8
9
10
11
12
13
14
15
16
17
18
19
20
21
22
23
24
25
26
27
28
29
30
31
32
33
34
35
36
37
38
39
40
41
42
43
44
45
46
47
48
49
50
51
52
53
54
55
function drawTexture(image) {
/* 1.建立程序对象,并应用 */
const textureVsSource = document.getElementById('textureVertexShader').innerText
const textureFsSource = document.getElementById('textureFragmentShader').innerText
const textureProgram = createProgram(gl, textureVsSource, textureFsSource)
gl.useProgram(textureProgram)

/* 2.用当前的程序对象绘制图形 */
// 顶点
const textureVertices = new Float32Array([
0.5, 0.5,
-0.5, 0.5,
0.5, -0.5,
])
const textureVertexBuffer = gl.createBuffer()
gl.bindBuffer(gl.ARRAY_BUFFER, textureVertexBuffer)
gl.bufferData(gl.ARRAY_BUFFER, textureVertices, gl.STATIC_DRAW)
const texturePosition = gl.getAttribLocation(textureProgram, 'a_Position')
gl.vertexAttribPointer(texturePosition, 2, gl.FLOAT, false, 0, 0)
gl.enableVertexAttribArray(texturePosition)
// 图钉
const pins = new Float32Array([
1, 1,
0, 1,
1, 0,
])
const pinBuffer = gl.createBuffer()
gl.bindBuffer(gl.ARRAY_BUFFER, pinBuffer)
gl.bufferData(gl.ARRAY_BUFFER, pins, gl.STATIC_DRAW)
const pin = gl.getAttribLocation(textureProgram, 'a_Pin')
gl.vertexAttribPointer(pin, 2, gl.FLOAT, false, 0, 0)
gl.enableVertexAttribArray(pin)
// 纹理
gl.pixelStorei(gl.UNPACK_FLIP_Y_WEBGL, 1)
gl.activeTexture(gl.TEXTURE0)
const texture = gl.createTexture()
gl.bindTexture(gl.TEXTURE_2D, texture)
gl.texImage2D(
gl.TEXTURE_2D,
0,
gl.RGB,
gl.RGB,
gl.UNSIGNED_BYTE,
image
)
gl.texParameteri(
gl.TEXTURE_2D,
gl.TEXTURE_MIN_FILTER,
gl.LINEAR
)
const u_Sampler = gl.getUniformLocation(textureProgram, 'u_Sampler')
gl.uniform1i(u_Sampler, 0)

gl.drawArrays(gl.TRIANGLES, 0, 3)
}

同步绘图

当纹理图形加载成功后,进行同步绘图。

1
2
3
4
5
6
const image = new Image()
image.src = './images/erha.jpg'
image.onload = function () {
drawSolid()
drawTexture(image)
}

多着色器动画

我想给场景中的图形添加一个动画,比如我想让纯色三角形不断的变换颜色。在上面的绘图方法中,很多操作都是不需要重复执行的,比如程序对象在建立之后,就不需要再建立了,后面在绘图的时候再接着用。

给纯色三角形添加一个代表时间的uniform变量
1
2
3
4
5
6
7
8
9
10
11
12
13
14
15
<script id="solidFragmentShader" type="x-shader/x-fragment">
precision mediump float;
uniform float u_Time;
void main(){
float r=(sin(u_Time/200.0)+1.0)/2.0;
gl_FragColor=vec4(r,0.7,0.4,1);
}
</script>
```

##### 声明不需要重复获取变量
```js
let solidProgram, solidVertexBuffer, solidPosition, solidTime = null
let textureProgram, textureVertexBuffer, texturePosition = null
let pinBuffer, pin = null

程序对象、缓冲对象、从着色器中获取的attribute变量和uniform变量都是不需要重复获取的。

初始化方法

1.把绘制纯色三角形的方法变成初始化方法

1
2
3
4
5
6
7
8
9
10
11
12
13
14
15
16
17
18
19
20
21
22
23
24
25
function initSolid() {
/* 1.建立程序对象*/
const solidVsSource = document.getElementById('solidVertexShader').innerText
const solidFsSource = document.getElementById('solidFragmentShader').innerText
solidProgram = createProgram(gl, solidVsSource, solidFsSource)
gl.useProgram(solidProgram)

/* 2.用当前的程序对象绘制图形 */
const solidVertices = new Float32Array([
-0.5, 0.5,
-0.5, -0.5,
0.5, -0.5,
])
solidVertexBuffer = gl.createBuffer()
gl.bindBuffer(gl.ARRAY_BUFFER, solidVertexBuffer)
gl.bufferData(gl.ARRAY_BUFFER, solidVertices, gl.STATIC_DRAW)
solidPosition = gl.getAttribLocation(solidProgram, 'a_Position')
gl.vertexAttribPointer(solidPosition, 2, gl.FLOAT, false, 0, 0)
gl.enableVertexAttribArray(solidPosition)

solidTime = gl.getUniformLocation(solidProgram, 'u_Time')

/* gl.clear(gl.COLOR_BUFFER_BIT)
gl.drawArrays(gl.TRIANGLES, 0, 3) */
}

2.把绘制纹理三角形的方法变成初始化方法

1
2
3
4
5
6
7
8
9
10
11
12
13
14
15
16
17
18
19
20
21
22
23
24
25
26
27
28
29
30
31
32
33
34
35
36
37
38
39
40
41
42
43
44
45
46
47
48
49
50
51
52
53
54
55
function initTexture(image) {
/* 1.建立程序对象,并应用 */
const textureVsSource = document.getElementById('textureVertexShader').innerText
const textureFsSource = document.getElementById('textureFragmentShader').innerText
textureProgram = createProgram(gl, textureVsSource, textureFsSource)
gl.useProgram(textureProgram)

/* 2.用当前的程序对象绘制图形 */
// 顶点
const textureVertices = new Float32Array([
0.5, 0.5,
-0.5, 0.5,
0.5, -0.5,
])
textureVertexBuffer = gl.createBuffer()
gl.bindBuffer(gl.ARRAY_BUFFER, textureVertexBuffer)
gl.bufferData(gl.ARRAY_BUFFER, textureVertices, gl.STATIC_DRAW)
texturePosition = gl.getAttribLocation(textureProgram, 'a_Position')
gl.vertexAttribPointer(texturePosition, 2, gl.FLOAT, false, 0, 0)
gl.enableVertexAttribArray(texturePosition)
// 图钉
const pins = new Float32Array([
1, 1,
0, 1,
1, 0,
])
pinBuffer = gl.createBuffer()
gl.bindBuffer(gl.ARRAY_BUFFER, pinBuffer)
gl.bufferData(gl.ARRAY_BUFFER, pins, gl.STATIC_DRAW)
pin = gl.getAttribLocation(textureProgram, 'a_Pin')
gl.vertexAttribPointer(pin, 2, gl.FLOAT, false, 0, 0)
gl.enableVertexAttribArray(pin)
// 纹理
gl.pixelStorei(gl.UNPACK_FLIP_Y_WEBGL, 1)
gl.activeTexture(gl.TEXTURE0)
const texture = gl.createTexture()
gl.bindTexture(gl.TEXTURE_2D, texture)
gl.texImage2D(
gl.TEXTURE_2D,
0,
gl.RGB,
gl.RGB,
gl.UNSIGNED_BYTE,
image
)
gl.texParameteri(
gl.TEXTURE_2D,
gl.TEXTURE_MIN_FILTER,
gl.LINEAR
)
const u_Sampler = gl.getUniformLocation(textureProgram, 'u_Sampler')
gl.uniform1i(u_Sampler, 0)

// gl.drawArrays(gl.TRIANGLES, 0, 3)
}

上面已经注释掉的是需要在绘图时重复执行的。

3.把需要重复执行的方法收集一下,用于连续渲染

1
2
3
4
5
6
7
8
9
10
11
12
13
14
15
16
17
18
function render(time = 0) {
gl.clear(gl.COLOR_BUFFER_BIT)

gl.useProgram(solidProgram)
gl.bindBuffer(gl.ARRAY_BUFFER, solidVertexBuffer)
gl.vertexAttribPointer(solidPosition, 2, gl.FLOAT, false, 0, 0)
gl.uniform1f(solidTime, time)
gl.drawArrays(gl.TRIANGLES, 0, 3)

gl.useProgram(textureProgram)
gl.bindBuffer(gl.ARRAY_BUFFER, textureVertexBuffer)
gl.vertexAttribPointer(texturePosition, 2, gl.FLOAT, false, 0, 0)
gl.bindBuffer(gl.ARRAY_BUFFER, pinBuffer)
gl.vertexAttribPointer(pin, 2, gl.FLOAT, false, 0, 0)
gl.drawArrays(gl.TRIANGLES, 0, 3)

requestAnimationFrame(render)
}

由上可知,在连续渲染时,必须要有的操作:

  • clear() 清理画布
  • useProgram() 应用程序对象
  • bindBuffer() 绑定缓冲区对象
  • vertexAttribPointer() 告诉显卡从当前绑定的缓冲区(bindBuffer()指定的缓冲区)中读取顶点数据
  • drawArrays() 绘图方法
    若attribute变量、uniform变量或者图片发生了变化,那就需要对其进行更新。

4.当纹理图像加载成功后,初始化绘图方法,连续绘图

1
2
3
4
5
6
7
const image = new Image()
image.src = './images/erha.jpg'
image.onload = function () {
initSolid()
initTexture(image)
render()
}

结语

本篇文章就到这里了,更多内容敬请期待,债见~

上一篇:
【可视化学习】90-无限管/隧道效果
下一篇:
【Canvas学习】05-canvas写字板和刮刮卡效果