前言
本篇文章继续跟着李伟老师学习 webgl,本篇主要内容是 webgl 代码的封装
明确封装层级
首先我们要明确我们该如何封装代码,大概思路如下

- 场景 Scene:包含所有的三维对象,并负责绘图
- 三维对象 Obj3D:包含几何体 Geo 和材质 Mat,对两者进行统一管理
- 几何体 Geo:对应 attribute 顶点数据
- 材质 Mat:包含程序对象,对应 uniform 变量
几何体 Geo
默认属性
1
2
3
4
5
6
7
8
9
10
11
12
13
| const defAttr = () => ({
data: {},
count:0,
index: null,
drawType:'drawArrays',
})
export default class Geo {
constructor(attr) {
Object.assign(this, defAttr(), attr)
}
……
}
|
- data 顶点数据
- count 顶点总数
- index 顶点索引数据
- 默认为 null,用 drawArrays 的方式绘图
- 若不为 null,用 drawElements 的方式绘图
- drawType 绘图方式
- drawArrays 使用顶点集合绘图,默认
- drawElements,使用顶点索引绘图
data 的数据结构如下:
1
2
3
4
5
6
7
8
9
10
11
12
13
14
15
16
17
| {
a_Position: {
array:类型数组,
size:矢量长度,
buffer:缓冲对象,
location:attribute变量,
needUpdate:true
},
a_Color: {
array:类型数组,
size:矢量长度,
buffer:缓冲对象,
location:attribute变量,
needUpdate:true
},
……
}
|
- array 存储所有的 attribute 数据
- size 构成一个顶点的所有分量的数目
- buffer 用 createBuffer() 方法建立的缓冲对象
- location 用 getAttribLocation() 方法获取的 attribute 变量
- needUpdate 在连续渲染时,是否更新缓冲对象
index 数据结构
1
2
3
4
5
| {
array:类型数组,
buffer:缓冲对象,
needUpdate:true
}
|
初始化方法
1
2
3
4
5
6
7
8
| init(gl,program) {
gl.useProgram(program)
this.initData(gl,program)
this.initIndex(gl)
}
|
init(gl,program) 方法会在场景 Scene 初始化时被调用
- gl:webgl 上下文对象,会通过场景 Scene 的初始化方法传入
- program:程序对象,会通过 Obj3D 的初始化方法传入
- initData() 初始化 attribute 变量
- initIndex() 初始化顶点索引
初始化顶点数量 count 和绘图方式 drawType
若顶点索引不为 null,就建立缓冲区对象,向其中写入顶点索引数据
initData() 初始化 attribute 变量
1
2
3
4
5
6
7
8
9
10
11
12
13
14
15
16
17
18
19
20
21
22
23
24
25
26
27
28
29
30
31
32
33
| initData(gl,program) {
for (let [key, attr] of Object.entries(this.data)) {
attr.buffer = gl.createBuffer()
gl.bindBuffer(gl.ARRAY_BUFFER, attr.buffer)
gl.bufferData(gl.ARRAY_BUFFER, attr.array, gl.STATIC_DRAW)
const location = gl.getAttribLocation(program, key)
gl.vertexAttribPointer(
location,
attr.size,
gl.FLOAT,
false,
0,
0
)
gl.enableVertexAttribArray(location)
attr.location=location
}
}
|
initIndex() 初始化顶点索引
1
2
3
4
5
6
7
8
9
10
11
12
13
14
15
16
17
18
19
20
21
| initIndex(gl) {
const { index } = this
if (index) {
this.count=index.array.length
this.drawType = 'drawElements'
index.buffer = gl.createBuffer()
gl.bindBuffer(gl.ELEMENT_ARRAY_BUFFER, index.buffer)
gl.bufferData(gl.ELEMENT_ARRAY_BUFFER, index.array, gl.STATIC_DRAW)
}else{
const { array, size } = this.data['a_Position']
this.count = array.length / size
this.drawType='drawArrays'
}
}
|
drawElements 和 drawArrays 区别
这里拓展回顾一下 drawElements 和 drawArrays 的区别
drawElements
1
| gl.drawElements(mode, count, type, offset);
|
参数 1-mode
枚举类型 指定要渲染的图元类型。可以是以下类型:
POINTS
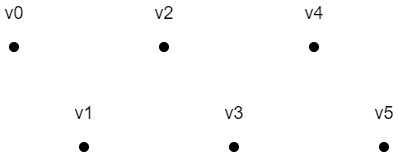
上面六个点的绘制顺序是:v0, v1, v2, v3, v4, v5
LINES
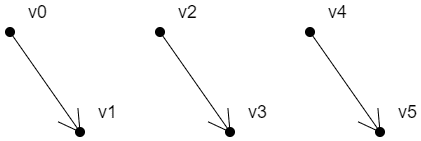
上面三条有向线段的绘制顺序是:
v0>v1
v2>v3
v4>v5
LINES_STRIP
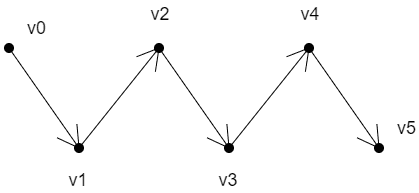
上面线条的绘制顺序是:v0>v1>v2>v3>v4>v5
LINE_LOOP
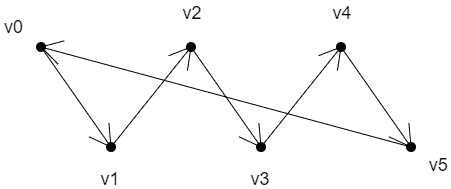
上面线条的绘制顺序是:v0>v1>v2>v3>v4>v5>v0
对于面的绘制,我们首先要知道一个原理:
面有正反两面。
面向我们的面,如果是正面,那它必然是逆时针绘制的;
面向我们的面,如果是反面,那它必然是顺时针绘制的;
TRIANGLES
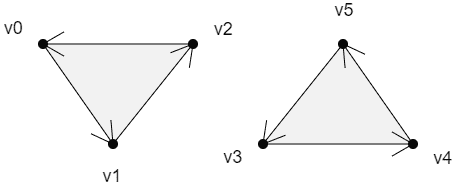
上面两个面的绘制顺序是:
v0>v1>v2
v3>v4>v5
TRIANGLE_STRIP
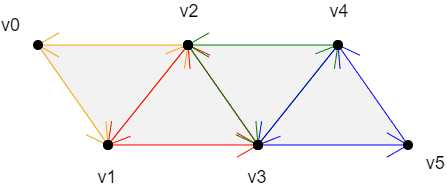
上面四个面的绘制顺序是:
v0>v1>v2
以上一个三角形的第二条边+下一个点为基础,以和第二条边相反的方向绘制三角形
v2>v1>v3
以上一个三角形的第三条边+下一个点为基础,以和第三条边相反的方向绘制三角形
v2>v3>v4
以上一个三角形的第二条边+下一个点为基础,以和第二条边相反的方向绘制三角形
v4>v3>v5
规律:
第一个三角形:v0>v1>v2
第偶数个三角形:以上一个三角形的第二条边+下一个点为基础,以和第二条边相反的方向绘制三角形
第奇数个三角形:以上一个三角形的第三条边+下一个点为基础,以和第三条边相反的方向绘制三角形
TRIANGLE_FAN
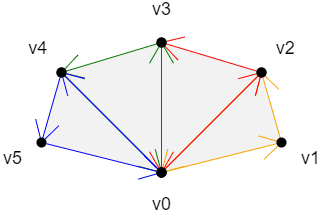
上面四个面的绘制顺序是:
v0>v1>v2
以上一个三角形的第三条边+下一个点为基础,按照和第三条边相反的顺序,绘制三角形
v0>v2>v3
以上一个三角形的第三条边+下一个点为基础,按照和第三条边相反的顺序,绘制三角形
v0>v3>v4
以上一个三角形的第三条边+下一个点为基础,按照和第三条边相反的顺序,绘制三角形
v0>v4>v5
规律:
第一个三角形:v0>v1>v2
以上一个三角形的第三条边+下一个点为基础,按照和第三条边相反的顺序,绘制三角形
参数 2-count
整数型 指定要渲染的元素数量。
参数 3-type
枚举类型 指定元素数组缓冲区中的值的类型。可能的值是:
- gl.UNSIGNED_BYTE
- gl.UNSIGNED_SHORT
当使用 OES_element_index_uint 扩展时:
- gl.UNSIGNED_INT
参数 4-offset
字节单位 指定元素数组缓冲区中的偏移量。必须是给定类型大小的有效倍数
drawArrays
1
| gl.drawArrays(mode, first, count);
|
参数 1-mode
同上
参数 2-first
指定从哪个点开始绘制
参数 3-count
指定绘制需要使用到多少个点。
更新方法,用于连续渲染
1
2
3
4
| update(gl) {
this.updateData(gl)
this.updateIndex(gl)
}
|
updateData(gl) 更新 attribute 变量
1
2
3
4
5
6
7
8
9
10
11
12
13
14
15
16
17
18
19
20
21
22
23
24
25
| updateData(gl) {
for (let attr of Object.values(this.data)){
const { buffer, location, size, needUpdate,array } = attr
gl.bindBuffer(gl.ARRAY_BUFFER, buffer)
if (needUpdate) {
attr.needUpdate = false
gl.bufferData(gl.ARRAY_BUFFER, array, gl.STATIC_DRAW)
}
gl.vertexAttribPointer(
location,
size,
gl.FLOAT,
false,
0,
0
)
}
}
|
updateIndex(gl) 更新顶点索引
1
2
3
4
5
6
7
8
9
10
| updateIndex(gl) {
const {index} = this
if (index) {
gl.bindBuffer(gl.ELEMENT_ARRAY_BUFFER, index.buffer)
if (index.needUpdate) {
index.needUpdate = false
gl.bufferData(gl.ELEMENT_ARRAY_BUFFER, index.array, gl.STATIC_DRAW)
}
}
}
|
设置 attribute 数据和顶点索引数据的方法
setData(key,val) 设置 attribute 数据
1
2
3
4
5
6
7
| setData(key,val){
const { data } = this
const obj = data[key]
if (!obj) { return }
obj.needUpdate=true
Object.assign(obj,val)
}
|
setIndex(val)设置顶点索引数据
1
2
3
4
5
6
7
8
9
10
11
12
13
| setIndex(val) {
const {index}=this
if (val) {
index.needUpdate = true
index.array=val
this.count=index.array.length
this.drawType = 'drawElements'
}else{
const { array, size } = this.data['a_Position']
this.count = array.length / size
this.drawType='drawArrays'
}
}
|
材质 Mat
知道了上面的点,那么这个材质也就差不多懂了
默认值
1
2
3
4
5
6
7
8
9
10
11
12
| const defAttr = () => ({
program: null,
data: {},
mode: 'TRIANGLES',
maps: {}
})
export default class Mat {
constructor(attr) {
Object.assign(this, defAttr(), attr)
}
……
}
|
- program 程序对象
- data uniform 数据
- mode 图形的绘制方式,默认独立三角形。
注:mode 也可以是数组,表示多种绘图方式,如[‘TRIANGLE_STRIP’, ‘POINTS’]
- maps 集合
data 结构
1
2
3
4
5
6
7
8
9
| {
u_Color: {
value:1,
type: 'uniform1f',
location:null,
needUpdate:true,
},
……
}
|
- value uniform 数据值
- type uniform 数据的写入方式
- location 用 getUniformLocation() 方法获取的 uniform 变量
- needUpdate 在连续渲染时,是否更新 uniform 变量
maps 数据结构:
1
2
3
4
5
6
7
8
| u_Sampler:{
image,
format,
wrapS,
wrapT,
magFilter,
minFilter
},
|
- image 图形源
- format 数据类型,默认 gl.RGB
- wrapS 对应纹理对象的 TEXTURE_WRAP_S 属性
- wrapT 对应纹理对象的 TEXTURE_WRAP_T 属性
- magFilter 对应纹理对象的 TEXTURE_MAG_FILTER 属性
- minFilter 对应纹理对象的 TEXTURE_MIN_FILTER 属性
初始化方法
获取 uniform 变量,绑定到其所在的对象上。
1
2
3
4
5
6
7
| init(gl) {
const {program,data,maps}=this
for (let [key, obj] of [...Object.entries(data),...Object.entries(maps)]) {
obj.location = gl.getUniformLocation(program, key)
obj.needUpdate=true
}
}
|
更新方法,用于连续渲染
1
2
3
4
| update(gl) {
this.updateData(gl)
this.updateMaps(gl)
}
|
1
2
3
4
5
6
7
8
9
10
11
12
13
14
15
16
17
18
| updateData(gl) {
for (let obj of Object.values(this.data)) {
if (!obj.needUpdate) { continue }
obj.needUpdate=false
const { type, value, location } = obj
if (type.includes('Matrix')) {
gl[type](location,false,value)
} else {
gl[type](location,value)
}
}
}
|
updateMaps(gl) 更新纹理
1
2
3
4
5
6
7
8
9
10
11
12
13
14
15
16
17
18
19
20
21
22
23
24
25
26
27
28
29
30
31
32
33
34
35
36
37
38
39
40
41
42
43
44
45
46
47
48
49
50
51
52
53
54
55
56
57
| updateMaps(gl) {
const { maps } = this
Object.values(maps).forEach((map, ind) => {
if (!map.needUpdate) { return }
map.needUpdate = false
const {
format = gl.RGB,
image,
wrapS,
wrapT,
magFilter,
minFilter,
location,
} = map
gl.pixelStorei(gl.UNPACK_FLIP_Y_WEBGL, 1)
gl.activeTexture(gl[`TEXTURE${ind}`])
const texture = gl.createTexture()
gl.bindTexture(gl.TEXTURE_2D, texture)
gl.texImage2D(
gl.TEXTURE_2D,
0,
format,
format,
gl.UNSIGNED_BYTE,
image
)
wrapS&&gl.texParameteri(
gl.TEXTURE_2D,
gl.TEXTURE_WRAP_S,
wrapS
)
wrapT&&gl.texParameteri(
gl.TEXTURE_2D,
gl.TEXTURE_WRAP_T,
wrapT
)
magFilter&&gl.texParameteri(
gl.TEXTURE_2D,
gl.TEXTURE_MAG_FILTER,
magFilter
)
if (!minFilter || minFilter > 9729) {
gl.generateMipmap(gl.TEXTURE_2D)
}
minFilter&&gl.texParameteri(
gl.TEXTURE_2D,
gl.TEXTURE_MIN_FILTER,
minFilter
)
gl.uniform1i(location, ind)
})
}
|
1
2
3
4
5
6
7
| setData(key,val){
const { data } = this
const obj = data[key]
if (!obj) { return }
obj.needUpdate=true
Object.assign(obj,val)
}
|
setMap(val)设置纹理
1
2
3
4
5
6
7
| setMap(key,val) {
const { maps } = this
const obj = maps[key]
if (!obj) { return }
obj.needUpdate=true
Object.assign(obj,val)
}
|
三维对象Obj3D
obj3D对象比较简单,主要负责对Geo对象和Mat对象的统一初始化和更新。
1
2
3
4
5
6
7
8
9
10
11
12
13
14
15
16
17
18
19
| const defAttr = () => ({
geo: null,
mat: null,
})
export default class Obj3D {
constructor(attr) {
Object.assign(this, defAttr(), attr)
}
init(gl) {
const {mat,geo}=this
mat.init(gl)
geo.init(gl,mat.program)
}
update(gl) {
const { mat, geo } = this
mat.update(gl)
geo.update(gl)
}
}
|
场景
Scene对象的主要功能就是收集所有的三维对象,然后画出来。
1
2
3
4
5
6
7
8
9
10
11
12
13
14
15
16
17
18
19
20
21
22
23
24
25
26
27
28
29
30
31
32
33
34
35
36
37
38
39
40
41
42
43
44
45
46
47
48
49
50
51
52
53
54
55
56
57
58
59
|
const defAttr = () => ({
gl:null,
children: [],
});
export default class Scene{
constructor(attr={}){
Object.assign(this,defAttr(),attr);
}
init() {
const { children, gl} = this
children.forEach(obj => {
obj.init(gl)
})
}
add(...objs){
const {children,gl}=this
objs.forEach(obj=>{
children.push(obj)
obj.parent = this
obj.init(gl)
})
}
remove(obj){
const {children}=this
const i = children.indexOf(obj)
if (i!==-1) {
children.splice(i, 1)
}
}
setUniform(key, val) {
this.children.forEach(({ mat }) => {
mat.setData(key,val)
})
}
draw() {
const { gl,children } = this
gl.clear(gl.COLOR_BUFFER_BIT)
children.forEach(obj => {
const { geo: {drawType,count }, mat:{mode,program}}=obj
gl.useProgram(program)
obj.update(gl)
if (typeof mode==='string') {
this[drawType](gl,count, mode)
} else {
mode.forEach(m => {
this[drawType](gl,count, m)
})
}
})
}
drawArrays(gl, count, mode) {
gl.drawArrays(gl[mode], 0, count)
}
drawElements(gl,count, mode) {
gl.drawElements(gl[mode], count, gl.UNSIGNED_BYTE, 0)
}
}
|
- Scene 对象的属性只有两个:
- gl:webgl上下文对象
- children:三维对象集合
- init() 初始化方法
- add() 添加三维对象
- remove() 删除三维对象
- setUniform() 统一设置所有对象共有的属性,比如视图投影矩阵
- draw() 绘图方法
结语
本篇文章就到这里了,更多内容敬请期待,债见~


