前言
本篇主要介绍一下 pdfjs 组件如何支持 pdf 内容点击复制的
pdfjs 如何预览 pdf
本篇参考我之前的文章即可,这里不再赘述。
定义一个按钮
我这里是搞了一个按钮,然后这个按钮选中之后才会有这个点击内容直接复制的效果
加一个按钮
1
2
3
4
5
6
7
8
| <button
class="toolbarButton hiddenMediumView"
title="FastCopy"
data-l10n-id="pdfjs-fast-copy-button"
id="fastCopyButton"
>
<span data-l10n-id="pdfjs-fast-copy-button-label">FastCopy</span>
</button>
|
定义中文 label
找到 pdfjs 中的 web/locale/zh_CN/viewer.ftl 文件,在里面添加,这时候我们会发现这个按钮就会有中文提示了
1
2
3
| pdfjs-fast-copy-button =
.title = 快捷复制
pdfjs-fast-copy-button-label = 快捷复制
|
定义样式
找到 pdfjs 中的 web/viewer.css 文件,在 root 里面添加你需要的 svg,这里我用了 pdfjs 自带的那个,你如果需要你的,那么你替换一下 svg 即可,然后按照你自己在 html 中定义的 id 把样式加上。
1
2
3
4
5
6
7
| :root {
--toolbarButton-fastCopy-icon: url(images/toolbarButton-viewAttachments.svg);
}
#fastCopyButton::before {
-webkit-mask-image: var(--toolbarButton-fastCopy-icon);
mask-image: var(--toolbarButton-fastCopy-icon);
}
|
此时我们就将一个按钮给加上了,效果如下
添加按钮状态切换功能
在viewer.mjs文件中,找到#bindListeners的绑定事件方法中,加上切换状态的逻辑,这里的toggled不需要我们定义样式,因为 pdfjs 已经提前定义过了,这样我们就实现了,点击进行状态选中,再次点击取消选中的功能
1
2
3
4
5
6
7
8
9
10
11
12
13
| const fastCopyButton = document.getElementById("fastCopyButton");
fastCopyButton.addEventListener("click", function (e) {
const isToggled = e.target.classList.contains("toggled");
if (isToggled) {
e.target.classList.remove("toggled");
} else {
e.target.classList.add("toggled");
}
});
|
此时效果如下
添加鼠标滑过内容,内容样式进行变化逻辑
研究内容样式
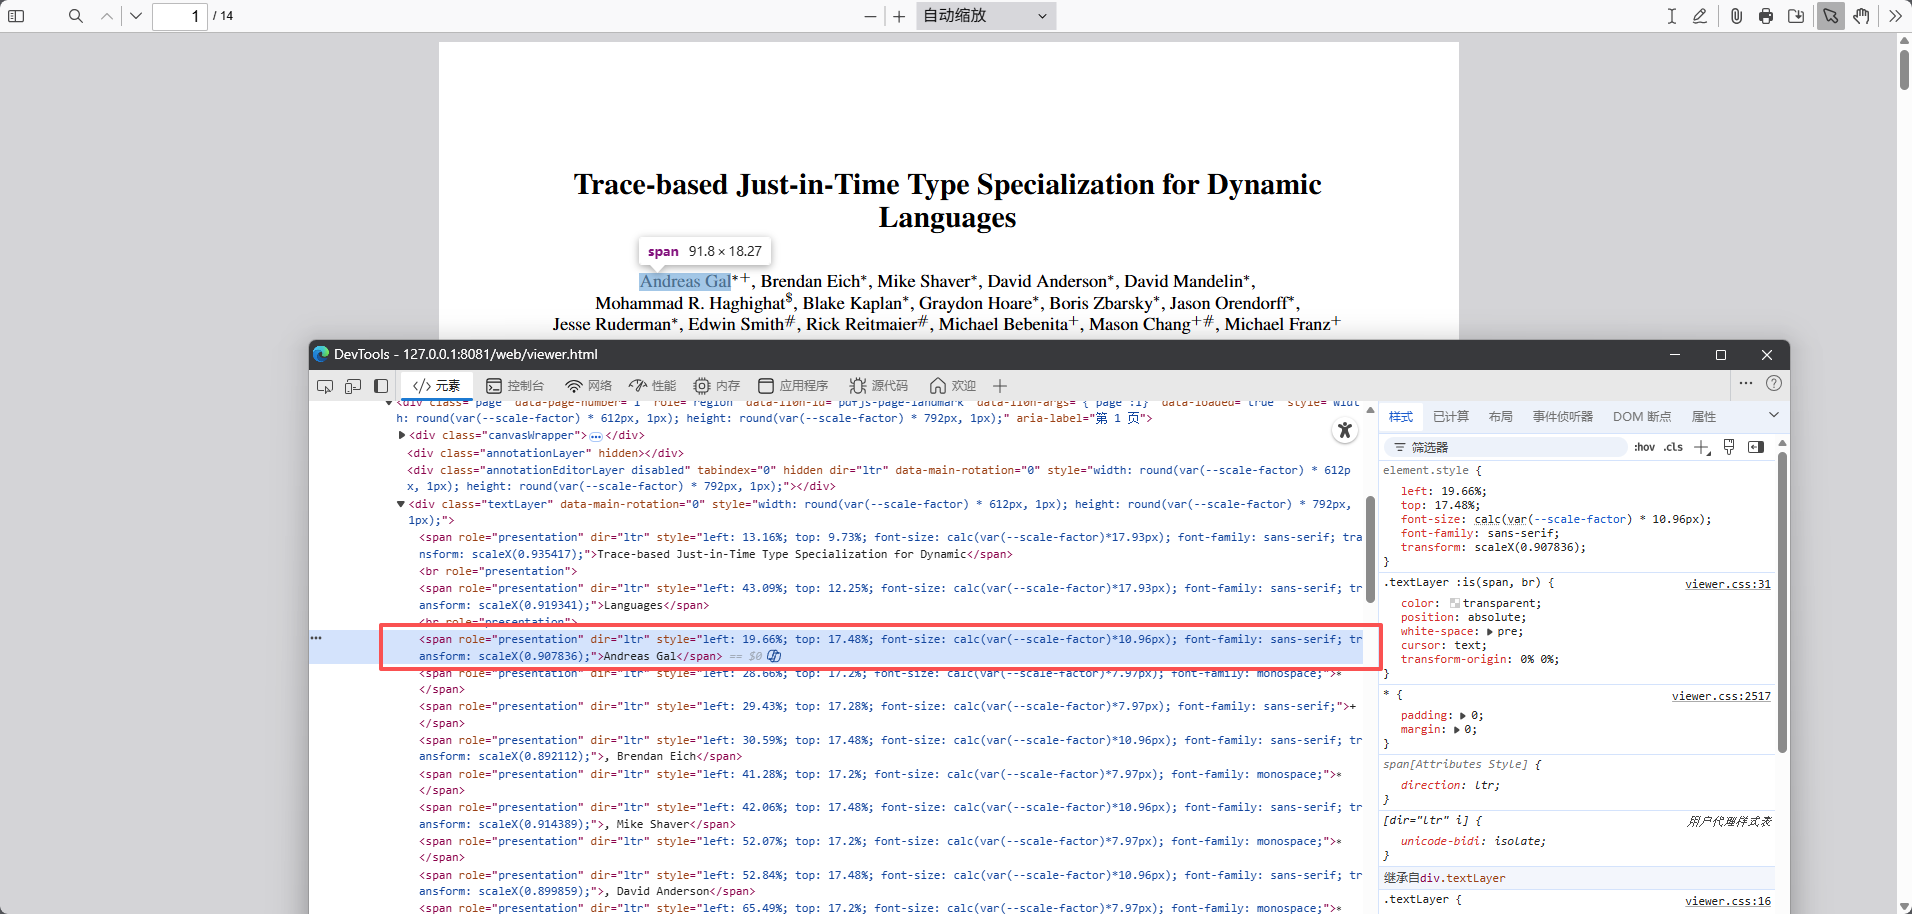
我们要先去研究一下,这些文字是否都有固定的样式包裹,果不其然,我发现这些文字的确都有统一的样式包裹
添加鼠标滑过内容事件监听
这里为什么用document.querySelectorAll呢?这是因为我们的 pdf 是分页的,每一个分页都是由textLayer进行包裹的,所以我们需要给每一页都加上监听事件
1
2
3
4
5
6
7
8
9
10
11
12
13
14
15
16
17
18
19
20
21
22
| fastCopyButton.addEventListener("click", function (e) {
const isToggled = e.target.classList.contains("toggled");
const textLayerClasses = document.querySelectorAll(".textLayer");
if (isToggled) {
e.target.classList.remove("toggled");
for (let i = 0; i < textLayerClasses.length; i++) {
textLayerClasses[i].removeEventListener("mousemove", handleTextMove);
}
} else {
e.target.classList.add("toggled");
for (let i = 0; i < textLayerClasses.length; i++) {
textLayerClasses[i].addEventListener("mousemove", handleTextMove);
}
}
});
|
实现 handleTextMove 效果
ok,接下来,我们需要实现 handleTextMove 效果,我们可以由上面的图得到,style中有位置信息的样式,因此我们只需要在这个样式上面盖一层样式,即可实现文字选中效果。
踩坑
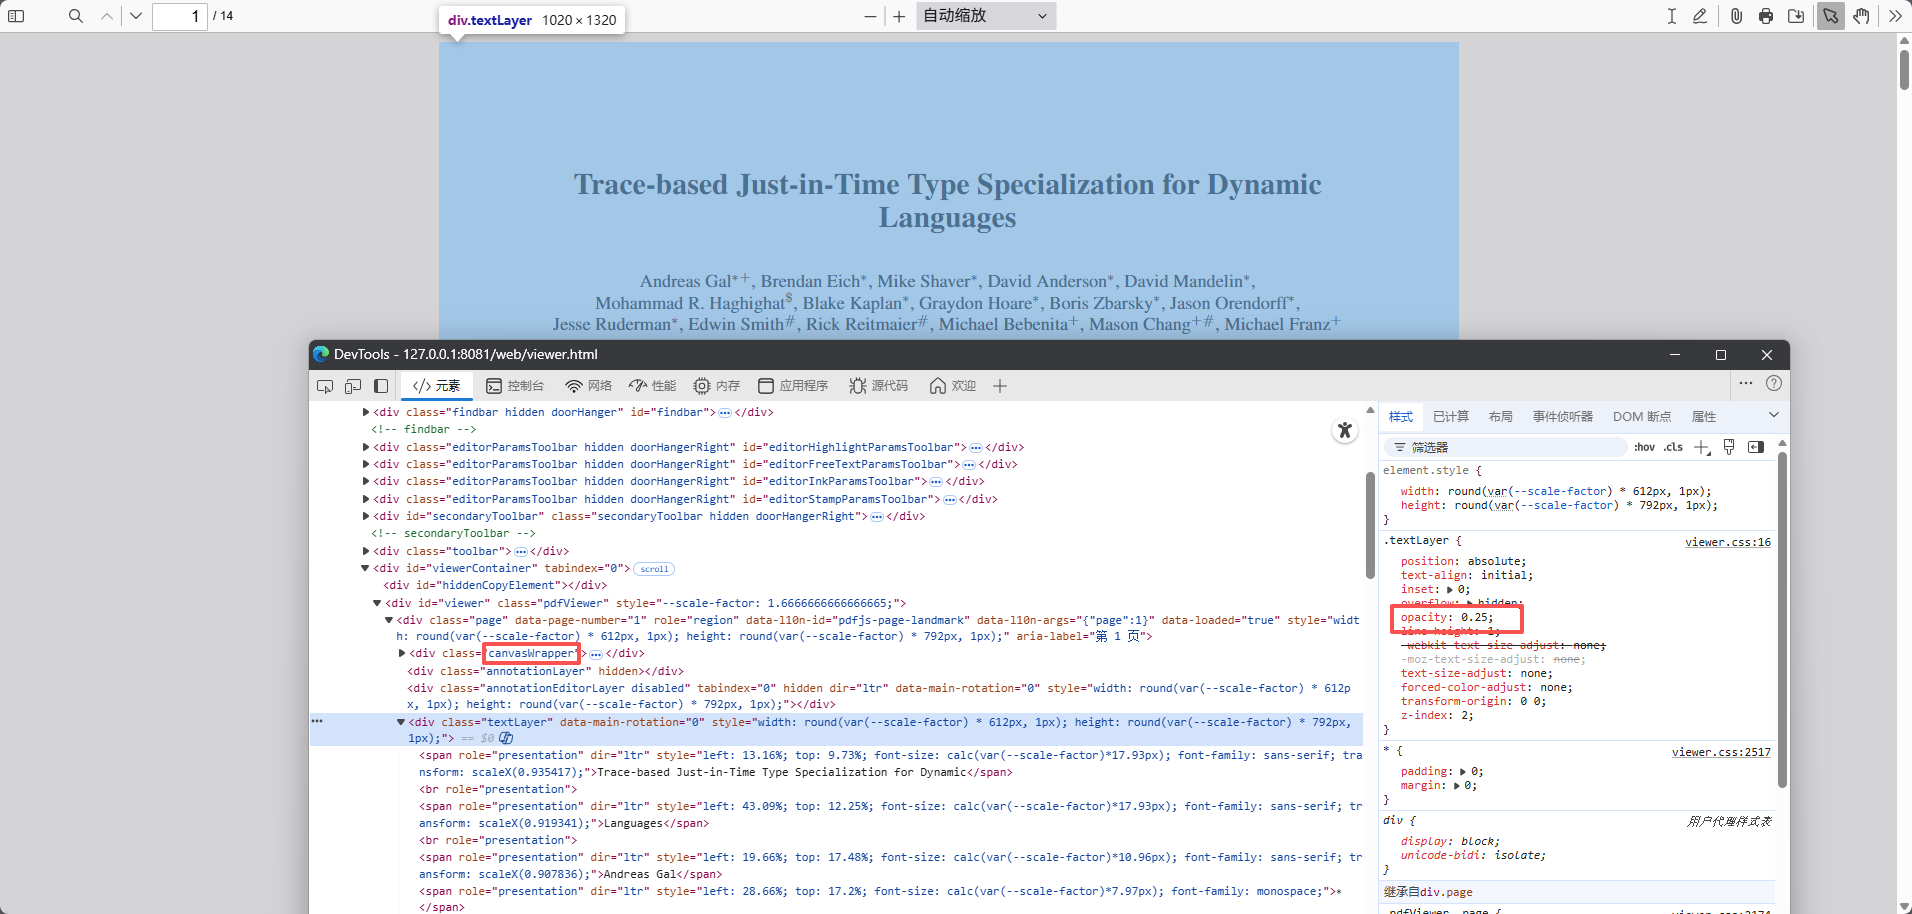
这里我们需要留意,我们的样式不能放到和span一个位置,这是因为 pdfjs 已经自己定义了span的样式接受父级样式的不透明度,因为我们是加东西,所以尽量不要动它原来的样式,避免出现别的问题,因此我找到了一个放置这个我们自己加样式的好位置,就是这个canvasWrapper下面,这个是 pdfjs 放置 canvas 的容器,我们就把我们的样式放到这个容器下面。
代码实现效果
1
2
3
4
5
6
7
8
9
10
11
12
13
14
15
16
17
18
19
20
21
22
23
24
25
26
27
28
29
30
| const handleTextMove = (e) => {
const curMoveDom = e.target;
if (
curMoveDom.tagName === "SPAN" &&
curMoveDom.getAttribute("role") === "presentation"
) {
const curText = e.target.innerText;
const targetStyle = e.target.getAttribute("style");
const curCopySpan = document.createElement("span");
curCopySpan.innerText = curText;
curCopySpan.setAttribute("style", targetStyle);
curCopySpan.style.fontWeight = "bold";
curCopySpan.style.color = "#000";
curCopySpan.style.backgroundColor = "#fff";
curCopySpan.style.transformOrigin = "0% 0%";
curCopySpan.style.zIndex = "999999";
curCopySpan.style.position = "absolute";
curCopySpan.style.cursor = "pointer";
curCopySpan.style.lineHeight = "1";
curCopySpan.id = "cur-copy-span";
const parentPageDom = curMoveDom.closest(".page");
const canvasWrapper = parentPageDom.querySelector(".canvasWrapper");
canvasWrapper.appendChild(curCopySpan);
}
};
|
鼠标滑过下一个的时候,把上一个的样式删除
此时我们是已经实现了文字选中效果,但是当我们鼠标滑过下一个的时候,上一个的样式还在,这时候我们就需要把上一个的样式删除,因此我们需要在mousemove事件中,加个判断删除的逻辑
1
2
3
4
5
6
7
8
| const handleTextMove = (e) => {
const curMoveDom = e.target;
const curCopySpan = document.getElementById("cur-copy-span");
if (curCopySpan) {
curCopySpan.remove();
}
};
|
此时效果如下:
提示 label 更加明显
此时样式提示还不够明显,我们简单加个popup-tips的效果
1
2
3
4
5
6
7
8
9
10
11
12
13
14
15
16
17
18
19
20
21
22
23
24
25
26
27
28
29
30
31
32
33
34
35
36
37
38
39
40
41
42
43
44
45
46
47
|
const popupTip = document.createElement("div");
popupTip.id = "cur-copy-popup-tip";
popupTip.style.cssText = `
position: absolute;
background: #333;
color: #fff;
padding: 6px 10px;
border-radius: 4px;
font-size: 12px;
white-space: nowrap;
z-index: 1000;
pointer-events: none;
top: -30px;
left: 50%;
transform: translateX(-50%);
opacity: 0;
transition: opacity 0.2s ease;
`;
const arrow = document.createElement("div");
arrow.style.cssText = `
position: absolute;
bottom: -5px;
left: 50%;
transform: translateX(-50%);
width: 0;
height: 0;
border-left: 5px solid transparent;
border-right: 5px solid transparent;
border-top: 5px solid #333;
`;
popupTip.textContent = "点击复制";
popupTip.appendChild(arrow);
curCopySpan.appendChild(popupTip);
curCopySpan.addEventListener("mouseenter", function () {
popupTip.style.opacity = "1";
});
curCopySpan.addEventListener("mouseleave", function () {
popupTip.style.opacity = "0";
});
|
效果图如下:

实现复制效果
导入 clipboard.js
首先,我们不能简单使用浏览器的自带复制功能,因为这个需要用户授权,就很麻烦,因此我们可以简单使用clipboard.js,去网上拿一下这个库的压缩文件clipboard.min.js,这一步我就不说了
在 html 中导入
1
| <script src="../build/clipboard.min.js"></script>
|
给选中的文字添加点击复制事件和对应提示
1
2
3
4
5
6
7
8
9
10
11
12
13
14
15
16
17
18
19
20
21
22
23
24
25
26
27
28
29
30
31
32
33
34
35
36
37
38
39
40
41
42
43
44
45
46
47
48
49
50
51
52
53
54
55
56
57
58
59
60
61
62
63
64
65
66
67
68
69
70
71
72
|
curCopySpan.addEventListener("click", async function (e) {
e.preventDefault();
e.stopPropagation();
try {
const fakeEl = document.createElement("button");
const clipboard = new ClipboardJS(fakeEl, {
text: () => curText,
});
clipboard.on("success", (e) => {
clipboard.destroy();
const successTip = document.createElement("div");
successTip.style.cssText = `
position: fixed;
background: #4CAF50;
color: #fff;
padding: 12px 20px;
border-radius: 8px;
font-size: 14px;
white-space: nowrap;
z-index: 10000;
pointer-events: none;
top: 5vh;
left: 50%;
transform: translateX(-50%);
opacity: 0;
transition: opacity 0.3s ease;
box-shadow: 0 4px 12px rgba(76, 175, 80, 0.3);
`;
successTip.textContent = `复制<${curText}>成功`;
document.body.appendChild(successTip);
setTimeout(() => {
successTip.style.opacity = "1";
}, 10);
setTimeout(() => {
successTip.style.opacity = "0";
setTimeout(() => {
if (successTip.parentNode) {
successTip.parentNode.removeChild(successTip);
}
}, 300);
}, 2000);
});
clipboard.on("error", (e) => {
clipboard.destroy();
window.parent.postMessage(
{
type: "copy-to-clipboard",
text: curText,
},
"*"
);
});
fakeEl.click();
} catch (e) {
window.parent.postMessage(
{
type: "copy-to-clipboard",
text: curText,
},
"*"
);
console.error(e);
}
});
|
此时效果如下:
滚动后重新监听
因为 pdfjs 有性能优化的逻辑,因此不是所有的内容都会一开始渲染出来。因此我们需要在滚动后重新监听。
在pdfjs中,有个setPageNum的方法,我们只需要在页面切换时重新监听即可,加俩次点击方法
1
2
3
4
5
6
7
8
9
10
| setPageNumber(pageNumber, pageLabel) {
this.pageNumber = pageNumber;
this.pageLabel = pageLabel;
const fastCopyButton = document.getElementById("fastCopyButton");
fastCopyButton.click();
fastCopyButton.click();
this.#updateUIState(false);
}
|
结语
本篇文章就到这里了,债见~